My niece had been looking for a Halloween treat that actually looked spooky without tasting like a science experiment. For a while, I just accepted that themed holiday desserts meant spending way too much time on something kids would barely touch because the frosting was too sweet or the cookie was stale. Every year, I’d scroll past those perfectly styled graveyard cakes and ghost cupcakes, knowing full well I didn’t have the patience for piping bags that needed warming up every five minutes. The whole thing felt like a lot of work for something that would get eaten in about thirty seconds flat.
Then came the Oreo truffle revelation. You know how some recipes just click the moment you think of them? This was one of those. I was standing in my kitchen, staring at a package of Oreos (honestly, this happens more often than I’d like to admit), and it hit me. Oreo truffles are already the perfect base for just about anything. They’re rich, they’re fudgy, and they don’t require turning on the oven. That last part matters more than you’d think when you’re trying to make something with a four-year-old “helping” in the kitchen. These Easy No-Bake Oreo Truffle Spiders came together in a way that felt less like a recipe and more like a happy accident.
What I love most about these little guys is how genuinely unsettling they look. The pretzel legs stick out at all angles, the candy eyes stare at you from that dark chocolate coating, and somehow they manage to be both adorable and slightly creepy. That’s the sweet spot for Halloween, right? They’re the kind of treat that makes people do a double-take before they grab one. And honestly, that moment of hesitation followed by the bite of pure chocolatey goodness is exactly what a Halloween dessert should deliver.
Why You’ll Love This Recipe
Let me tell you why these little spiders have become my go-to for every Halloween gathering. First and foremost, they are genuinely easy. I’m talking no mixer required, no oven preheating, no tempering chocolate like some kind of pastry chef. You crush, you mix, you dip, you chill. That’s it. I’ve made these with my niece standing on a stool next to me, and she handled most of the steps without any help. That says something.
- No-Bake Magic : This recipe comes together in about 20 minutes of active time. The rest is just chilling in the fridge, which means you can make them a day ahead and cross one more thing off your to-do list.
- Simple Ingredients : You need Oreos, cream cheese, chocolate chips, pretzels, and candy eyes. That’s five ingredients. Five. You probably already have most of them in your kitchen right now.
- Perfect for Halloween Parties : These spiders are the star of any Halloween spread. Kids love them, adults sneak them when they think no one is looking, and they photograph beautifully for those obligatory holiday Instagram posts.
- Crowd-Pleaser : I’ve brought these to three different Halloween parties now, and every single time, they’re the first thing to disappear. People can’t resist the combination of creamy Oreo filling and crunchy chocolate coating.
- Unbelievably Delicious : The texture is what gets me every time. The Oreo truffle center is soft and fudgy, the chocolate shell is snappy, and the pretzels add that salty crunch that makes everything better.
What makes this recipe different from every other spider-themed dessert out there is the balance. It’s not too sweet, thanks to the saltiness of the pretzels and the slight bitterness of dark chocolate. The cream cheese cuts through the sugar in a way that makes these dangerously easy to eat. I’ve watched people eat four or five of these in one sitting without realizing it. They’re that good.
This recipe is the kind that makes you close your eyes after the first bite. It’s comfort food reimagined for Halloween—faster, easier, but with the same soul-soothing satisfaction. Perfect for impressing guests without stress, or turning a simple evening into something memorable.
What Ingredients You Will Need
This recipe uses simple, everyday ingredients to deliver that rich, fudgy flavor and satisfying crunch. Here’s everything you’ll need to make these creepy-crawly treats.
- Oreo cookies (36 cookies) — You’ll need the classic Oreos, not the double-stuf variety. The filling-to-cookie ratio works perfectly for truffles. I prefer the original flavor, but feel free to experiment with golden Oreos for a different look.
- Cream cheese (8 ounces, softened) — Make sure your cream cheese is at room temperature. Cold cream cheese won’t blend smoothly, and you’ll end up with lumpy truffles. I use full-fat Philadelphia cream cheese for the best texture, but Neufchâtel works in a pinch.
- Chocolate chips (24 ounces, semi-sweet or dark) — Semi-sweet gives you that classic chocolate flavor that pairs perfectly with the Oreo filling. Dark chocolate adds a more sophisticated bitterness. I’ve used Ghirardelli and Nestlé with great results. Avoid milk chocolate here—it makes the spiders look less like actual spiders and more like something you’d find at a candy store.
- Mini pretzel twists (48 pieces) — These become the spider legs. Look for mini pretzel twists that are sturdy enough to hold their shape when stuck into the truffle. I’ve tried regular-sized pretzels, but they look comically large. The mini ones are just right.
- Candy eyes (48 pieces) — You can find these at any craft store or in the baking aisle at the grocery store. I prefer the ones with black pupils because they give the spiders a more expressive look. Wilton brand works well.
- Coconut oil or shortening (1 tablespoon, optional) — Adding a tiny bit of coconut oil to your melted chocolate helps it set with a beautiful shine and makes dipping easier. It’s optional, but I highly recommend it.
That’s it. Five main ingredients, plus one optional helper. The beauty of this recipe is that you don’t need anything fancy. No exotic extracts, no hard-to-find specialty items. Just good, honest ingredients that come together to create something that looks way more complicated than it actually is.
One thing I’ve learned from making these dozens of times—always buy an extra package of Oreos. Someone will eat some while you’re working, and you’ll be grateful for the backup. Trust me on this one.
Equipment Needed
You don’t need much for this recipe, which is part of why I love it so much. Here’s what you’ll want to have on hand.
- Food processor or ziplock bag and rolling pin — A food processor makes quick work of crushing the Oreos into fine crumbs. If you don’t have one, put the cookies in a ziplock bag and go to town with a rolling pin. It’s therapeutic, honestly.
- Large mixing bowl — You’ll need room to mix the crushed Oreos with the cream cheese. A standard-sized mixing bowl works perfectly.
- Baking sheet lined with parchment paper — This is where your truffles will rest while they chill. Parchment paper is non-negotiable here; wax paper will stick to the chocolate.
- Microwave-safe bowl or double boiler — For melting the chocolate. I use the microwave method because it’s faster, but a double boiler gives you more control.
- Fork or dipping tool — You’ll use this to dip the truffles into the melted chocolate. A regular dinner fork works, but I’ve found that a dipping fork with a looped handle gives you better control.
- Small cookie scoop or tablespoon — For portioning the truffle mixture evenly. A #50 cookie scoop (about 1.5 tablespoons) is the perfect size.
- Refrigerator — The truffles need to chill at multiple stages. Make sure you have space in your fridge.
If you don’t have a food processor, don’t sweat it. I’ve made these using the ziplock bag method, and they turned out just as good. The key is getting the Oreos crushed finely enough that there aren’t any large chunks. You want a sandy texture, not gravel.
Preparation Method
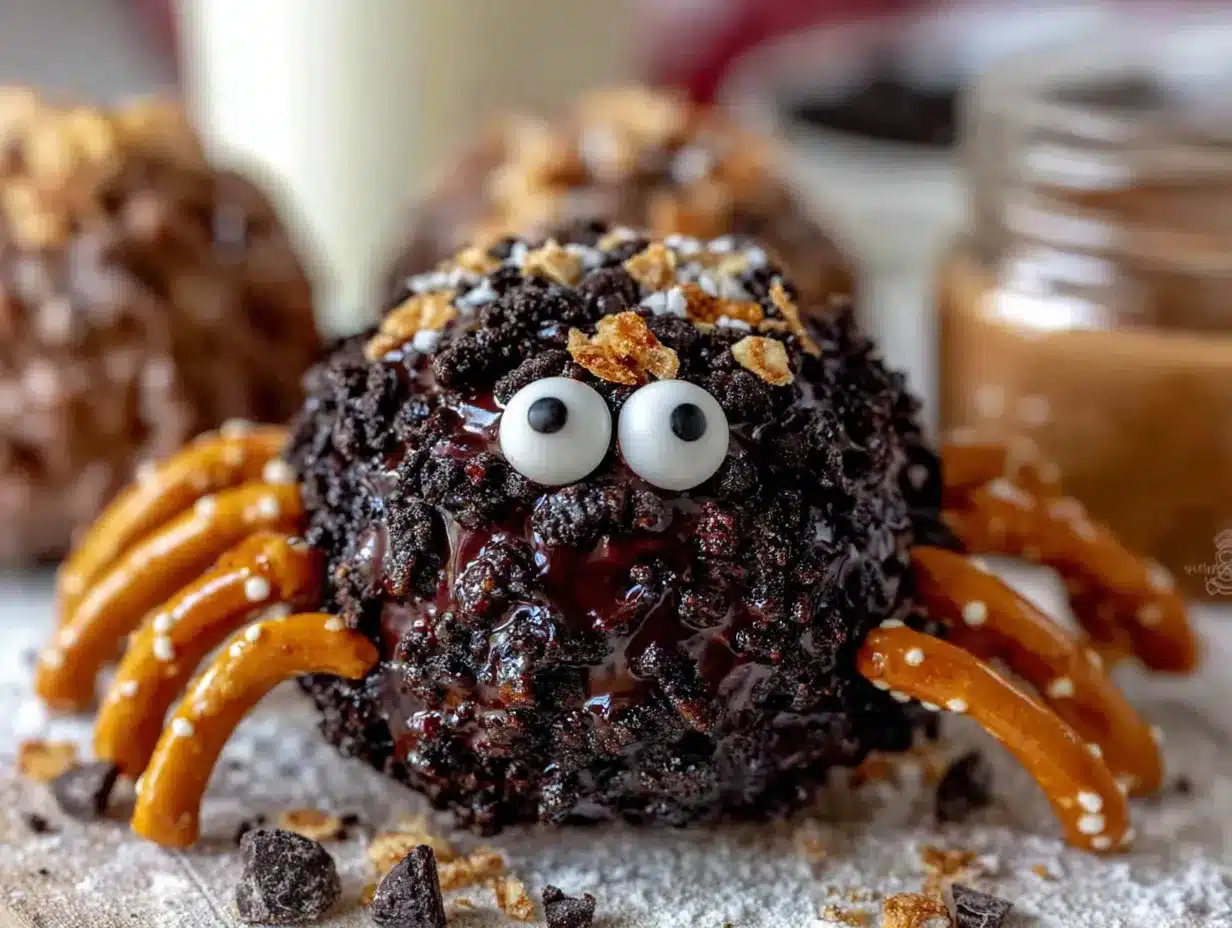
Alright, let’s get into the actual making of these little guys. I’ve broken this down into clear steps so you can follow along without any confusion. Take your time, and remember—these are supposed to look a little messy. That’s part of the charm.
- Crush the Oreos — Place all 36 Oreos in your food processor and pulse until you get fine crumbs. You want them to look like dark sand. If you’re using the ziplock bag method, crush them until no large pieces remain. The filling will incorporate into the crumbs, which is exactly what you want.
- Mix the truffle base — In a large mixing bowl, combine the Oreo crumbs with the softened cream cheese. Use a spatula or your hands (I prefer my hands—it’s faster) to mix until everything is fully combined. The mixture should hold together when you squeeze it. If it feels too dry, add another tablespoon of cream cheese. If it’s too sticky, add a few more crushed Oreos.
- Portion the truffles — Scoop out about 1.5 tablespoons of the mixture and roll it into a ball. You should get about 24 truffles from this batch. Place each ball on the parchment-lined baking sheet. Don’t worry about making them perfectly round at this point; you’ll shape them again after they chill.
- First chill — Place the baking sheet in the refrigerator for at least 30 minutes. This step is crucial. If you try to dip warm truffles, they’ll fall apart in the chocolate. Trust me, I’ve learned this the hard way.
- Melt the chocolate — While the truffles are chilling, melt your chocolate chips. If using the microwave, heat in 30-second intervals, stirring between each, until smooth. Add the coconut oil if you’re using it. Let the chocolate cool slightly—it should be warm but not hot. Hot chocolate will melt your truffles.
- Dip the truffles — Remove the chilled truffles from the fridge. Working one at a time, drop a truffle into the melted chocolate. Use your fork to gently roll it around until fully coated. Lift it out and let the excess chocolate drip off. Place it back on the parchment paper.
- Add the legs — While the chocolate is still wet, press four mini pretzel twists into each side of the truffle to create eight legs. The pretzels should stick out at slightly different angles for that authentic spider look. Don’t worry about making them symmetrical—spiders aren’t symmetrical in real life.
- Add the eyes — Press two candy eyes onto the front of each spider, just above where the legs meet. Use a tiny dab of melted chocolate to help them stick if needed.
- Final chill — Return the baking sheet to the refrigerator for another 20-30 minutes, or until the chocolate is fully set. The chocolate should be firm to the touch and the pretzels should be securely attached.
Here’s a tip I picked up after my first few batches—when you’re dipping the truffles, work quickly but carefully. The chocolate starts to set as soon as it hits the cold truffle, so you have about 10-15 seconds to add the pretzels and eyes before it becomes too firm. If the chocolate starts to thicken while you’re working, pop it back in the microwave for 10 seconds.
Your kitchen should smell like a chocolate factory at this point. The combination of Oreo and melted chocolate is intoxicating. Try not to eat all the chocolate before you finish dipping. I speak from experience.
Cooking Tips & Techniques
After making these spiders more times than I can count, I’ve collected a few tricks that make the process smoother and the results better. Here’s what I’ve learned.
Temperature matters more than you think. The cream cheese needs to be at room temperature. I know, I know, everyone says that. But here’s the thing—cold cream cheese doesn’t blend into the Oreo crumbs evenly. You’ll end up with white streaks in your truffles, and while they’ll still taste fine, they won’t look as good. Leave the cream cheese on the counter for an hour before you start.
Don’t over-mix the truffle base. Once the Oreo crumbs and cream cheese come together, stop mixing. Over-mixing can make the truffles greasy and dense. You want them to be fudgy, not heavy.
Chill the truffles twice. I know it seems like extra work, but that first chill before dipping is non-negotiable. If you skip it, the truffles will start to soften in the warm chocolate, and you’ll end up with chocolate soup with bits of Oreo floating in it. Not a good look.
Use a deep bowl for the chocolate. A shallow bowl makes dipping awkward. You want a bowl that’s deep enough to submerge the entire truffle with just a gentle roll. A cereal bowl works perfectly.
Keep the pretzels organized. Before you start dipping, sort your pretzel twists so they’re all facing the same direction. This makes it faster to grab them and press them into the chocolate. I learned this after fumbling with a pile of pretzels while chocolate dripped everywhere.
Make extra. These spiders are popular. I’ve never brought a batch home from a party. If you think 24 spiders is enough, double the recipe. You won’t regret it.
Variations & Adaptations
One of the best things about this recipe is how easy it is to customize. Here are some variations I’ve tried and loved.
White Chocolate Spiders — Swap the dark chocolate for white chocolate or candy melts. The white coating makes the spiders look ghostly and pale, which is a fun twist. Add a drop of black food coloring to the white chocolate for a marbled effect that looks genuinely creepy.
Peanut Butter Spiders — Add 1/4 cup of creamy peanut butter to the truffle mixture. The peanut butter adds a savory note that balances the sweetness beautifully. Just be aware that these will be softer and might need a longer chill time before dipping.
Gluten-Free Version — Use gluten-free chocolate sandwich cookies instead of Oreos. I’ve tested this with several brands, and they all work well. Just make sure your pretzels are also gluten-free, or substitute with gluten-free pretzel sticks cut in half.
Mint Chocolate Spiders — Add 1/2 teaspoon of peppermint extract to the truffle mixture. The mint pairs surprisingly well with the chocolate coating. These taste like thin mints in spider form.
Spice It Up — Add a pinch of cayenne pepper or cinnamon to the chocolate before dipping. The heat cuts through the richness and adds an unexpected kick. I made these for a Halloween party last year, and they were the talk of the night.
If you’re feeling adventurous, try making these with different cookie bases. I’ve used chocolate wafer cookies and even crushed brownies (baked, cooled, and crumbled) with great results. The possibilities are endless.
Serving & Storage Suggestions
These spiders are best served chilled, right out of the fridge. The chocolate is snappy, the truffle center is firm but creamy, and the pretzels are still crunchy. If you leave them out at room temperature for more than 30 minutes, the pretzels will start to soften. They’ll still taste good, but you’ll lose that satisfying crunch.
For presentation, arrange the spiders on a black or orange platter to match the Halloween theme. I like to scatter a few extra pretzel twists around the platter to look like spider legs that have wandered off. It’s a silly touch, but kids love it.
These spiders pair beautifully with a glass of cold milk or a warm mug of hot chocolate. For an adult gathering, try serving them alongside a decadent red wine chocolate cake for a chocolate-heavy dessert spread that will impress everyone.
Storage Instructions: Keep the spiders in an airtight container in the refrigerator for up to one week. Layer them between sheets of parchment paper to prevent the pretzels from breaking. You can also freeze them for up to three months. Place them in a single layer on a baking sheet, freeze until solid, then transfer to a freezer-safe container. Thaw in the refrigerator overnight before serving.
The flavors actually develop over time. Day-old spiders taste even better than fresh ones, as the Oreo filling and cream cheese have had time to meld together. If you can resist eating them all in one sitting, you’ll be rewarded with an even richer flavor the next day.
Nutritional Information & Benefits
Let’s be real—these are a treat, not a health food. But here’s the nutritional breakdown for one spider (based on the recipe making 24 servings).
- Calories: Approximately 180-200 per spider
- Fat: 12g (mostly from cream cheese and chocolate)
- Carbohydrates: 20g
- Sugar: 14g
- Protein: 3g
- Sodium: 150mg
While these aren’t exactly diet-friendly, they do have a few redeeming qualities. Dark chocolate is rich in antioxidants, and cream cheese provides a small amount of calcium and protein. The pretzels add a bit of iron from the enriched flour.
If you’re watching your sugar intake, you can reduce the sweetness by using dark chocolate with 70% cocoa content and sugar-free Oreos (yes, they exist). The taste will be different, but the texture will be the same.
These spiders contain dairy (cream cheese, chocolate), gluten (Oreos, pretzels), and soy (often found in chocolate chips). If you have allergies, be sure to check labels carefully. I’ve made dairy-free versions using vegan cream cheese and dairy-free chocolate chips with good results.
Conclusion
These Easy No-Bake Oreo Truffle Spiders have become a Halloween tradition in my house, and I don’t see that changing anytime soon. They’re fun to make, impressive to look at, and absolutely delicious to eat. The best part? You don’t need any special skills or equipment to pull them off. If you can crush a cookie and melt some chocolate, you can make these spiders.
I love that this recipe brings people together. I’ve made them with kids who couldn’t stop giggling at the wobbly legs. I’ve brought them to parties where grown adults argued over who got the last one. I’ve even made them for a Halloween bake sale where they sold out in under an hour. There’s something about these little guys that brings out the kid in everyone.
So go ahead, give them a try. Customize them however you like—add sprinkles, use different colored candy melts, or experiment with different fillings. The recipe is forgiving and flexible. And when you’re done, I’d love to hear how they turned out. Drop a comment below and tell me about your spider-making adventures. Did your kids help? Did you try a fun variation? Did you eat half the batch before they made it to the party? No judgment here.
Happy Halloween, and happy snacking!
Frequently Asked Questions
Can I make these spiders ahead of time?
Absolutely! These spiders are perfect for making ahead. Prepare them up to three days in advance and store them in an airtight container in the refrigerator. They actually taste better after a day or two as the flavors meld together. Just make sure they’re fully set before you stack them.
Why did my truffles fall apart in the chocolate?
This usually happens when the truffles aren’t chilled enough before dipping. Make sure they’ve been in the fridge for at least 30 minutes, and that the chocolate isn’t too hot. If the chocolate is hot enough to melt the truffle, you’ll end up with a mess. Let the chocolate cool slightly before you start dipping.
Can I use double-stuf Oreos instead of regular?
You can, but you’ll need to adjust the cream cheese amount. Double-stuf Oreos have more filling, which means the truffle mixture will be sweeter and softer. Reduce the cream cheese by about 2 tablespoons to compensate. The texture will be slightly different, but they’ll still taste great.
How do I keep the pretzels from falling off?
The key is pressing the pretzels into the chocolate while it’s still wet. If the chocolate has started to set, the pretzels won’t stick. Work quickly, and use a tiny dab of melted chocolate to “glue” any loose pretzels in place after the spiders have chilled. You can also use melted white chocolate as an edible adhesive.
Can I freeze these spiders?
Yes! These freeze beautifully. Place the finished spiders on a baking sheet in a single layer and freeze until solid. Then transfer them to a freezer-safe container with layers of parchment paper between them. They’ll keep for up to three months. Thaw in the refrigerator overnight before serving.
Pin This Recipe!
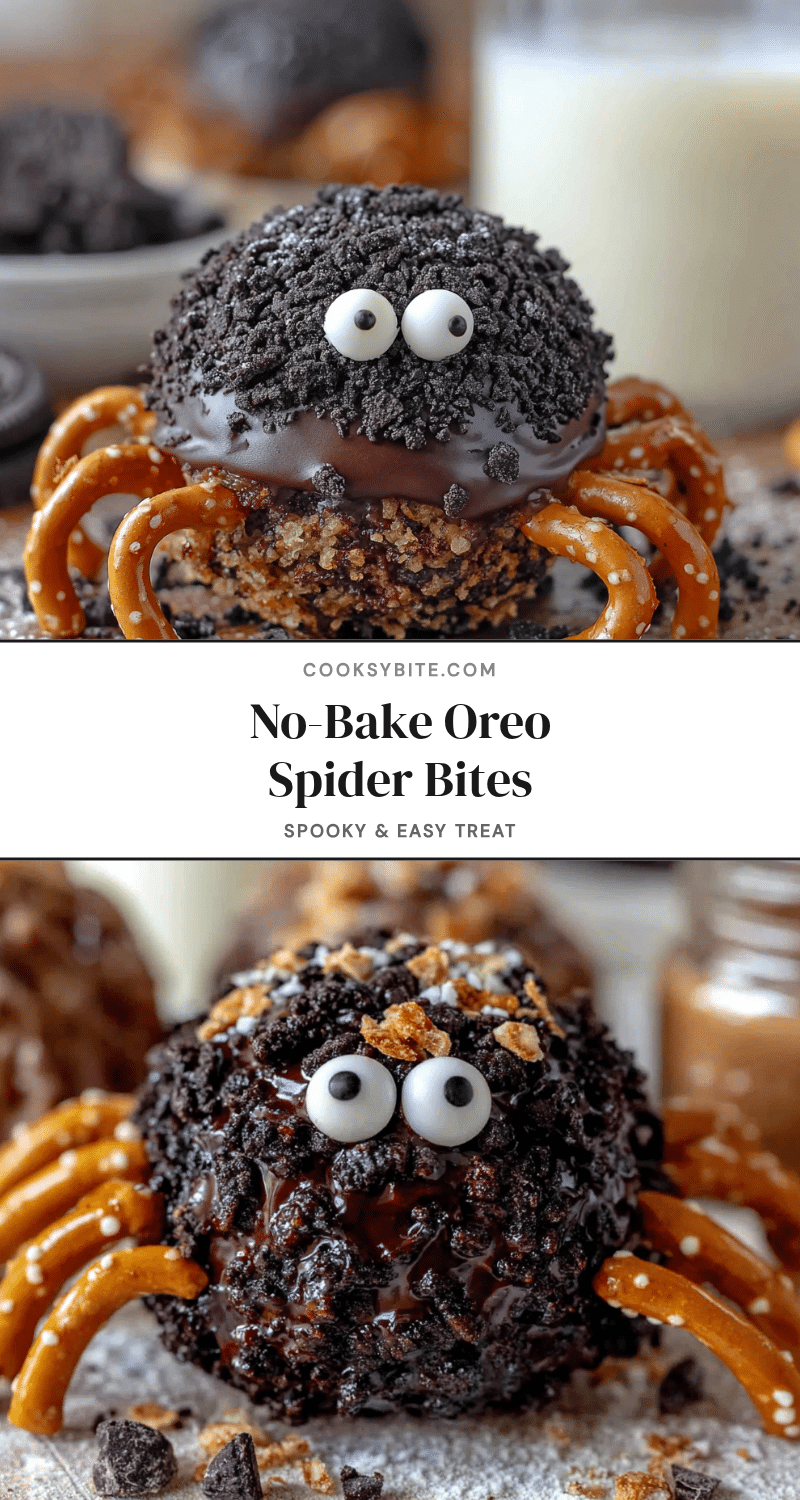
Easy No-Bake Oreo Truffle Spiders: Perfect Halloween Treat
These no-bake Oreo truffle spiders are a fun and easy Halloween treat that looks spooky but tastes delicious. Made with just five ingredients, they’re perfect for parties and kid-friendly.
- Prep Time: 20 minutes
- Cook Time: 0 minutes
- Total Time: 1 hour 20 minutes (includes chilling)
- Yield: 24 spiders 1x
- Category: Dessert
- Cuisine: American
Ingredients
- 36 Oreo cookies (classic, not double-stuf)
- 8 ounces cream cheese, softened
- 24 ounces semi-sweet or dark chocolate chips
- 48 mini pretzel twists
- 48 candy eyes
- 1 tablespoon coconut oil or shortening (optional)
Instructions
- Crush the Oreos in a food processor until fine crumbs form.
- In a large bowl, mix Oreo crumbs with softened cream cheese until fully combined.
- Scoop 1.5 tablespoons of mixture and roll into balls. Place on parchment-lined baking sheet. Makes about 24.
- Chill in refrigerator for at least 30 minutes.
- Melt chocolate chips in microwave in 30-second intervals, stirring until smooth. Add coconut oil if using. Let cool slightly.
- Dip each chilled truffle into melted chocolate, coating completely. Let excess drip off.
- While chocolate is wet, press 4 mini pretzel twists into each side for legs.
- Press 2 candy eyes onto the front of each spider.
- Return to refrigerator for 20-30 minutes until chocolate is set.
Notes
Chill truffles thoroughly before dipping to prevent them from falling apart. Work quickly when adding pretzels and eyes as chocolate sets fast. Store in airtight container in refrigerator for up to one week or freeze for up to three months.
Nutrition
- Serving Size: 1 spider
- Calories: 190
- Sugar: 14
- Sodium: 150
- Fat: 12
- Saturated Fat: 7
- Carbohydrates: 20
- Fiber: 1
- Protein: 3
Keywords: Halloween treats, no-bake desserts, Oreo truffles, spider cookies, easy Halloween recipes


