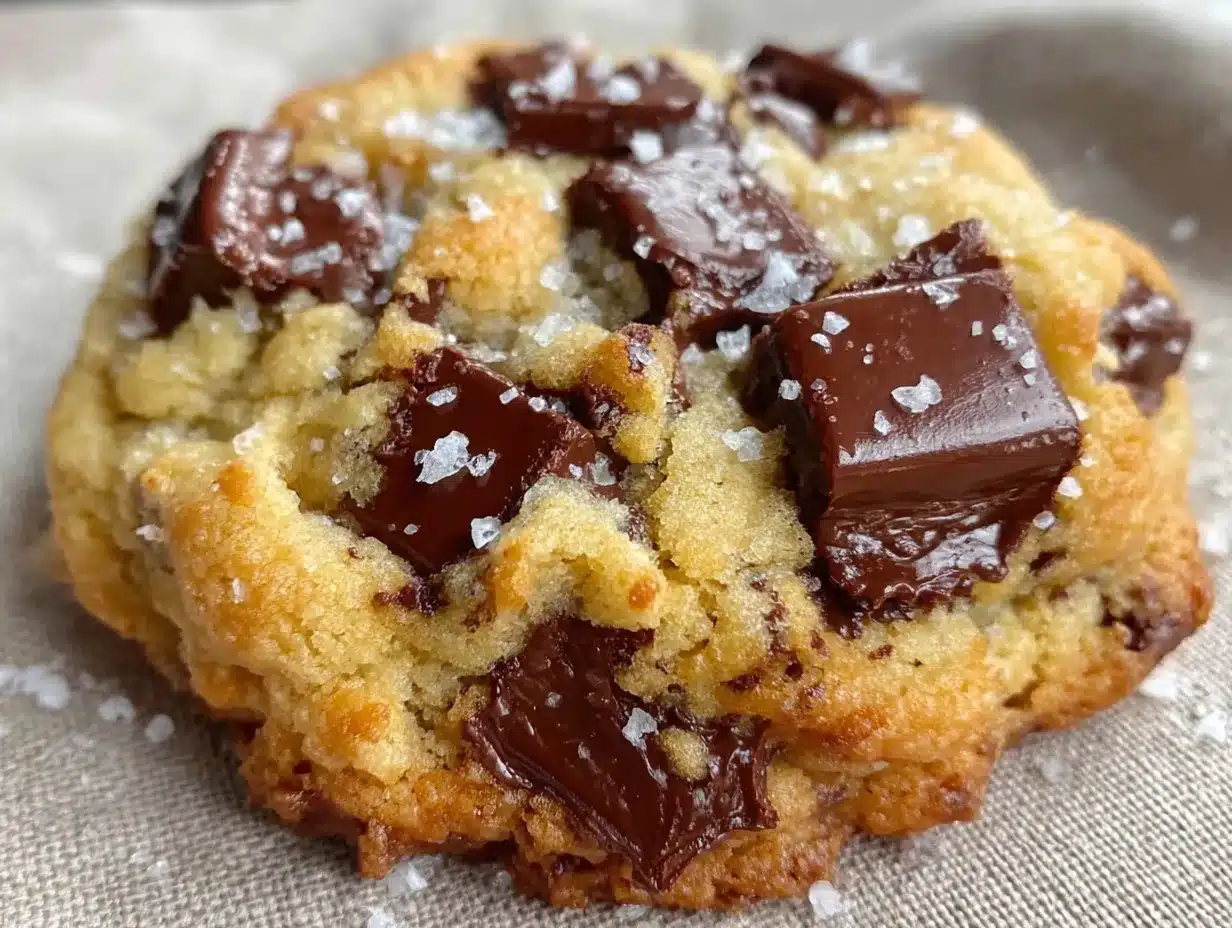
The crackled top. That slight, sugary crunch that gives way to a soft, almost underbaked center. That’s the whole point. I spent years chasing that specific texture—the one you get from a really good bakery, where the cookie is thick enough to sink your teeth into but never bready or dry. My kitchen counter has seen more failed batches than I care to admit (flat ones, cakey ones, ones that spread into one giant, sad disc). But honestly, the quest became a bit of an obsession. I wanted a cookie that looked as good as it tasted, with that signature domed top and a chewy, melt-in-your-mouth middle.
It’s not about fancy ingredients or complicated techniques. It’s about understanding a few key steps—like letting the dough rest and using the right fat-to-sugar ratio. This recipe for the best thick and chewy bakery style chocolate chip cookies is the result of all that trial and error. It’s the one I bring to potlucks where people ask for the recipe before they even finish the first one. It’s the one that made my neighbor (a self-proclaimed cookie snob) knock on my door at 9 PM just to ask what I did differently.
And you know what? It’s not that complicated. You just need a little patience and the right game plan. Trust me on this one.
Why You’ll Love This Recipe
These aren’t just any chocolate chip cookies. They are the best thick and chewy bakery style chocolate chip cookies you’ll ever make at home. I’ve tested this recipe more times than I can count, tweaking the flour, the chill time, and the baking temperature until everything was just right. Here is why this version stands out from the hundreds of other recipes out there:
- Perfectly Thick & Chewy: No flat, greasy discs here. The combination of melted butter and an extra egg yolk creates a dense, fudgy texture that holds its shape beautifully.
- Bakery-Quality Results at Home: That iconic crinkly top and soft center? Achieved by a simple dough rest in the fridge. It’s the secret weapon of every good bakery.
- Simple, Pantry-Friendly Ingredients: You don’t need any weird specialty flours or obscure extracts. Everything is probably in your kitchen right now.
- Crowd-Pleaser Guaranteed: I’ve made these for birthday parties, holiday cookie exchanges, and quiet Tuesday nights. They disappear every single time.
- Make-Ahead Friendly: The dough freezes beautifully, so you can have fresh, warm cookies whenever the craving hits.
What makes this recipe different? It’s not just another cookie recipe. It’s the one where the texture is the star. The slight caramelization from the brown sugar, the pools of melted chocolate, and that satisfying chew—it’s comfort food at its finest. This is the kind of cookie that makes you close your eyes after the first bite. It’s simple, it’s reliable, and it’s absolutely delicious.
What Ingredients You Will Need
This recipe uses simple, wholesome ingredients to deliver that signature bakery-style texture. Each one plays a specific role, so it’s worth paying attention to the details. Here is everything you’ll need:
For the Cookie Dough
- All-purpose flour: 2 ¼ cups (280g). Spoon and level it into your measuring cup—don’t scoop directly from the bag, or you’ll end up with dry cookies.
- Unsalted butter: 1 cup (2 sticks, 226g), melted and slightly cooled. Melting the butter is key for that chewy texture. I like using Kerrygold for its rich flavor.
- Granulated sugar: ¾ cup (150g). Adds sweetness and helps with spreading.
- Light brown sugar: ¾ cup (160g), packed. This is where the moisture and chewiness come from. Don’t skip it.
- Large egg: 1 whole egg + 1 egg yolk, at room temperature. The extra yolk adds richness and tenderness.
- Vanilla extract: 2 teaspoons. Pure vanilla makes a difference here.
- Baking soda: 1 teaspoon. Helps the cookies spread just enough.
- Salt: 1 teaspoon. I use fine sea salt. It balances the sweetness perfectly.
- Cornstarch: 1 tablespoon. This is my little secret for extra softness and that perfect thick texture.
- Semi-sweet chocolate chips: 2 cups (340g). I prefer Guittard or Ghirardelli for quality. You can also chop up a chocolate bar for those melty pools.
Ingredient Tips: For the best results, make sure your egg is at room temperature. If you’re in a hurry, place it in a bowl of warm water for 5 minutes. The cornstarch is non-negotiable here—it’s what gives the cookies that signature bakery-style lift without making them cakey. If you want a slightly saltier finish, sprinkle a little flaky sea salt on top right when they come out of the oven.
Equipment Needed
You don’t need a professional kitchen to make the best thick and chewy bakery style chocolate chip cookies. Here is what you’ll need:
- Large mixing bowl: A sturdy glass or stainless steel bowl works great.
- Whisk: For mixing the wet ingredients.
- Rubber spatula or wooden spoon: For folding in the dry ingredients and chocolate chips.
- Measuring cups and spoons: For accuracy, a kitchen scale is even better.
- Baking sheets: Heavy-duty, light-colored baking sheets prevent over-browning. Dark pans can cause the bottoms to burn.
- Parchment paper or silicone baking mat: Essential for easy cleanup and even baking.
- Cookie scoop: A 3-tablespoon scoop ensures uniform cookies that bake evenly. I love my OXO scoop for this.
- Wire cooling rack: Lets air circulate so the cookies don’t get soggy on the bottom.
If you don’t have a cookie scoop, just use two spoons to portion the dough. It’s a bit messier, but it works in a pinch.
Preparation Method
Follow these steps carefully, and you’ll have a batch of the best thick and chewy bakery style chocolate chip cookies ready to go. The secret is in the rest time, so don’t rush it.
- Melt the butter: In a small saucepan or microwave-safe bowl, melt the 1 cup of butter. Let it cool for about 5 minutes—it should be warm, not hot. Hot butter will cook the eggs.
- Combine the wet ingredients: In a large mixing bowl, whisk the melted butter with the granulated sugar and brown sugar until smooth and combined. It will look a bit grainy, and that’s fine. Whisk in the whole egg, the extra egg yolk, and the vanilla extract until the mixture is pale and slightly thick, about 1 minute.
- Mix the dry ingredients: In a separate bowl, whisk together the flour, cornstarch, baking soda, and salt. This ensures the leavening agents are evenly distributed.
- Combine wet and dry: Gradually add the dry ingredients to the wet mixture. Use a rubber spatula to fold everything together gently. Stop mixing as soon as you no longer see streaks of flour. Over-mixing will make the cookies tough.
- Add the chocolate chips: Fold in the chocolate chips until they are evenly distributed. Reserve about ¼ cup of chips to press onto the tops of the dough balls later—it makes them look extra bakery-like.
- Chill the dough (crucial step!): Cover the bowl with plastic wrap and refrigerate for at least 30 minutes, or up to 72 hours. This rest allows the flavors to meld and the butter to solidify, which prevents the cookies from spreading too much. For the absolute best texture, I recommend chilling for at least 2 hours.
- Preheat the oven: When you’re ready to bake, preheat your oven to 375°F (190°C). Line two baking sheets with parchment paper.
- Portion the dough: Use your cookie scoop to portion the dough into balls, about 3 tablespoons each (roughly 50g). Place them 3 inches apart on the prepared baking sheets. Press a few reserved chocolate chips onto the tops of each dough ball.
- Bake: Bake for 11-13 minutes, or until the edges are golden brown and the centers look slightly puffy and underdone. The cookies will continue to set on the hot baking sheet. For a softer, chewier center, pull them out at the 11-minute mark.
- Cool: Let the cookies rest on the baking sheet for 5 minutes. This is non-negotiable—they are too fragile to move right away. After 5 minutes, transfer them to a wire rack to cool completely. Or, you know, eat one warm. I won’t judge.
Cooking Tips & Techniques
After making these cookies more times than I can count, I’ve learned a few things the hard way. Here are my best tips for perfect results every time:
- Don’t skip the chill. I know it’s tempting to bake right away, but the dough needs that time in the fridge. Without it, your cookies will spread into thin, crispy pancakes. The cold butter creates a thicker, taller cookie.
- Measure your flour correctly. The number one mistake home bakers make is using too much flour. Use the spoon-and-level method: fluff the flour with a spoon, spoon it into your measuring cup, and level it off with a knife. A kitchen scale is even better.
- Use a light-colored baking sheet. Dark, non-stick pans absorb more heat and can burn the bottoms of your cookies before the centers are done. If you only have dark pans, reduce the oven temperature by 25°F.
- Rotate your pan halfway through. Halfway through the bake time, spin the baking sheet 180 degrees. This ensures even browning, especially in older ovens that have hot spots.
- Underbake slightly. I’ve ruined many batches by leaving them in the oven “just one more minute.” Pull them out when the edges are set but the centers still look soft and slightly shiny. They will continue to cook on the hot pan.
- My biggest failure? I once tried to double the batch and forgot the cornstarch. The cookies were flat, greasy, and sad. It was a waste of good chocolate. Learn from my mistake—don’t skip that ingredient!
Variations & Adaptations
One of the best things about this recipe for the best thick and chewy bakery style chocolate chip cookies is how adaptable it is. Here are a few ways to switch it up:
- Chocolate Lover’s Dream: Swap ½ cup of the semi-sweet chips for dark chocolate chunks or white chocolate chips. You can also add a tablespoon of cocoa powder to the dry ingredients for a double-chocolate version.
- Nutty Crunch: Fold in ¾ cup of toasted, chopped pecans or walnuts along with the chocolate chips. The crunch adds a lovely contrast to the soft dough.
- Gluten-Free Option: Substitute the all-purpose flour with a 1:1 gluten-free baking flour blend that contains xanthan gum. I’ve used King Arthur Measure for Measure with great results. Chill the dough for at least an hour to help it set.
- Sea Salt Finish: Right after the cookies come out of the oven, sprinkle a tiny pinch of flaky sea salt (like Maldon) on top. That sweet-salty combo is absolutely addictive.
- M&M’s Swap: For a fun, colorful twist, replace half the chocolate chips with mini M&M’s. This is my go-to for birthday parties or bake sales.
I once tried a variation with browned butter—browning the butter before cooling it and using it in the dough. It added a nutty, toffee-like flavor that was incredible. Just note that browned butter has less moisture, so you might need to add a splash of milk if the dough seems too dry.
Serving & Storage Suggestions
These cookies are best served slightly warm, when the chocolate is still a little melty and the centers are soft. Here’s how to handle them:
- Serving: Let the cookies cool on the baking sheet for 5 minutes, then transfer to a wire rack. Serve them warm with a tall glass of cold milk or a hot cup of coffee. They’re also fantastic crumbled over vanilla ice cream for an easy dessert.
- Storing: Store baked cookies in an airtight container at room temperature for up to 5 days. To keep them soft, add a slice of white bread to the container—the bread absorbs excess moisture and the cookies stay chewy. Replace the bread every other day.
- Freezing Baked Cookies: Cool the cookies completely, then place them in a single layer in a freezer-safe zip-top bag. They’ll keep for up to 3 months. Thaw at room temperature for about 20 minutes, or warm them in a 300°F oven for 5 minutes.
- Freezing Raw Dough: Scoop the dough into balls and place them on a parchment-lined baking sheet. Freeze until solid (about 1 hour), then transfer the frozen dough balls to a freezer bag. Bake from frozen, adding 2-3 minutes to the bake time.
- Flavor Development: Honestly, these cookies taste even better the next day. The flavors meld together overnight, and the texture becomes even more perfectly chewy. If you can resist eating them all, store a few for day two.
Nutritional Information & Benefits
Let’s be real—these are a treat, not a health food. But knowing what’s in them helps you enjoy them mindfully. Here’s the estimated nutrition per cookie (based on a 3-tablespoon scoop, making about 24 cookies):
| Nutrient | Amount per Cookie |
|---|---|
| Calories | 245 |
| Total Fat | 13g |
| Saturated Fat | 8g |
| Cholesterol | 35mg |
| Sodium | 180mg |
| Total Carbohydrates | 32g |
| Dietary Fiber | 1g |
| Sugars | 20g |
| Protein | 3g |
Key Benefits: Dark chocolate (if you use 70% or higher) contains antioxidants and a small amount of iron. The butter provides fat-soluble vitamins A, D, and E. This recipe is also nut-free (unless you add nuts), making it a safe option for school bake sales. For a dairy-free version, substitute the butter with a plant-based baking stick (like Earth Balance) and use dairy-free chocolate chips.
I personally love that these cookies feel like a true indulgence. They’re the kind of thing you make on a rainy Sunday afternoon when you just need something comforting. A little butter, a little sugar, and a lot of chocolate—sometimes that’s exactly what you need.
Conclusion
If you’ve been searching for the best thick and chewy bakery style chocolate chip cookies, your search ends here. This recipe is the real deal—it’s been tested, tweaked, and loved by everyone who’s tried it. The texture is spot-on, the flavor is perfectly balanced, and the process is straightforward enough for a Tuesday night bake session.
Don’t be afraid to make this recipe your own. Play with the mix-ins, try the browned butter version, or just stick with the classic. The beauty of a great cookie recipe is that it becomes a canvas for your own creativity. I’d love to hear how yours turn out! Did you add anything fun? Did you manage to resist eating the entire batch in one sitting? (I haven’t.) Drop a comment below and share your cookie triumphs—or your happy accidents. Happy baking!
Frequently Asked Questions
Why did my cookies turn out flat?
Flat cookies usually mean the dough wasn’t chilled long enough, or the butter was too warm when you mixed it. Make sure to chill the dough for at least 30 minutes (2 hours is better). Also, check that your baking soda is fresh—old baking soda loses its leavening power.
Can I use margarine instead of butter?
I don’t recommend it. Margarine has a higher water content than butter, which will make your cookies spread more and become greasy. Stick with real unsalted butter for the best texture and flavor.
How do I make my cookies softer?
For extra soft cookies, pull them out of the oven a minute or two earlier, while the centers still look slightly underdone. Also, make sure you’re not over-measuring your flour. Adding an extra tablespoon of cornstarch can also help keep them tender.
Can I make this dough ahead of time?
Absolutely! The dough can be refrigerated for up to 72 hours. In fact, the longer it rests, the better the flavor. You can also freeze the dough balls for up to 3 months—just bake them straight from the freezer, adding a couple of extra minutes to the bake time.
Can I use bread flour instead of all-purpose flour?
Yes, you can! Bread flour has a higher protein content, which will make your cookies slightly chewier and a bit thicker. Use the same amount (2 ¼ cups) and expect a slightly denser, more structured cookie. It’s a great swap if you love a really substantial chew.
Pin This Recipe!

Best Thick and Chewy Bakery Style Chocolate Chip Cookies
The crackled top. That slight, sugary crunch that gives way to a soft, almost underbaked center. That’s the whole point. This recipe for the best thick and chewy bakery style chocolate chip cookies is the result of all that trial and error, delivering perfectly thick, chewy cookies with a signature domed top and melt-in-your-mouth middle.
- Prep Time: 15 minutes
- Cook Time: 11-13 minutes
- Total Time: 30 minutes (plus chilling time)
- Yield: 24 cookies 1x
- Category: Dessert
- Cuisine: American
Ingredients
- 2 ¼ cups (280g) all-purpose flour
- 1 cup (2 sticks, 226g) unsalted butter, melted and slightly cooled
- ¾ cup (150g) granulated sugar
- ¾ cup (160g) light brown sugar, packed
- 1 large egg + 1 egg yolk, at room temperature
- 2 teaspoons vanilla extract
- 1 teaspoon baking soda
- 1 teaspoon fine sea salt
- 1 tablespoon cornstarch
- 2 cups (340g) semi-sweet chocolate chips
Instructions
- Melt the butter: In a small saucepan or microwave-safe bowl, melt the 1 cup of butter. Let it cool for about 5 minutes—it should be warm, not hot. Hot butter will cook the eggs.
- Combine the wet ingredients: In a large mixing bowl, whisk the melted butter with the granulated sugar and brown sugar until smooth and combined. It will look a bit grainy, and that’s fine. Whisk in the whole egg, the extra egg yolk, and the vanilla extract until the mixture is pale and slightly thick, about 1 minute.
- Mix the dry ingredients: In a separate bowl, whisk together the flour, cornstarch, baking soda, and salt. This ensures the leavening agents are evenly distributed.
- Combine wet and dry: Gradually add the dry ingredients to the wet mixture. Use a rubber spatula to fold everything together gently. Stop mixing as soon as you no longer see streaks of flour. Over-mixing will make the cookies tough.
- Add the chocolate chips: Fold in the chocolate chips until they are evenly distributed. Reserve about ¼ cup of chips to press onto the tops of the dough balls later—it makes them look extra bakery-like.
- Chill the dough (crucial step!): Cover the bowl with plastic wrap and refrigerate for at least 30 minutes, or up to 72 hours. This rest allows the flavors to meld and the butter to solidify, which prevents the cookies from spreading too much. For the absolute best texture, I recommend chilling for at least 2 hours.
- Preheat the oven: When you’re ready to bake, preheat your oven to 375°F (190°C). Line two baking sheets with parchment paper.
- Portion the dough: Use your cookie scoop to portion the dough into balls, about 3 tablespoons each (roughly 50g). Place them 3 inches apart on the prepared baking sheets. Press a few reserved chocolate chips onto the tops of each dough ball.
- Bake: Bake for 11-13 minutes, or until the edges are golden brown and the centers look slightly puffy and underdone. The cookies will continue to set on the hot baking sheet. For a softer, chewier center, pull them out at the 11-minute mark.
- Cool: Let the cookies rest on the baking sheet for 5 minutes. This is non-negotiable—they are too fragile to move right away. After 5 minutes, transfer them to a wire rack to cool completely. Or, you know, eat one warm. I won’t judge.
Notes
Don’t skip the chill time—it’s crucial for thick cookies. Measure flour correctly using the spoon-and-level method. Underbake slightly for a chewy center. For a saltier finish, sprinkle flaky sea salt on top after baking. The dough can be refrigerated for up to 72 hours for better flavor.
Nutrition
- Serving Size: 1 cookie
- Calories: 245
- Sugar: 20
- Sodium: 180
- Fat: 13
- Saturated Fat: 8
- Carbohydrates: 32
- Fiber: 1
- Protein: 3
Keywords: chocolate chip cookies, thick and chewy cookies, bakery style cookies, best chocolate chip cookies, homemade cookies


