I had claimed to hate upside-down cake for years. Like, a solid decade. The canned pineapple rings, the maraschino cherries that looked like they belonged on a cocktail toothpick, the syrupy-sweet mess that always stuck to the pan in a sad, torn layer. It felt like a dessert from a 1970s potluck that nobody actually wanted to eat. Then last autumn, a friend from California showed up at my door with a bag of Hachiya persimmons so ripe they practically wobbled. “Make something,” she said. “I dare you.” I shoved them in the freezer, mostly out of defiance. A week later, I defrosted one out of curiosity, peeled back the skin, and tasted the pure, honeyed pulp. And I thought—maybe, just maybe, this weird fruit could be the thing that finally made me eat my words. Honestly, I wasn’t trying to prove anything. I just wanted to use up the fruit before it turned into a science experiment. But when I pulled that cake out of the oven, with the caramel bubbling up around the fanned persimmon slices, I knew I was in trouble. And then my six-year-old, who had sworn off all things “squishy” and “brown,” walked into the kitchen, pointed at the cooling cake, and asked for a piece before dinner. That’s when I knew I had something real.
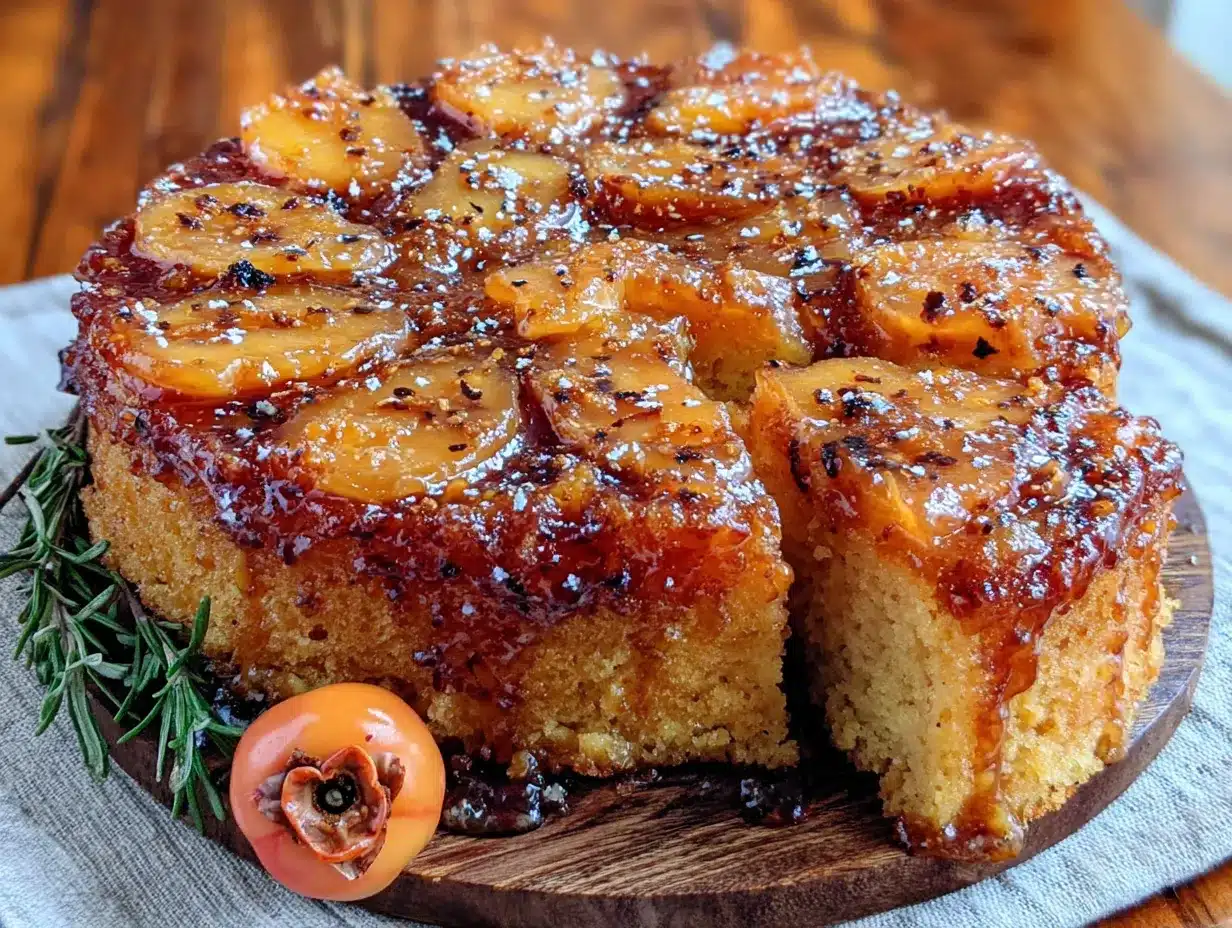
Maybe you’ve been there—staring down a bag of persimmons at the grocery store, wondering if they’re just a pretty face or if they actually taste good. Let me tell you, they’re the quiet heroes of the fall fruit world. This cake turned my upside-down skepticism into a full-blown obsession. The caramel gets sticky and dark, the persimmon slices soften into jammy pockets of sweetness, and the cake itself is tender enough to make you close your eyes on the first bite. It’s the kind of dessert that makes everyone at the table go quiet for a second. And then ask for seconds.
Why You’ll Love This Recipe
I have tested this cake six times in the past two months. Six times. My family has been very patient, and very well-fed. Here is why this version is the one worth keeping:
- Kid-Approved Magic: My kids fought over the last slice. The sticky caramel and soft fruit win over even the pickiest eaters. I’ve seen it happen at my own table, twice.
- Simple Ingredients: You likely have butter, sugar, flour, and eggs in your kitchen right now. The only “special” ingredient is the persimmons, and they show up at nearly every grocery store from September through January.
- Perfect for Fall Gatherings: This cake looks impressive on a dessert table but takes about 15 minutes of active prep time. It’s the kind of dessert that makes you look like you tried harder than you actually did.
- Budget-Friendly: Persimmons are often sold in bulk bags for a few dollars. One bag makes two cakes. Compare that to a fancy bakery tart, and you’re saving real money.
- Unbelievably Delicious: The texture is what gets me every time. The caramel soaks into the cake bottom (which becomes the top), creating a sticky, tender crumb that’s part pudding, part cake, and all comfort.
What makes this recipe different from all the other upside-down cakes out there? It’s the persimmons. They don’t get mushy or watery like some fruits. Instead, they hold their shape, soften into a luxurious jam-like layer, and their natural honey flavor pairs perfectly with the deep caramel. No artificial syrups. No canned fruit. Just real, honest ingredients doing their best work.
What Ingredients You Will Need
This recipe relies on a short list of pantry staples plus the star of the show—ripe persimmons. Here is what you need and why each ingredient matters:
- Unsalted butter, softened (1/2 cup, or 113 grams): Use unsalted so you control the salt level. I prefer Kerrygold for its rich flavor, but any good-quality butter works. Soften it to room temperature for easy creaming.
- Granulated sugar (1 cup, or 200 grams): Half goes into the caramel, half into the cake batter. Regular white sugar gives the cleanest caramel flavor. Do not substitute brown sugar for the caramel layer—it can crystallize unevenly.
- Ripe Hachiya persimmons (3 to 4 medium, about 450 grams total): You want them soft, almost squishy, with translucent skin. Fuyu persimmons (the squat, firm ones) will not work here—they stay crunchy and won’t soften into that jammy layer. Look for Hachiya persimmons that feel like a water balloon when gently squeezed.
- All-purpose flour (1 1/2 cups, or 180 grams): Spoon and level your flour for the most accurate measurement. Scooping directly from the bag packs in too much flour and makes the cake dry.
- Baking powder (1 1/2 teaspoons): Make sure it’s fresh. Test it by dropping a little into hot water—if it fizzes, it’s good.
- Salt (1/2 teaspoon): Balances the sweetness. I use fine sea salt.
- Large eggs (2, room temperature): Room-temperature eggs emulsify better into the batter, creating a lighter crumb. If you forgot to take them out early, place them in a bowl of warm water for 5 minutes.
- Buttermilk (1/2 cup, or 120 ml): Adds tenderness and a slight tang that cuts through the sweetness. No buttermilk? Add 1/2 tablespoon of lemon juice or white vinegar to regular milk and let it sit for 5 minutes.
- Vanilla extract (1 teaspoon): Pure vanilla, not imitation. It rounds out the caramel flavor beautifully.
- Lemon juice (1 tablespoon): A squeeze in the caramel prevents crystallization and brightens the persimmon flavor.
For the Topping (Optional but Recommended)
- Flaky sea salt (a pinch): Sprinkle over the warm cake. It sounds fancy, but honestly, it just makes the caramel taste even better. Maldon is my go-to.
- Whipped cream or vanilla ice cream: Not required, but highly suggested. The cold cream against the warm, sticky cake is a textural dream.
Equipment Needed
You do not need a fancy kitchen to pull this off. Here is what you will need:
- 9-inch round cake pan (at least 2 inches deep): A standard 9-inch round pan works. Avoid springform pans—the caramel can leak through the seam. I use a basic metal pan from the grocery store, and it works perfectly.
- Electric mixer (handheld or stand): You can cream the butter and sugar by hand, but it takes a solid 5 minutes of vigorous whisking. A mixer makes it effortless.
- Small saucepan: For making the caramel. Use a heavy-bottomed pan to prevent scorching.
- Sharp knife and cutting board: For slicing the persimmons. A serrated knife works best if your persimmons are very soft.
- Mixing bowls: One large, one medium.
- Rubber spatula: For scraping every last bit of caramel and batter. Do not skip this—you want all that sticky goodness in the pan.
- Cooling rack: Essential for letting the cake cool before flipping. If you flip it too soon, the cake can break apart.
- Parchment paper: Optional but helpful. If your pan is not nonstick, line the bottom with a round of parchment for guaranteed release.
Preparation Method
Let me walk you through this step by step. I have made every mistake possible—burnt caramel, undercooked cake, stuck-on persimmons—so you do not have to.
- Preheat your oven to 350°F (175°C). Place a rack in the center position. While the oven heats, get your ingredients ready. This is not a recipe where you want to scramble mid-step.
- Make the caramel layer: In a small saucepan over medium heat, combine 1/2 cup (100 grams) of the granulated sugar with 2 tablespoons of water. Stir gently until the sugar looks like wet sand. Stop stirring once it starts boiling. Let it cook, swirling the pan occasionally, until it turns a deep amber color—think the color of a copper penny. This takes about 5 to 7 minutes. Watch it closely; caramel goes from perfect to burnt in seconds. As soon as it reaches that deep amber, remove it from the heat and carefully stir in 2 tablespoons of unsalted butter and the lemon juice. The mixture will bubble up—that’s normal. Pour the caramel into your cake pan and tilt the pan to coat the bottom evenly. Set it aside to cool slightly.
- Prepare the persimmons: While the caramel cools, peel the persimmons. The skin is thin and edible, but peeling gives a more elegant look. Slice them horizontally into rounds about 1/4-inch thick. If you have a very soft persimmon, use a gentle sawing motion with a serrated knife. Arrange the slices over the caramel in a single layer, overlapping slightly. I like to start from the outside edge and work inward, like a spiral. Do not press them down—just lay them gently.
- Make the cake batter: In a medium bowl, whisk together the flour, baking powder, and salt. Set aside. In a large bowl, beat the remaining 1/2 cup (113 grams) of softened butter with the remaining 1/2 cup (100 grams) of sugar until light and fluffy, about 3 minutes with an electric mixer. Scrape down the sides of the bowl once or twice.
- Add the eggs and vanilla: Beat in the eggs one at a time, mixing well after each addition. Add the vanilla extract. The mixture might look a little curdled at this point—that is fine. It will come together when you add the flour.
- Alternate adding flour and buttermilk: With the mixer on low speed, add about one-third of the flour mixture, then half of the buttermilk, mixing just until combined. Repeat with another third of flour, the remaining buttermilk, and finally the last of the flour. Stop mixing as soon as the streaks of flour disappear. Overmixing makes the cake tough.
- Assemble the cake: Gently spoon the batter over the persimmon layer. Use a spatula to spread it evenly, being careful not to disturb the fruit arrangement. The batter will be thick—that is normal. Smooth the top as best you can.
- Bake: Place the pan on the center rack and bake for 35 to 40 minutes. The cake is done when a toothpick inserted into the center comes out clean or with a few moist crumbs. The top should be golden brown and spring back when lightly pressed. My oven runs hot, so I start checking at 32 minutes.
- Cool and flip: Let the cake cool in the pan on a wire rack for exactly 10 minutes. Do not skip this rest—it lets the caramel set slightly so it doesn’t all run off when you flip. After 10 minutes, run a knife around the edge of the pan. Place a serving plate upside down over the pan, then carefully flip the whole thing over. Lift the pan off slowly. If any persimmon slices stick, just nudge them back into place with a spatula.
- Serve warm or at room temperature: The cake is at its best when still slightly warm, with the caramel soft and sticky. Sprinkle with flaky sea salt if you are using it. Add a dollop of whipped cream or a scoop of vanilla ice cream, and you have dessert that will make everyone at the table go quiet.
Cooking Tips & Techniques
I learned most of these the hard way. Let me save you the trouble.
Watch the caramel like a hawk. The first time I made this, I walked away to answer a text message. By the time I came back, the caramel smelled like burnt toast and had turned into a solid, bitter disc. Caramel goes from perfect to ruined in about 30 seconds. Stay by the stove, and trust your eyes more than your timer.
Use persimmons that are almost too soft to handle. If your Hachiya persimmons are still firm, they will not soften properly during baking and will leave you with crunchy, astringent slices. Let them sit on the counter for a few days until they feel like a water balloon. You can also freeze ripe persimmons for up to 3 months—just thaw them in the fridge overnight before using.
Do not overmix the batter. I am guilty of this more often than I want to admit. The urge to keep mixing until the batter is perfectly smooth is strong, but it develops gluten and makes the cake dense. Mix until you see the last streak of flour disappear, then stop. A few small lumps are fine.
Let the cake rest exactly 10 minutes. I tested this at 5 minutes, 10 minutes, and 20 minutes. At 5 minutes, the caramel was too runny and soaked into the cake unevenly. At 20 minutes, the caramel had hardened and stuck to the pan. Ten minutes is the sweet spot where the caramel is still warm and fluid but thick enough to hold its shape.
Flip with confidence. Hesitation is what causes the cake to slide off-center. Place the plate firmly over the pan, hold them together with both hands, and flip in one smooth motion. If you are nervous, do it over the sink. I have done this at least a dozen times, and I still hold my breath every time.
Variations & Adaptations
This cake is forgiving. Here are a few ways to make it your own:
- Gluten-Free Version: Swap the all-purpose flour with a 1:1 gluten-free baking flour blend. I have used Bob’s Red Mill 1:1 Baking Flour with great results. The texture is slightly more tender, but the flavor is identical.
- Dairy-Free Adaptation: Use vegan butter (I like Miyoko’s) and replace the buttermilk with 1/2 cup of unsweetened oat milk mixed with 1/2 tablespoon of lemon juice. The cake will be a little less rich, but still delicious.
- Spiced Variation: Add 1 teaspoon of ground cinnamon and 1/4 teaspoon of ground cardamom to the flour mixture. The warm spices complement the persimmon’s honey notes beautifully. I tried this on a whim one rainy Sunday, and it is now my second-favorite version.
- Apple-Persimmon Combo: Replace one of the persimmons with a thinly sliced Honeycrisp or Fuji apple. The apple adds a slight tartness that balances the sweetness. Arrange the slices in alternating patterns for a beautiful presentation.
- Mini Cakes Version: Divide the caramel and persimmon slices among 4-inch mini cake pans or a jumbo muffin tin. Reduce the baking time to 18 to 22 minutes. Perfect for portion control or gifting.
Serving & Storage Suggestions
This cake is best served warm, about 20 minutes after it comes out of the oven. The caramel is still soft and sticky, and the cake is tender. A scoop of vanilla ice cream melting into the warm caramel is honestly one of the best things I have ever eaten. If you are serving it at a gathering, let it cool completely to room temperature, then reheat individual slices in the microwave for 15 seconds before serving.
Storage instructions: Cover the cake tightly with plastic wrap or store it in an airtight container at room temperature for up to 2 days. After that, move it to the refrigerator for up to 5 days. The caramel will harden slightly when cold, but it softens again when reheated.
Freezing: This cake freezes surprisingly well. Wrap the completely cooled cake (without any toppings) in a double layer of plastic wrap, then a layer of aluminum foil. Freeze for up to 3 months. Thaw overnight in the refrigerator, then reheat in a 300°F (150°C) oven for 10 to 15 minutes. The caramel will be just as sticky as the day you made it.
Reheating tips: For a single slice, microwave for 15 to 20 seconds. For a whole cake, cover it with foil and warm in a 300°F (150°C) oven for 10 minutes. The caramel will soften and the cake will taste freshly baked.
Flavor development note: This cake actually tastes better on day two. The caramel continues to soak into the cake, and the persimmon flavor deepens. If you can resist eating it all on day one, you will be rewarded.
Nutritional Information & Benefits
Let’s be honest—this is a dessert, not a health food. But it does have some redeeming qualities. Each serving (based on 8 slices) contains approximately:
- Calories: 320
- Fat: 14g
- Carbohydrates: 47g
- Fiber: 3g
- Sugar: 32g
- Protein: 4g
Health benefits of persimmons: Persimmons are packed with vitamin A, vitamin C, and antioxidants. They also contain fiber, which helps slow down sugar absorption. So while this cake is definitely a treat, the persimmons bring some nutritional value to the party.
Dietary considerations: This recipe contains gluten, dairy, and eggs. For gluten-free and dairy-free options, see the variations section above. The cake is nut-free as written, making it safe for school lunches or nut-free households.
Frequently Asked Questions
Can I use Fuyu persimmons instead of Hachiya?
I do not recommend it. Fuyu persimmons are firm and crunchy, even when ripe. They will not soften into that jammy layer during baking, and they can leave you with an unpleasant texture. Stick with soft, ripe Hachiya persimmons for the best results.
My caramel turned into a hard disc. What went wrong?
This usually happens when the caramel is cooked too long or at too high a temperature. Next time, remove the caramel from the heat as soon as it reaches a deep amber color. Also, make sure your butter and lemon juice are at room temperature—cold ingredients can cause the caramel to seize.
Can I make this cake ahead of time?
Absolutely. Bake the cake a day ahead, let it cool completely in the pan (do not flip it), cover it tightly, and store it at room temperature. Flip it onto a serving plate about an hour before serving. The caramel will have set slightly, but it softens at room temperature.
Why did my cake stick to the pan?
Two possible reasons: either the caramel was too cool when you poured it into the pan (it should be warm and fluid), or you did not let the cake rest long enough before flipping. Make sure to pour the caramel into the pan while it is still warm, and always let the cake rest for exactly 10 minutes after baking.
Can I double this recipe?
Yes, but use two separate 9-inch pans instead of one larger pan. The caramel and fruit layers do not scale well in a single larger pan, and the baking time becomes unpredictable. Two cakes also mean you can freeze one for later—a win-win situation.
Conclusion
This sticky caramel persimmon upside-down cake is the dessert that changed my mind about an entire category of baking. It is not fussy, it is not complicated, and it does not require a trip to a specialty grocery store. It just requires a few ripe persimmons, a little patience with the caramel, and the willingness to flip a cake upside down and hope for the best.
I have made this cake for birthday dinners, casual weeknight desserts, and a Thanksgiving potluck where it disappeared in under 20 minutes. Every time, someone asks for the recipe. Every time, I tell them the same thing: use the softest persimmons you can find, do not walk away from the caramel, and do not be afraid to add a pinch of flaky salt on top.
If you make this cake—and I really hope you do—let me know how it turns out. Did your kids fight over the last slice? Did you try the spiced variation? Drop a comment below or tag me in your photos. I love seeing these sticky, beautiful cakes come out of ovens all over the place. And if you have a persimmon skeptic at your table, well, this might just be the recipe that changes their mind too.
Pin This Recipe!

Best Easy Sticky Caramel Persimmon Upside-Down Cake

This sticky caramel persimmon upside-down cake is the dessert that changed my mind about an entire category of baking. It is not fussy, it is not complicated, and it does not require a trip to a specialty grocery store.
- Prep Time: 15 minutes
- Cook Time: 35-40 minutes
- Total Time: 50-55 minutes
- Yield: 8 servings 1x
- Category: Dessert
- Cuisine: American
Ingredients
- 1/2 cup (113 grams) unsalted butter, softened
- 1 cup (200 grams) granulated sugar
- 3 to 4 medium ripe Hachiya persimmons (about 450 grams total)
- 1 1/2 cups (180 grams) all-purpose flour
- 1 1/2 teaspoons baking powder
- 1/2 teaspoon salt
- 2 large eggs, room temperature
- 1/2 cup (120 ml) buttermilk
- 1 teaspoon vanilla extract
- 1 tablespoon lemon juice
- 2 tablespoons unsalted butter (for caramel)
- Flaky sea salt (optional, for topping)
- Whipped cream or vanilla ice cream (optional, for serving)
Instructions
- Preheat your oven to 350°F (175°C). Place a rack in the center position.
- Make the caramel layer: In a small saucepan over medium heat, combine 1/2 cup (100 grams) of the granulated sugar with 2 tablespoons of water. Stir gently until the sugar looks like wet sand. Stop stirring once it starts boiling. Let it cook, swirling the pan occasionally, until it turns a deep amber color (like a copper penny), about 5 to 7 minutes. Remove from heat and carefully stir in 2 tablespoons of unsalted butter and the lemon juice. Pour the caramel into your 9-inch cake pan and tilt to…
- Prepare the persimmons: Peel the persimmons and slice them horizontally into rounds about 1/4-inch thick. Arrange the slices over the caramel in a single layer, overlapping slightly, starting from the outside edge and working inward like a spiral.
- Make the cake batter: In a medium bowl, whisk together the flour, baking powder, and salt. Set aside. In a large bowl, beat the remaining 1/2 cup (113 grams) of softened butter with the remaining 1/2 cup (100 grams) of sugar until light and fluffy, about 3 minutes with an electric mixer. Scrape down the sides once or twice.
- Add the eggs and vanilla: Beat in the eggs one at a time, mixing well after each addition. Add the vanilla extract.
- Alternate adding flour and buttermilk: With the mixer on low speed, add about one-third of the flour mixture, then half of the buttermilk, mixing just until combined. Repeat with another third of flour, the remaining buttermilk, and finally the last of the flour. Stop mixing as soon as the streaks of flour disappear.
- Assemble the cake: Gently spoon the batter over the persimmon layer. Use a spatula to spread it evenly, being careful not to disturb the fruit arrangement.
- Bake: Place the pan on the center rack and bake for 35 to 40 minutes, until a toothpick inserted into the center comes out clean or with a few moist crumbs. The top should be golden brown and spring back when lightly pressed.
- Cool and flip: Let the cake cool in the pan on a wire rack for exactly 10 minutes. After 10 minutes, run a knife around the edge of the pan. Place a serving plate upside down over the pan, then carefully flip the whole thing over. Lift the pan off slowly. If any persimmon slices stick, nudge them back into place with a spatula.
- Serve warm or at room temperature: Sprinkle with flaky sea salt if using. Add a dollop of whipped cream or a scoop of vanilla ice cream if desired.
Notes
Watch the caramel closely as it can go from perfect to burnt in seconds. Use Hachiya persimmons that are very soft (like a water balloon) for best results. Let the cake rest exactly 10 minutes before flipping. The cake tastes even better on day two as the caramel continues to soak in.
Nutrition
- Serving Size: 1 slice
- Calories: 320
- Sugar: 32
- Sodium: 180
- Fat: 14
- Saturated Fat: 8
- Carbohydrates: 47
- Fiber: 3
- Protein: 4
Keywords: persimmon upside-down cake, caramel cake, fall dessert, easy cake recipe, sticky caramel cake


