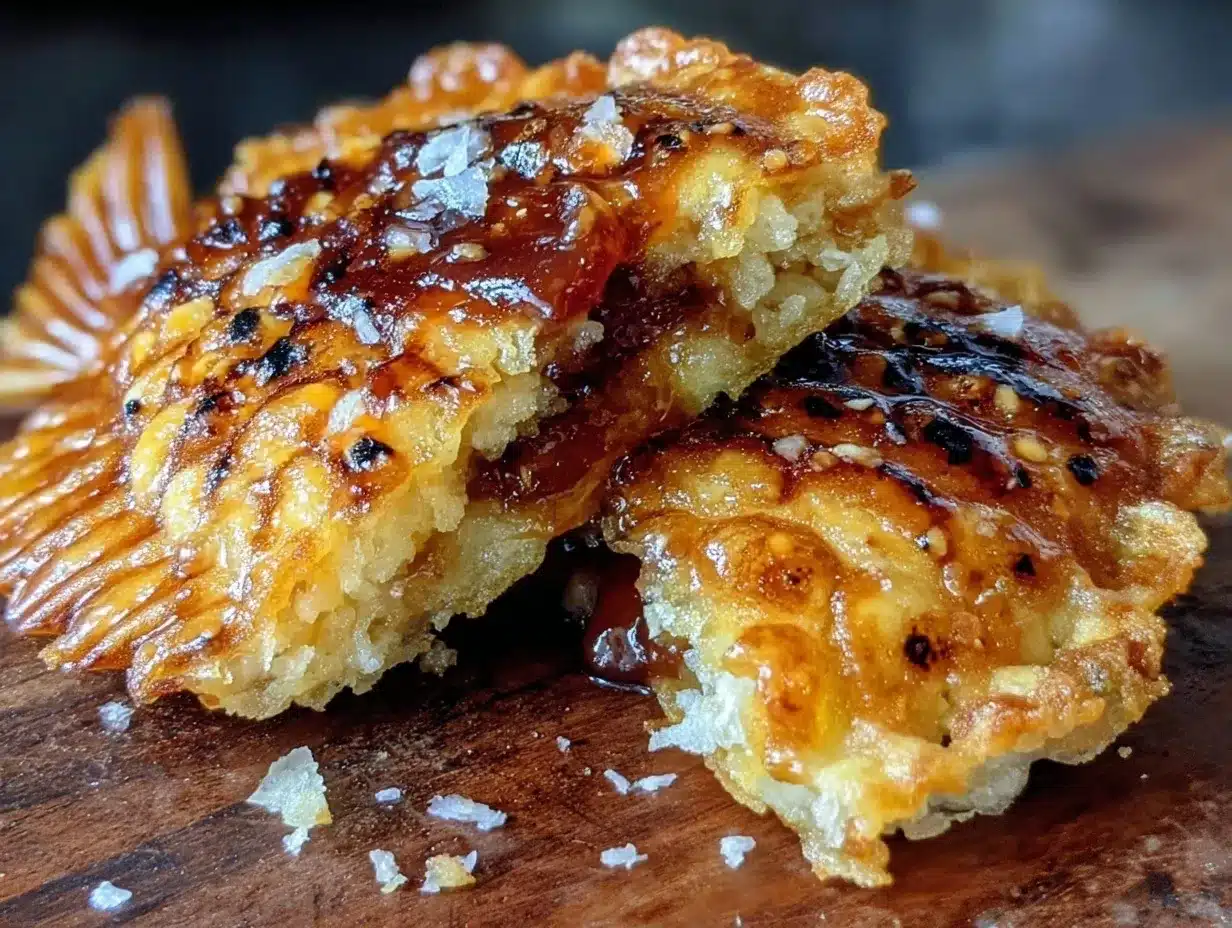
It was one of those chilly Sunday afternoons when I found myself wandering through a bustling street market, the kind where every stall seems to tell a story. The air was filled with the tempting smells of grilled meats, sweet syrups, and something else — a warm, toasty scent that immediately caught my attention. I followed that smell to a small vendor flipping fish-shaped cakes on a griddle. Curious, I asked about them and learned they were called Taiyaki, traditional Japanese treats filled with sweet red bean paste. Honestly, I was skeptical at first — fish-shaped cakes? But one bite later, I was hooked. The crisp exterior gave way to a soft, sweet center that honestly felt like a little moment of joy in my hectic week.
Back home, I couldn’t shake the craving for those crispy Taiyaki fish-shaped cakes with sweet red bean filling. After a few trial runs — some messier than others — I finally landed on a recipe that nails that perfect crispy shell and that sweet, smooth filling without the fuss of specialty ingredients. What surprised me most was how straightforward it was to make these at home, even without a fancy Taiyaki pan (though I do recommend getting one if you want to get fancy). It’s become a bit of a weekend obsession, and honestly, it’s my go-to when I want a cozy, nostalgic treat that’s just a little different than your average dessert.
There’s something quietly satisfying about recreating this street snack in my own kitchen, especially knowing it’s handmade from scratch. It’s not just the flavor but the whole experience — the sizzle, the smell, and that satisfying crunch with every bite. That’s why this recipe has stuck with me, a small but sweet reminder that sometimes the best treats come from unexpected places and a bit of patience.
Why You’ll Love This Recipe
- Quick & Easy: Comes together in about 30 minutes, perfect for an afternoon snack or last-minute dessert craving.
- Simple Ingredients: Uses pantry basics like flour, eggs, and canned sweet red bean paste — no exotic shopping needed.
- Perfect for Cozy Gatherings: Ideal for sharing at casual get-togethers or a fun cooking project with family or friends.
- Crowd-Pleaser: Kids and adults alike love the crispy texture combined with the gentle sweetness of the red bean filling.
- Authentic Yet Adaptable: This recipe captures the traditional flavor with a homemade touch, and you can easily swap fillings to suit your taste.
- Special Technique: The secret lies in the batter’s thickness and the right cooking temperature to get that perfect crispiness without burning.
- Emotional Connection: It’s a recipe that brings a little piece of Japanese street food culture into your kitchen, making dessert time feel special and comforting.
What Ingredients You Will Need
This recipe uses simple, wholesome ingredients to deliver bold flavor and satisfying texture without the fuss. Most of these are pantry staples, and you can find sweet red bean paste at most Asian grocery stores or online. Here’s what you’ll need:
- All-purpose flour – 1 cup (120 g), for the light and tender batter
- Baking powder – 1 tsp, to give the cakes a slight rise and fluffiness
- Granulated sugar – 2 tbsp, for a hint of sweetness in the batter
- Egg – 1 large (room temperature), adds richness and helps bind the batter
- Milk – 3/4 cup (180 ml), use whole or 2% for best texture; dairy-free milk works too
- Vegetable oil – 1 tbsp, plus extra for greasing the pan
- Sweet red bean paste (anko) – about 1/2 cup (150 g), smooth or chunky depending on preference
Ingredient tips: Look for firm, small-curd red bean paste for that authentic texture. If you want to try something different, custard or chocolate can be fun swaps. For a gluten-free version, substitute the flour with a 1:1 gluten-free blend, but the texture will be slightly different.
Equipment Needed
- Taiyaki pan: The classic choice, fish-shaped with hinged sides for flipping. If you don’t have one, a waffle iron or a small cast-iron skillet can work in a pinch, but the shape won’t be quite the same.
- Mixing bowls: For combining your batter and ingredients.
- Whisk or fork: To mix the batter until smooth.
- Spoon or piping bag: For filling the batter and red bean paste neatly into the pan.
- Spatula or tongs: Helpful for flipping the cakes safely.
Personally, I started with a budget-friendly cast iron Taiyaki pan — it’s a great option if you want to test the waters before investing in an electric model. Make sure to oil your pan lightly before each batch to avoid sticking. A silicone brush works wonders here.
Preparation Method
- Mix dry ingredients: In a medium bowl, sift together 1 cup (120 g) all-purpose flour, 1 tsp baking powder, and 2 tbsp granulated sugar. This ensures the batter is smooth and free of lumps. (Approx. 3 minutes)
- Combine wet ingredients: In a separate bowl, whisk 1 large room-temperature egg, 3/4 cup (180 ml) milk, and 1 tbsp vegetable oil until fully blended. (Approx. 2 minutes)
- Create the batter: Slowly pour the wet ingredients into the dry mix, stirring gently with a whisk or fork until just combined. The batter should be thick but pourable — similar to pancake batter. Avoid overmixing, or the cakes may turn dense. (Approx. 2 minutes)
- Preheat the Taiyaki pan: Place your Taiyaki pan over medium heat, lightly greasing both sides with vegetable oil. Heat for about 3-4 minutes until hot but not smoking.
- Fill the pan: Pour about 2 tablespoons of batter into one side of the fish mold, spreading slightly to cover the base. Add about 1 tablespoon of sweet red bean paste in the center, then cover with another 2 tablespoons of batter to encase the filling. (Approx. 3 minutes)
- Cook the cakes: Close the pan and cook for 3-4 minutes on one side. Flip carefully using tongs or a spatula and cook for another 3-4 minutes until both sides are golden brown and crispy. You should hear a pleasant sizzle, and the aroma will intensify. (Approx. 8 minutes)
- Check for doneness: The Taiyaki should be crisp on the outside with no wet batter spots. If it’s browning too fast, lower the heat slightly to prevent burning. (Approx. 1 minute)
- Remove and cool: Transfer the cakes to a wire rack to cool for a few minutes before serving — this keeps them from getting soggy. (Approx. 5 minutes)
Pro tip: Don’t overcrowd the pan. Cook one or two cakes at a time for even heat distribution and crispiness. Also, if you notice the red bean paste oozing out, reduce the filling slightly next time.
Cooking Tips & Techniques
Getting Taiyaki just right can be a bit of a dance, but once you catch the rhythm, it’s pure fun. One key is temperature control — too hot, and the batter burns before the inside cooks; too low, and you lose that crispness. I learned the hard way that medium heat is your friend here. Patience is key: resist the urge to peek or flip too soon.
Another tip is batter consistency. Too thin, and the cakes will be floppy; too thick, and they’ll be dense. If your batter feels off, add a little milk to loosen it or a touch more flour to thicken. I found a whisk works better than a spoon to avoid lumps.
When adding the sweet red bean paste, keep it centered and don’t overfill. It should be a sweet surprise inside, not a messy spill. Using a small spoon or piping bag helps with neatness.
Finally, flipping the Taiyaki pan can be tricky at first. Use tongs or a sturdy spatula and move gently. Over time, you’ll develop a feel for it — and trust me, the satisfying “flip” sound never gets old!
Variations & Adaptations
- Flavor swaps: Try custard, Nutella, or sweet potato puree as alternative fillings for a new twist on tradition.
- Dietary adjustments: Use almond flour or gluten-free blends to make these gluten-free. Swap dairy milk for oat or almond milk for a dairy-free version.
- Cooking methods: Don’t have a Taiyaki pan? A waffle iron or even a sandwich press can work — just expect a different shape and texture.
- Seasonal touches: In summer, add fresh or frozen berries mixed with a little sugar to the filling for a fruity surprise.
- Personal favorite: I once added a sprinkle of cinnamon to the batter and a dab of cream cheese with the red bean paste. It was unexpectedly delicious and creamy!
Serving & Storage Suggestions
Serve Taiyaki warm or at room temperature for the best experience. They pair beautifully with a cup of green tea or a light coffee. For a playful presentation, arrange them on a wooden platter with a sprinkle of powdered sugar or a drizzle of sweet syrup.
To store, keep the cakes in an airtight container at room temperature for up to a day. For longer storage, refrigerate and reheat gently in a toaster oven or skillet to regain crispiness. Freezing is possible but may soften the texture upon thawing.
Flavors actually deepen after a few hours, so if you can wait, Taiyaki can taste even better the next day — just be sure to revive that crunch before serving.
Nutritional Information & Benefits
Each Taiyaki fish-shaped cake contains roughly 150-180 calories, depending on the size and filling amount. The recipe offers a nice balance of carbs and protein from the flour and egg, with fiber and antioxidants coming from the red bean paste. Red beans are known for their heart-healthy benefits and are a natural source of iron and magnesium.
This recipe is naturally low in fat, especially if you use a light oil and minimal sugar. It’s an approachable treat for those mindful of ingredients but still craving something sweet and comforting. Just a heads-up: it contains gluten and eggs, so it’s not suitable for all allergies.
Conclusion
Making crispy Taiyaki fish-shaped cakes with sweet red bean filling at home brings a little magic to your kitchen. It’s a recipe that’s approachable, fun, and genuinely rewarding — especially when you see those golden, perfectly shaped cakes come out crisp and warm. I love how it turns an ordinary afternoon into a comforting moment that feels both playful and nostalgic.
Feel free to tweak the filling or batter to make it yours — that’s part of the joy. Whether you’re new to Taiyaki or a seasoned fan, this recipe is a great way to bring a taste of Japanese street food culture to your table.
Give it a try, and don’t be shy about sharing your own twists or questions. I’m always excited to hear how these little fish-shaped treats find a place in your kitchen.
FAQs
What if I don’t have a Taiyaki pan?
You can use a waffle iron or sandwich press as alternatives, though the shape won’t be the same. Cooking times may vary slightly, so keep an eye on the batter crisping.
Can I make the sweet red bean paste from scratch?
Absolutely! Cooking azuki beans with sugar until soft and mashed is traditional, but store-bought paste saves time and is just as delicious.
How do I keep the Taiyaki crispy after cooking?
Cool them on a wire rack to prevent sogginess and avoid stacking while warm. Reheat gently in a toaster oven or skillet to bring back crispness.
Can I freeze Taiyaki for later?
Yes, you can freeze them wrapped well in plastic wrap and stored in an airtight container. Thaw and reheat in an oven or skillet to restore texture.
Is there a vegan version of this recipe?
Try swapping eggs for a flax or chia seed “egg” and using plant-based milk. Use a vegan red bean paste or make your own without animal products.
Pin This Recipe!

Crispy Taiyaki Fish-Shaped Cakes Recipe Easy Homemade Sweet Red Bean Filling

A quick and easy recipe for crispy Japanese Taiyaki fish-shaped cakes filled with sweet red bean paste, perfect for a cozy snack or dessert.
- Prep Time: 10 minutes
- Cook Time: 20 minutes
- Total Time: 30 minutes
- Yield: 4 servings 1x
- Category: Dessert
- Cuisine: Japanese
Ingredients
- 1 cup (120 g) all-purpose flour
- 1 tsp baking powder
- 2 tbsp granulated sugar
- 1 large egg (room temperature)
- 3/4 cup (180 ml) milk (whole or 2%, dairy-free milk works too)
- 1 tbsp vegetable oil, plus extra for greasing the pan
- 1/2 cup (150 g) sweet red bean paste (anko), smooth or chunky
Instructions
- Mix dry ingredients: In a medium bowl, sift together all-purpose flour, baking powder, and granulated sugar until smooth and lump-free.
- Combine wet ingredients: In a separate bowl, whisk the egg, milk, and vegetable oil until fully blended.
- Create the batter: Slowly pour the wet ingredients into the dry mix, stirring gently until just combined. The batter should be thick but pourable.
- Preheat the Taiyaki pan: Place the pan over medium heat, lightly greasing both sides with vegetable oil. Heat for 3-4 minutes until hot but not smoking.
- Fill the pan: Pour about 2 tablespoons of batter into one side of the fish mold, spread slightly. Add about 1 tablespoon of sweet red bean paste in the center, then cover with another 2 tablespoons of batter.
- Cook the cakes: Close the pan and cook for 3-4 minutes on one side. Flip carefully and cook for another 3-4 minutes until both sides are golden brown and crispy.
- Check for doneness: Ensure the Taiyaki is crisp on the outside with no wet batter spots. Adjust heat if browning too fast.
- Remove and cool: Transfer the cakes to a wire rack to cool for a few minutes before serving.
Notes
Use medium heat to avoid burning the batter. Don’t overcrowd the pan; cook one or two cakes at a time for even crispiness. Adjust batter thickness with milk or flour as needed. Center the red bean paste and avoid overfilling to prevent oozing. Cool on a wire rack to keep crispiness.
Nutrition
- Serving Size: 1 Taiyaki fish-shape
- Calories: 150180
- Sugar: 8
- Sodium: 120
- Fat: 5
- Saturated Fat: 1
- Carbohydrates: 28
- Fiber: 3
- Protein: 4
Keywords: Taiyaki, fish-shaped cakes, sweet red bean paste, Japanese dessert, crispy cakes, homemade Taiyaki, easy dessert