Let me tell you, the scent of fresh raspberries mingling with zesty lemon wafting from my kitchen is enough to make anyone’s mouth water. The first time I baked these creamy raspberry lemon bars, I was instantly hooked—the kind of moment where you pause, take a deep breath, and just smile because you know you’re onto something truly special. I remember being knee-high to a grasshopper, watching my grandma whip up lemony desserts that instantly brightened any gloomy afternoon, and years ago, I stumbled upon this recipe while trying to recreate that same nostalgic magic on a rainy weekend.
Honestly, my family couldn’t stop sneaking these bars off the cooling rack (and I can’t really blame them). There’s something about that perfect creamy texture combined with the tangy freshness of raspberry and lemon that makes this dessert dangerously easy to love. Whether you’re looking for a sweet treat to brighten up your Pinterest cookie board or a show-stopping dessert for potlucks, these lemon bars tick all the boxes. After testing this recipe multiple times in the name of research, of course, it quickly became a staple for family gatherings and gifting. It feels like a warm hug in dessert form, and trust me—you’re going to want to bookmark this one.
Why You’ll Love This Creamy Raspberry Lemon Bars Recipe
Coming from countless kitchen experiments and family feedback, this creamy raspberry lemon bars recipe is a winner in so many ways. I’ve tested it time and again to make sure it’s just right, and here’s why you’ll adore it:
- Quick & Easy: Comes together in under 45 minutes, perfect for busy weeknights or last-minute dessert cravings.
- Simple Ingredients: No fancy grocery trips needed; you likely already have everything in your pantry and fridge.
- Perfect for Any Occasion: Whether it’s brunch, a picnic, or a casual dinner party, these bars steal the show without extra fuss.
- Crowd-Pleaser: Kids and adults alike keep asking for more—there’s just something about that creamy, tangy combo.
- Unbelievably Delicious: The smooth cream layer balances the bright raspberry-lemon topping with a texture and flavor combo that feels next-level.
What really sets this recipe apart is the perfectly balanced tangy freshness from real lemon juice and raspberries, combined with a creamy filling that’s not too sweet but rich enough to satisfy. I use a special trick of folding in a touch of cream cheese for ultra-smooth texture, which honestly lifts this recipe from “nice” to “wow.” You know what? This isn’t just another lemon bar recipe—it’s your best version, the one you’ll be coming back to again and again.
This dessert isn’t just good—it’s the kind that makes you close your eyes after the first bite and savor that zing. It’s comfort food reimagined: fresh, bright, and creamy all at once. Perfect for impressing guests without breaking a sweat, or turning an ordinary day into a sweet celebration.
What Ingredients You Will Need
This recipe uses simple, wholesome ingredients to deliver bold flavor and satisfying texture without the fuss. Most are pantry staples, and the fresh raspberries and lemons bring that seasonal brightness that makes these bars unforgettable.
- For the crust:
- 1 ½ cups (190g) all-purpose flour (I recommend King Arthur for the best texture)
- ½ cup (115g) unsalted butter, softened (adds richness and buttery flavor)
- ¼ cup (50g) granulated sugar
- Pinch of salt
- For the creamy filling:
- 8 oz (225g) cream cheese, softened (for that luscious creaminess)
- ½ cup (100g) granulated sugar
- 2 large eggs, room temperature
- Juice and zest of 2 medium lemons (about ¼ cup or 60ml juice; this is where the tang shines)
- 1 tsp vanilla extract
- For the raspberry topping:
- 1 cup (125g) fresh raspberries (in summer, swap in fresh berries; frozen work too but drain thawed ones)
- 2 tbsp powdered sugar (optional, for dusting or extra sweetness)
If you’re dairy-free, swap cream cheese with dairy-free coconut cream cheese, and use dairy-free butter alternatives. For a gluten-free option, almond flour works well for the crust but expect a slightly different texture. Just make sure to pick firm, ripe raspberries for best flavor and texture—soft or mushy berries can make the topping watery.
Equipment Needed
- 9×9-inch (23×23 cm) baking pan — I use a glass pan for even baking but a metal pan works fine too.
- Mixing bowls — one large and one medium-sized is ideal.
- Electric mixer or hand whisk — electric mixer makes the creamy filling smooth and easy.
- Zester or fine grater — for lemon zest.
- Measuring cups and spoons — accuracy is key in baking.
- Rubber spatula — great for scraping down the bowl and folding ingredients.
- Fine mesh sieve (optional) — if you want to dust powdered sugar evenly on top.
If you don’t have a zester, a microplane or even the fine side of a box grater works. I recommend investing in a good electric mixer if you bake often; it saves so much time and effort. For budget-friendly options, silicone spatulas and glass pans work great and last for years with proper care. Just hand wash and dry your tools promptly to keep them in top shape.
Preparation Method
- Preheat your oven to 350°F (175°C). Line your 9×9-inch baking pan with parchment paper, leaving an overhang on the sides for easy removal later. This step saves you from a sticky situation!
- Make the crust: In a large bowl, combine 1 ½ cups all-purpose flour, ¼ cup granulated sugar, and a pinch of salt. Add the softened butter and use your fingers or a pastry cutter to mix until the mixture resembles coarse crumbs. Press this evenly into the bottom of your prepared pan. I like to use the bottom of a glass or measuring cup to get it nice and compact. Bake for 15 minutes or until the edges are lightly golden.
- Prepare the creamy filling: While the crust bakes, in a medium bowl, beat the softened cream cheese and ½ cup sugar until smooth and fluffy, about 2-3 minutes using an electric mixer. Add the eggs one at a time, beating well after each addition.
- Add lemon zest and juice: Stir in the freshly grated zest and ¼ cup lemon juice, along with 1 tsp vanilla extract. Mix just until combined; overmixing can make the filling tough. The mixture should be silky and pourable, with that unmistakable bright aroma.
- Pour the filling over the baked crust: Carefully spread the creamy lemon mixture evenly over the warm crust. Gently scatter your fresh raspberries on top, pressing them slightly into the filling but not stirring.
- Bake again: Return the pan to the oven and bake for another 20-25 minutes, or until the filling is set but still slightly jiggly in the center. A toothpick inserted should come out mostly clean with a few moist crumbs.
- Cool and chill: Let the bars cool completely at room temperature, then refrigerate for at least 2 hours—or overnight if you can wait! This chilling step is crucial for that creamy, sliceable texture.
- Slice and serve: Use the parchment overhang to lift the bars out of the pan. Cut into 12 squares with a sharp knife, wiping the blade between cuts for neat edges. Dust with powdered sugar if you like, and serve chilled or at room temperature.
Pro tip: If your crust edges brown too quickly, tent the pan loosely with foil during baking. And don’t skip the refrigeration—it really sets the cream filling perfectly.
Cooking Tips & Techniques
This recipe benefits from a few tried-and-true baking tricks I’ve learned over time. First, always use room temperature eggs and cream cheese to avoid lumps and ensure smooth filling. When mixing the batter, don’t rush—beat cream cheese and sugar until fluffy to get that light, creamy texture.
Another tip: zest your lemons before juicing them to avoid losing any aromatic oils. For raspberries, handle gently—they bruise easily and can make the topping watery if overmixed.
Watch your baking times closely. Overbaking can dry out the filling or crack the surface, while underbaking leaves it too loose. When the edges are set but the center still jiggles slightly, you’re right on the money.
Multitasking tip: prepare the crust while the oven preheats, then mix the filling during the crust’s bake time. Efficient and saves you waiting around.
Lastly, for easier slicing, chill the bars well and use a hot, clean knife—dip the blade in hot water and wipe dry between cuts for cleaner edges.
Variations & Adaptations
Want to mix things up? Here are some tasty twists you can try:
- Berry Swap: Substitute raspberries with blueberries, blackberries, or even chopped strawberries for a different berry burst.
- Gluten-Free: Use almond flour or a gluten-free flour blend for the crust to accommodate gluten sensitivities. The texture will be slightly denser but still delicious.
- Dairy-Free: Replace cream cheese with a dairy-free alternative like cashew cream or coconut cream cheese, and swap butter for a plant-based spread.
- Herbal Hint: Add a teaspoon of finely chopped fresh thyme or basil to the filling for a subtle herbal lift that pairs beautifully with lemon.
- Chocolate Drizzle: Once cooled, drizzle melted dark chocolate over the bars for a decadent finish that pairs surprisingly well with the tartness.
I once tried adding a splash of limoncello to the filling for an adult-only version. The results? Pure magic, with a little boozy zing that made these bars a party favorite.
Serving & Storage Suggestions
These creamy raspberry lemon bars are best served chilled or at room temperature. I like to plate them with a sprig of fresh mint or a few whole raspberries on the side for a pretty presentation that’s perfect for brunch tables or dessert platters.
Pair these bars with a cup of hot tea or a glass of sparkling lemonade to complement the tangy freshness. They also work beautifully alongside light salads or grilled chicken for a casual summer meal.
For storage, keep the bars in an airtight container in the refrigerator for up to 4 days. They hold up well frozen too—wrap tightly and freeze for up to 2 months. To reheat, simply thaw in the fridge overnight and serve chilled or at room temp. Flavors tend to deepen after a day, so if you can wait, it’s worth it!
Nutritional Information & Benefits
Each creamy raspberry lemon bar contains approximately 180 calories, with 8 grams of fat, 25 grams of carbs, and 3 grams of protein per serving (based on 12 bars). The fresh raspberries add a boost of antioxidants and vitamin C, while the lemon juice contributes a refreshing dose of vitamin C and aids digestion.
This dessert is a lighter option compared to many traditional bars, thanks to the fresh fruit and tangy lemon cutting through the richness. If you’re mindful of sugar, you can reduce the amount slightly or swap regular sugar for coconut sugar or a natural sweetener.
For those with allergies, this recipe contains dairy, eggs, and gluten (unless adapted). However, it’s easy to adjust for many dietary needs without losing that signature creamy tang.
Conclusion
Honestly, these creamy raspberry lemon bars are a keeper—bright, tangy, and creamy all at once. If you’ve been hunting for a dessert recipe that feels special but comes together without fuss, this one’s for you. Feel free to make it your own with different berries or a little chocolate drizzle. I love this recipe because it reminds me of family, sunshine, and those simple moments that make life sweeter.
Give it a try and let me know how yours turn out! Don’t forget to share your tweaks or questions in the comments—I’m always excited to hear your stories. Here’s to many delicious, tangy bites ahead!
FAQs About Creamy Raspberry Lemon Bars
Can I use frozen raspberries instead of fresh?
Yes, but make sure to thaw and drain them well to avoid excess moisture, which can make the bars soggy.
How do I get the filling to be perfectly creamy and smooth?
Use room temperature cream cheese and eggs, and beat the filling until fluffy but don’t overmix once the lemon juice is added to avoid a tough texture.
Can I make these bars ahead of time?
Absolutely! They actually taste better after chilling overnight, making them perfect for prepping a day ahead.
What’s the best way to store leftover bars?
Keep them in an airtight container in the fridge for up to 4 days, or freeze tightly wrapped for up to 2 months.
Can I make the crust gluten-free?
Yes, substitute with almond flour or a gluten-free blend, but expect a slightly different texture—still delicious though!
Pin This Recipe!

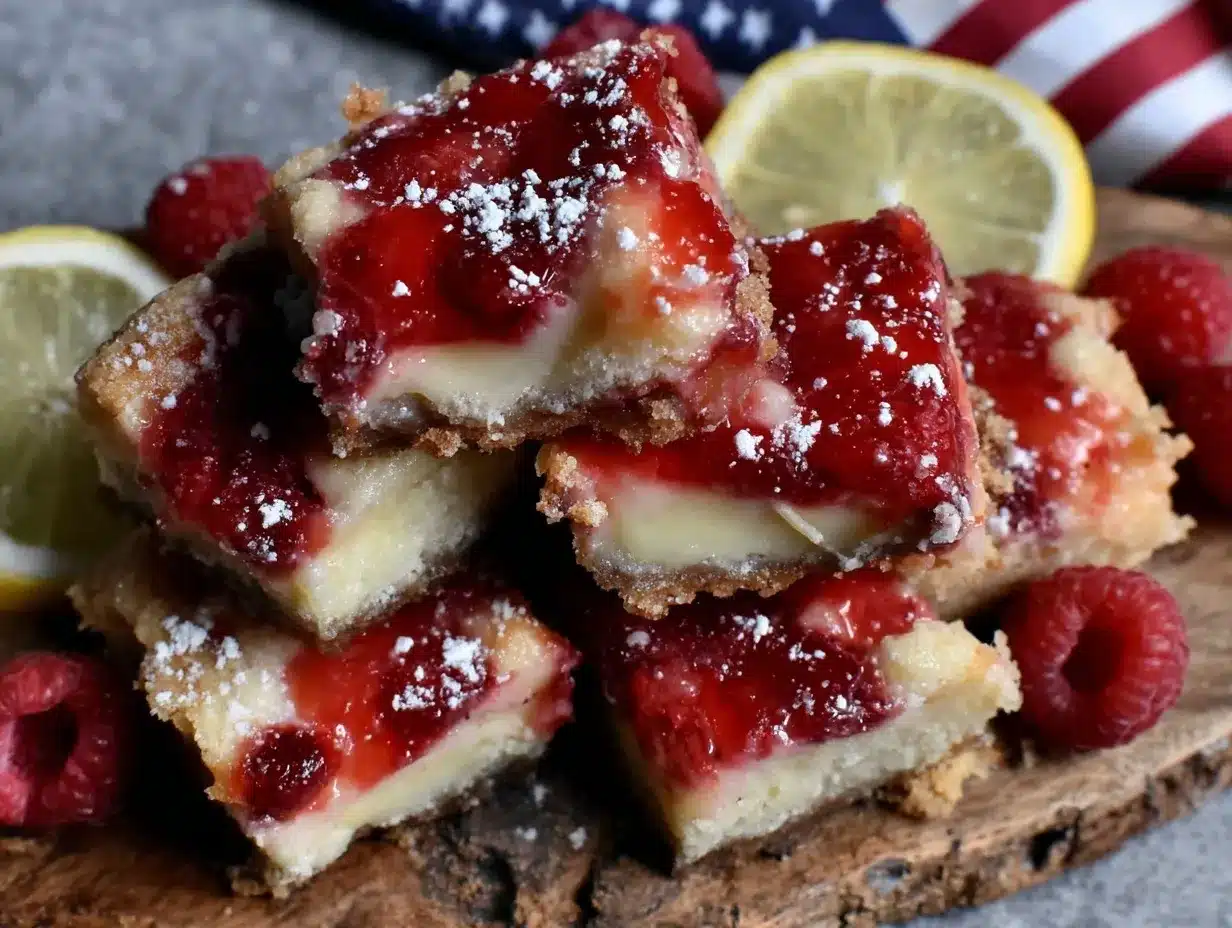
Creamy Raspberry Lemon Bars
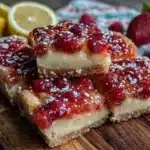
These creamy raspberry lemon bars combine a buttery crust with a luscious cream cheese filling and fresh raspberry topping for a tangy, easy-to-love dessert perfect for any occasion.
- Prep Time: 15 minutes
- Cook Time: 40 minutes
- Total Time: 2 hours 55 minutes
- Yield: 12 servings 1x
- Category: Dessert
- Cuisine: American
Ingredients
- 1 ½ cups (190g) all-purpose flour
- ½ cup (115g) unsalted butter, softened
- ¼ cup (50g) granulated sugar
- Pinch of salt
- 8 oz (225g) cream cheese, softened
- ½ cup (100g) granulated sugar
- 2 large eggs, room temperature
- Juice and zest of 2 medium lemons (about ¼ cup or 60ml juice)
- 1 tsp vanilla extract
- 1 cup (125g) fresh raspberries
- 2 tbsp powdered sugar (optional)
Instructions
- Preheat your oven to 350°F (175°C). Line a 9×9-inch baking pan with parchment paper, leaving an overhang on the sides for easy removal.
- Make the crust: In a large bowl, combine flour, granulated sugar, and salt. Add softened butter and mix until the mixture resembles coarse crumbs. Press evenly into the bottom of the prepared pan. Bake for 15 minutes or until edges are lightly golden.
- Prepare the creamy filling: In a medium bowl, beat cream cheese and sugar until smooth and fluffy, about 2-3 minutes. Add eggs one at a time, beating well after each addition.
- Add lemon zest, juice, and vanilla extract to the filling. Mix just until combined.
- Pour the filling over the baked crust. Scatter fresh raspberries on top, pressing slightly into the filling without stirring.
- Bake for another 20-25 minutes, or until the filling is set but slightly jiggly in the center.
- Cool bars completely at room temperature, then refrigerate for at least 2 hours or overnight.
- Use parchment overhang to lift bars from pan. Cut into 12 squares. Dust with powdered sugar if desired and serve chilled or at room temperature.
Notes
Use room temperature cream cheese and eggs for smooth filling. Avoid overmixing after adding lemon juice to prevent tough texture. Chill bars well before slicing for clean cuts. Tent pan with foil if crust edges brown too quickly. Frozen raspberries can be used if thawed and drained well.
Nutrition
- Serving Size: 1 bar (1/12th of rec
- Calories: 180
- Fat: 8
- Carbohydrates: 25
- Protein: 3
Keywords: raspberry lemon bars, creamy lemon bars, easy lemon dessert, homemade lemon bars, tangy dessert, raspberry dessert, lemon bars recipe