My sister texted me a photo last summer. It was a pan of something that looked suspiciously like a candy bar had melted into a sheet pan. “You need to make these,” she said. I squinted at my phone. The top was all crinkly chocolate, and the edges were jagged in a way that made me think of peanut brittle. I typed back, “What even is that?” Her response came in three separate messages: “Peanut butter. Pretzels. Chocolate. No oven.” I rolled my eyes. I mean, how good could something that simple actually be? I was picturing a sticky, overly sweet mess that would fall apart the second you tried to cut it.
For a week, that photo sat in my messages. And every time I scrolled past it, I found myself staring at that chocolate layer a little longer. The salty pretzel pieces peeking out from the bottom. The way the peanut butter filling looked almost fudgy. I finally caved on a Tuesday afternoon when the humidity was so thick you could chew it. I had all the ingredients—pretzels I’d bought for a party that never happened, a half-jar of peanut butter, and a bag of chocolate chips I was saving for a rainy day. I figured I’d make them, take one bite, and move on with my life.
I was wrong. I mean, really wrong. The first bite made me stop what I was doing—which is rare for me, honestly. I usually eat while scrolling or standing over the sink. But this one? It made me sit down. The crunch of the pretzel crust, the creamy-sweet peanut butter layer, and that snap of chocolate on top… it was the kind of bar that makes you close your eyes without meaning to. It wasn’t complicated. It wasn’t fancy. It was just exactly what a no-bake dessert should be. And honestly, that’s why it stuck.
Why You’ll Love This Recipe
Let me tell you straight up: I’ve tested this recipe six times. Six. The first batch vanished so fast at a family barbecue that I had to make another one just to confirm I hadn’t gotten lucky. (Spoiler: I hadn’t.) These bars are the real deal, and here’s why they keep showing up in my kitchen.
- No Oven Required: When it’s 90 degrees outside and your air conditioner is barely hanging on, the last thing you want to do is turn on the oven. These bars come together entirely on the stovetop and in the fridge. That’s it.
- Simple Ingredients: You probably have most of this stuff already. Pretzels, peanut butter, butter, powdered sugar, chocolate chips. No weird extracts or specialty flours. Just pantry staples doing their thing.
- Perfect for Parties: I brought these to a potluck last month, and three different people asked for the recipe before the main course even came out. They cut clean, they travel well, and they look way more impressive than the effort suggests.
- Crowd-Pleaser: Kids love the sweet-salty thing. Adults love that they’re not too heavy. Even my friend who “doesn’t really like sweet desserts” ate two.
- Unbelievably Delicious: The texture is what gets you. The pretzel crust stays crunchy. The peanut butter layer is soft but firm enough to hold its shape. And the chocolate topping cracks just a little when you bite into it.
What makes this recipe different from all the other no-bake bars out there? It’s the ratio. I spent three batches tweaking the pretzel-to-peanut butter-to-chocolate balance until it felt right. Not too sweet, not too salty, not so rich that you can only manage a tiny square. These bars hit that Goldilocks zone where one bar turns into two without you even noticing.
This is the kind of dessert you make when you want to impress people without stressing yourself out. It’s comfort food that doesn’t require a sweat session in the kitchen. And honestly? That’s my favorite kind of recipe.
What Ingredients You Will Need
This recipe uses pretty straightforward ingredients, but a few small choices can make a big difference. Here’s what you need and why each one matters.
For the Pretzel Crust
- 2 cups crushed pretzels (about 6 ounces) – Use salted pretzels here. The salt is crucial for balancing the sweetness. I like the classic mini twist pretzels, but pretzel sticks work too. Just crush them until you have a mix of fine crumbs and small chunks. You don’t want dust, but you also don’t want whole pretzels.
- 1/2 cup unsalted butter, melted – Butter binds the pretzel crumbs together. If you only have salted butter, just skip adding any extra salt to the crust.
- 2 tablespoons packed light brown sugar – This adds a tiny bit of sweetness and helps the crust hold together better than white sugar would.
For the Peanut Butter Layer
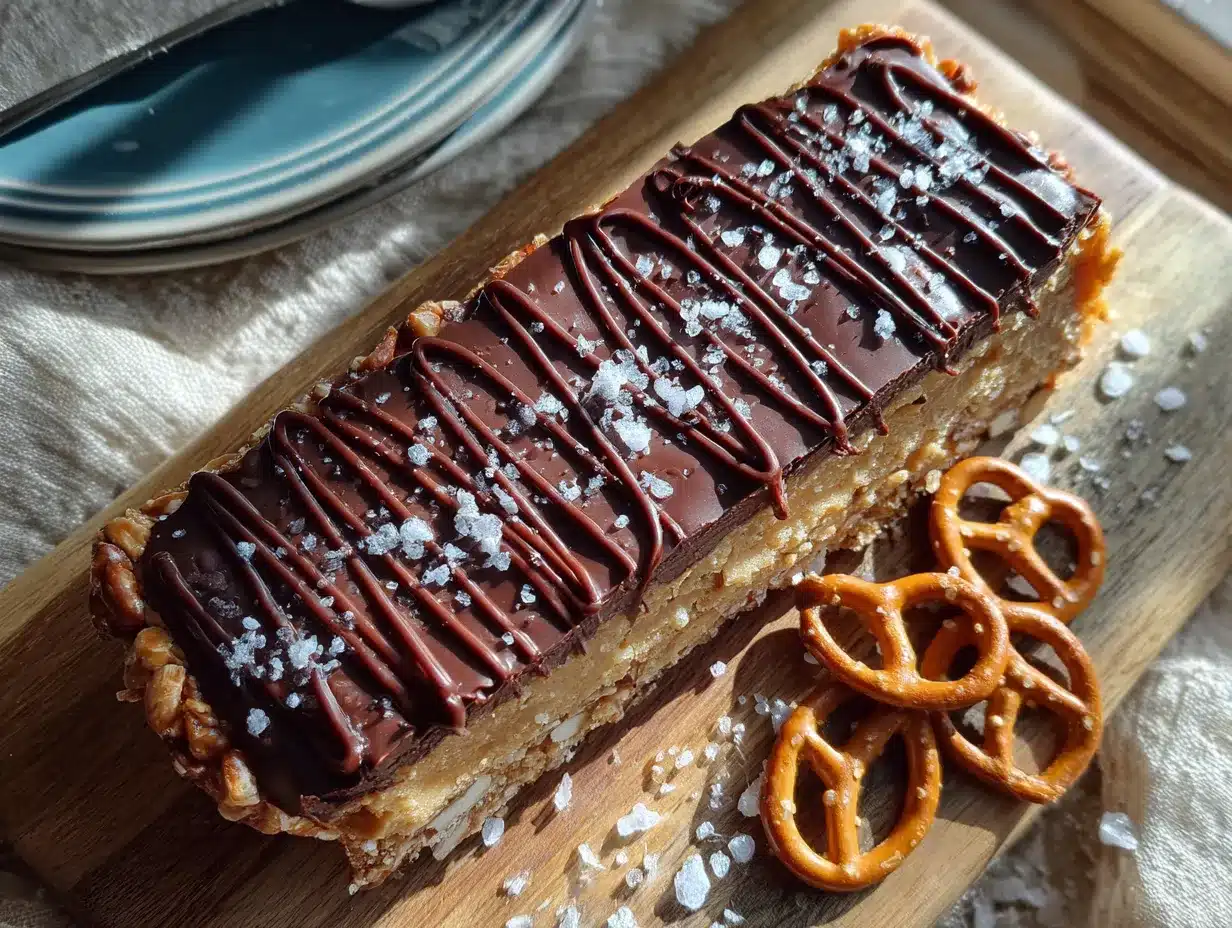
- 1 cup creamy peanut butter – I recommend Skippy or Jif for this one. Natural peanut butter that separates (the kind you have to stir) can make the filling grainy or oily. You want the stabilized stuff here for a smooth, firm layer.
- 1/2 cup unsalted butter, softened – Room temperature butter blends much more easily into the peanut butter and sugar.
- 1 1/2 cups powdered sugar – This sweetens the filling and gives it that soft, fudge-like texture.
- 1 teaspoon vanilla extract – Pure vanilla adds warmth. Imitation works fine too, but use a full teaspoon either way.
For the Chocolate Topping
- 1 1/2 cups semi-sweet chocolate chips – I prefer Ghirardelli or Guittard. Semi-sweet is the sweet spot because it’s not too sugary against the peanut butter. Milk chocolate works if you want it sweeter, and dark chocolate (60-70%) is great if you like a more grown-up flavor.
- 2 tablespoons coconut oil or vegetable shortening – This helps the chocolate melt smoothly and gives it that nice snap when you cut into it. Coconut oil adds a very subtle flavor that I actually love with the peanut butter, but shortening is completely neutral.
Optional Garnish
- Flaky sea salt – A tiny sprinkle on top right after the chocolate sets makes these bars next-level. Trust me on this one.
- Extra crushed pretzels – Press a few into the chocolate before it sets for a prettier presentation.
Equipment Needed
You don’t need a fancy kitchen for these bars. Here’s what I use:
- 8×8-inch baking pan – This is the perfect size for these bars. A 9×9 works too, but the bars will be slightly thinner. Line it with parchment paper so you can lift the whole thing out easily.
- Food processor or zip-top bag – For crushing the pretzels. A food processor gives you more control over the texture. A zip-top bag and a rolling pin work great too—just make sure the bag doesn’t have any holes, or you’ll be sweeping pretzel dust off your floor (speaking from experience here).
- Medium microwave-safe bowl – For melting the chocolate. You can also use a double boiler if you’re fancy, but the microwave is faster.
- Electric hand mixer or stand mixer – For the peanut butter filling. You can mix it by hand with a spatula if your butter is really soft, but a mixer makes it much smoother.
- Spatula – For pressing the crust into the pan and spreading the chocolate. A rubber or silicone spatula is ideal.
- Measuring cups and spoons – Standard stuff. Nothing special here.
If you don’t have an electric mixer, just soften your butter really well and use a sturdy spatula. It’ll take a little more elbow grease, but the filling will come together just fine. And honestly, I’ve made these in a friend’s kitchen with a fork and a lot of determination. They still turned out great.
Preparation Method
Alright, let’s make these bars. The whole process takes about 20 minutes of active work, plus at least 2 hours of chilling time. Plan ahead so you’re not tempted to cut them too early—I’ve been there, and it’s a mess.
Step 1: Prep Your Pan
Line an 8×8-inch baking pan with parchment paper. Leave some overhang on two opposite sides—this creates handles for lifting the bars out later. If you don’t have parchment, you can grease the pan with butter, but the bars will be harder to remove cleanly.
Step 2: Make the Pretzel Crust
Crush your pretzels until you have a mix of fine crumbs and small pea-sized pieces. You want some texture here—not a powder. Measure out 2 cups of crushed pretzels. In a medium bowl, combine the crushed pretzels, melted butter, and brown sugar. Stir until every crumb is coated and the mixture looks like wet sand. Press this mixture firmly into the bottom of your prepared pan. I use the bottom of a measuring cup to really pack it down. A loose crust will fall apart when you cut the bars. Pop the pan in the fridge while you make the filling.
Step 3: Make the Peanut Butter Filling
In a large bowl, beat together the softened butter and peanut butter with an electric mixer on medium speed until smooth and combined—about 1 minute. Add the powdered sugar and vanilla extract. Start mixing on low so the sugar doesn’t fly everywhere (learned that one the hard way). Once it’s mostly combined, turn the mixer up to medium and beat for 2-3 minutes until the mixture is light, fluffy, and completely smooth. It should look like a thick frosting.
Step 4: Assemble the Filling Layer
Take the crust out of the fridge. Spoon the peanut butter mixture over the crust in dollops. Use a spatula to spread it evenly, going all the way to the edges. Take your time here—if you rush, you’ll pull up chunks of the crust. Press down gently as you spread to eliminate any air pockets. Return the pan to the fridge for 30 minutes. This step is important because it firms up the filling so the chocolate layer doesn’t sink in.
Step 5: Make the Chocolate Topping
In a microwave-safe bowl, combine the chocolate chips and coconut oil. Microwave in 30-second intervals, stirring well after each, until the chocolate is completely smooth and glossy. This usually takes about 1 1/2 to 2 minutes total. Don’t overheat it—chocolate burns easily and gets grainy. If you’re using a double boiler, just melt it gently over simmering water, stirring constantly.
Step 6: Top with Chocolate
Pour the melted chocolate over the chilled peanut butter layer. Tilt the pan gently to spread it evenly, or use a spatula. If you want to add extra crushed pretzels or flaky sea salt, sprinkle them on now while the chocolate is still wet. Place the pan back in the fridge for at least 2 hours, or until the chocolate is completely set and firm to the touch.
Step 7: Cut and Serve
Lift the entire block out of the pan using the parchment handles. Place it on a cutting board. Use a sharp knife to cut into squares—I usually go for 16 bars (4 rows by 4 rows). For clean cuts, wipe the knife clean between each slice. If the chocolate cracks a little, that’s normal and honestly kind of beautiful.
Cooking Tips & Techniques
I’ve made these bars enough times to know exactly where things can go wrong. Here’s what I’ve learned the hard way so you don’t have to.
Don’t skip the chilling steps. I know it’s tempting to rush, especially when you’re craving something sweet. But if you don’t chill the crust before adding the filling, the butter can soak into the pretzels and make them soggy. And if you don’t chill the filling before adding the chocolate, the warm chocolate can melt the peanut butter layer and create a muddy mess. Patience pays off here.
Crush your pretzels with intention. Too fine, and your crust will be dense and almost sandy. Too chunky, and the bars won’t hold together when you cut them. Aim for a mix of fine crumbs and small pieces about the size of a pea. I use a food processor and pulse about 8-10 times, then check the texture.
Use room temperature butter for the filling. Cold butter won’t blend smoothly into the peanut butter, and you’ll end up with little lumps. Leave your butter out for about 30 minutes before you start. If you forgot, you can microwave it for 5-10 seconds—just don’t melt it.
Press the crust firmly. This is the most common mistake I see. If your crust is loose, the bars will crumble when you try to cut them. I press mine down with the bottom of a glass or a measuring cup until it feels solid and compact.
Let the chocolate cool slightly before pouring. If your chocolate is piping hot, it can melt the peanut butter layer. Let it sit for 2-3 minutes after melting before you pour it over the filling. It should still be liquid but not steaming.
Cut with a warm knife for cleaner edges. Run your knife under hot water, dry it off, and then slice. The warmth helps the knife glide through the chocolate without cracking it. Wipe the knife clean between each cut.
Variations & Adaptations
One of the best things about this recipe is how easy it is to change up. Here are some variations I’ve tried and loved.
Gluten-Free Version: Just use gluten-free pretzels. Most major brands make them now, and they work exactly the same way. Everything else in the recipe is naturally gluten-free, so this is an easy swap.
Chocolate Peanut Butter Swirl: Instead of a solid chocolate top layer, pour about two-thirds of the melted chocolate over the filling. Drop spoonfuls of the remaining chocolate on top and swirl it with a knife. It looks gorgeous and gives you pockets of chocolate in every bite.
White Chocolate Version: Swap the semi-sweet chocolate chips for white chocolate. The sweetness is different—much more candy-like—but it’s a fun twist if you’re making these for kids. Add a few drops of peppermint extract to the white chocolate for a holiday version.
Add-In Ideas: Press mini chocolate chips, crushed peanuts, or even a few M&Ms into the top layer before the chocolate sets. I made a batch with crushed potato chips on top once (don’t judge), and it was ridiculously good.
Dairy-Free Adaptation: Use a vegan butter stick (like Earth Balance) and dairy-free chocolate chips. The coconut oil in the topping is already dairy-free, so that part is covered. Just make sure your pretzels don’t have any dairy ingredients—most don’t, but it’s worth checking.
If you’re a fan of no-bake desserts, you might also enjoy these fluffy strawberry mousse cups for another quick, crowd-pleasing treat. And if you’re in the mood for something a little more decadent, these cherry chocolate brownies are always a hit.
Serving & Storage Suggestions
These bars are best served cold, straight from the fridge. The crust stays crunchy, the filling is firm but creamy, and the chocolate has that satisfying snap. If you let them sit at room temperature for more than 15-20 minutes, the chocolate can get a little soft and the crust might start to lose its crunch. So keep them chilled until you’re ready to serve.
How to Serve: Arrange the bars on a platter and let them sit out for about 5 minutes before serving—just enough to take the chill off without losing the texture. For a fancier presentation, drizzle a little melted peanut butter over the top and add a sprinkle of flaky sea salt. They pair beautifully with a cold glass of milk, a hot cup of coffee, or even a scoop of vanilla ice cream on the side.
Storage: Store the bars in an airtight container in the refrigerator for up to 1 week. Layer them with parchment paper between each layer so they don’t stick together. I’ve found that they actually taste better on day two—the flavors meld together and the texture settles into something even more perfect.
Freezer Instructions: These bars freeze beautifully. Place the cut bars on a baking sheet and freeze until solid (about 1 hour). Transfer them to a freezer-safe container or zip-top bag, separating layers with parchment paper. They’ll keep for up to 3 months. To serve, thaw in the refrigerator for about 30 minutes, or eat them frozen for a crunchy, cold treat—I won’t judge.
Reheating: Honestly, I don’t recommend reheating these. They’re designed to be eaten cold. But if you want a slightly softer texture, let them sit at room temperature for 10 minutes before serving.
Nutritional Information & Benefits
Let’s be real: these are not health food. But they’re made with real ingredients, and that counts for something. Here’s the estimated nutritional breakdown for one bar (based on 16 servings):
| Nutrient | Amount Per Bar |
|---|---|
| Calories | 285 |
| Total Fat | 18g |
| Saturated Fat | 8g |
| Cholesterol | 20mg |
| Sodium | 220mg |
| Total Carbohydrates | 28g |
| Dietary Fiber | 2g |
| Sugars | 18g |
| Protein | 5g |
These bars provide about 5 grams of protein per serving thanks to the peanut butter, which also adds healthy monounsaturated fats. The pretzels offer a small amount of iron and B vitamins, and the dark chocolate (if you use it) is rich in antioxidants. That said, these are a treat—something to enjoy in moderation, not a daily snack. I personally love making them for weekends, parties, or any time I need a little sweet-salty pick-me-up.
If you’re looking for a lighter option, you might also like these mini lemon blueberry cheesecakes—they’re a bit lighter but still feel indulgent.
Frequently Asked Questions
Can I use natural peanut butter?
I don’t recommend it. Natural peanut butter that separates (the kind you have to stir) can make the filling grainy or oily. The stabilizers in processed peanut butter like Skippy or Jif help the filling set up firm and smooth. If you only have natural peanut butter, you can try it, but the texture won’t be the same.
Why did my crust fall apart?
This usually happens for one of two reasons: either you didn’t press the crust firmly enough into the pan, or you didn’t use enough butter. Make sure you’re really packing the crust down with the bottom of a glass or measuring cup. The mixture should feel like wet sand that holds its shape when squeezed.
Can I make these in a 9×13 pan?
You can, but the bars will be thinner. Double the recipe if you want them to be the same height. If you use a 9×13 pan with the original recipe amounts, reduce the chilling time slightly and expect thinner, more delicate bars.
How do I get clean cuts?
Use a sharp knife and wipe it clean between each slice. For extra-clean cuts, run your knife under hot water, dry it off, and then slice. The warmth helps the knife glide through the chocolate without cracking it. Also, make sure the bars are fully chilled—at least 2 hours in the fridge.
Can I skip the coconut oil in the chocolate?
You can, but the chocolate won’t have the same smooth, snappy texture. Without the coconut oil, the chocolate can be a little thicker and more prone to cracking when you cut it. If you don’t have coconut oil, vegetable shortening works exactly the same way.
Conclusion
These Easy No-Bake Peanut Butter Pretzel Bars are exactly the kind of recipe I keep coming back to. They’re simple enough to throw together on a Tuesday, but impressive enough to bring to a party. The salty crunch of the pretzel crust, the creamy peanut butter filling, and that glossy chocolate top—it’s a combination that just works.
What I love most about this recipe is how forgiving it is. You can swap in different chocolates, add your own toppings, or even double the batch for a crowd. It’s the kind of dessert that doesn’t require precision or stress. Just good ingredients, a little patience, and a pan to set it all in.
I’d love to hear how yours turn out. Did you add anything fun to the top? Use white chocolate instead? Leave a comment below and let me know—I read every single one. And if you’re looking for more no-fuss desserts, check out the full recipe collection for more ideas. Happy no-baking, friends!
Pin This Recipe!
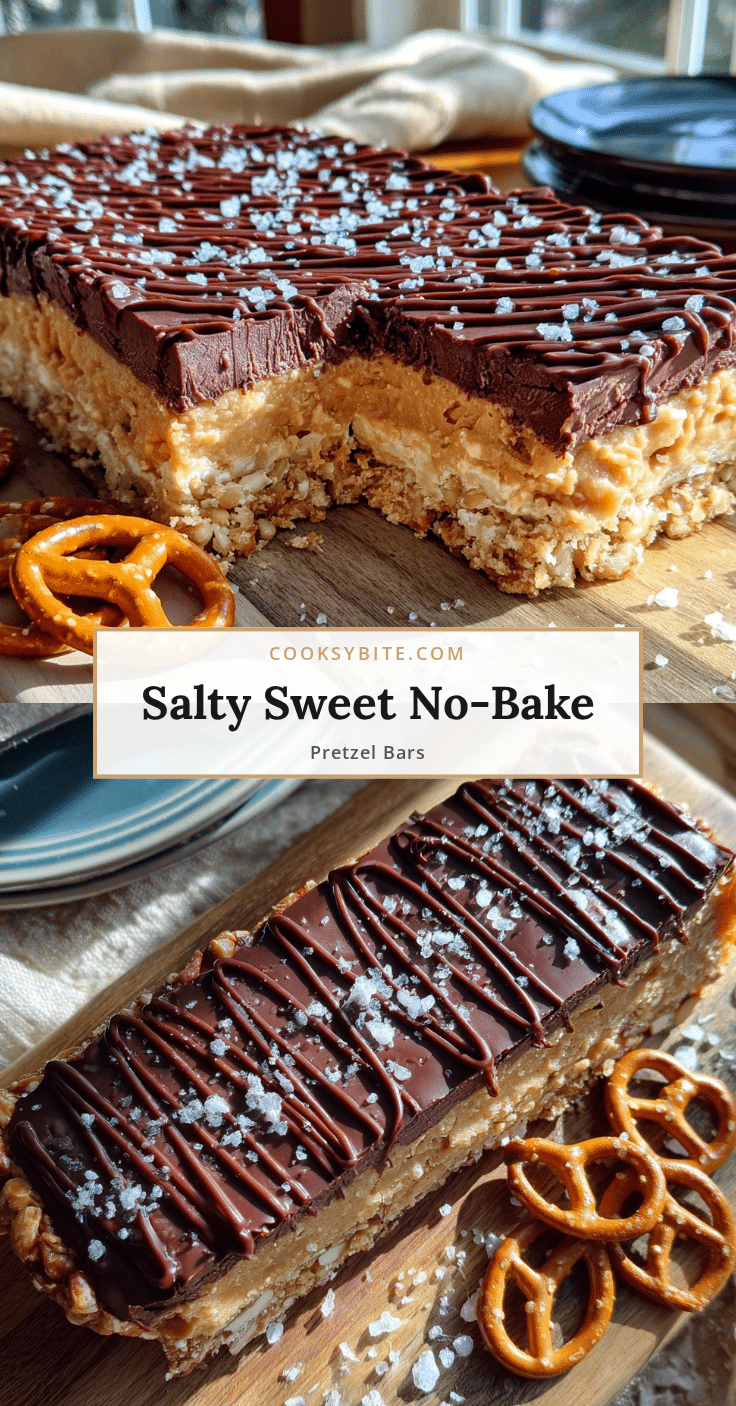
Best Easy No-Bake Peanut Butter Pretzel Bars Recipe
These no-bake peanut butter pretzel bars feature a crunchy pretzel crust, a creamy peanut butter filling, and a glossy chocolate topping. They’re the perfect sweet-and-salty treat that comes together in minutes without turning on the oven.
- Prep Time: 20 minutes
- Cook Time: 0 minutes
- Total Time: 2 hours 20 minutes (includes chilling)
- Yield: 16 bars 1x
- Category: Dessert
- Cuisine: American
Ingredients
- 2 cups crushed pretzels (about 6 ounces)
- 1/2 cup unsalted butter, melted
- 2 tablespoons packed light brown sugar
- 1 cup creamy peanut butter (e.g., Skippy or Jif)
- 1/2 cup unsalted butter, softened
- 1 1/2 cups powdered sugar
- 1 teaspoon vanilla extract
- 1 1/2 cups semi-sweet chocolate chips
- 2 tablespoons coconut oil or vegetable shortening
- Flaky sea salt (optional, for garnish)
- Extra crushed pretzels (optional, for garnish)
Instructions
- Line an 8×8-inch baking pan with parchment paper, leaving overhang on two opposite sides.
- Crush pretzels into a mix of fine crumbs and small pea-sized pieces. Measure 2 cups.
- In a medium bowl, combine crushed pretzels, melted butter, and brown sugar. Stir until coated. Press firmly into the bottom of the prepared pan using a measuring cup. Refrigerate while making the filling.
- In a large bowl, beat softened butter and peanut butter with an electric mixer on medium speed until smooth, about 1 minute.
- Add powdered sugar and vanilla extract. Mix on low until combined, then beat on medium for 2-3 minutes until light and fluffy.
- Remove crust from fridge. Spoon peanut butter mixture over crust and spread evenly to the edges. Return to fridge for 30 minutes.
- In a microwave-safe bowl, combine chocolate chips and coconut oil. Microwave in 30-second intervals, stirring after each, until smooth (about 1.5-2 minutes total). Let cool for 2-3 minutes.
- Pour melted chocolate over chilled peanut butter layer. Tilt pan to spread evenly. If desired, sprinkle with flaky sea salt or extra crushed pretzels.
- Refrigerate for at least 2 hours, until chocolate is completely set.
- Lift the block out using parchment handles. Cut into 16 squares with a sharp knife, wiping clean between cuts.
Notes
Don’t skip the chilling steps. Use room temperature butter for the filling. Press the crust firmly. Let chocolate cool slightly before pouring. For clean cuts, use a warm knife and wipe between slices.
Nutrition
- Serving Size: 1 bar
- Calories: 285
- Sugar: 18
- Sodium: 220
- Fat: 18
- Saturated Fat: 8
- Carbohydrates: 28
- Fiber: 2
- Protein: 5
Keywords: no-bake, peanut butter, pretzel, chocolate, bars, easy dessert, sweet and salty


