I was scrubbing flour off my counter when my phone buzzed. A text from my sister-in-law: “Are you holding out on me? Because I haven’t stopped thinking about those scones.” That was three days after I’d dropped off a batch at her place, just because. She’d eaten the last one cold, standing over her kitchen sink, and said it was the best thing I’d ever made. And honestly? I kind of agreed.
The thing is, I didn’t set out to create some kind of perfect maple pumpkin scone. I was just tired of dry, crumbly pumpkin scones that taste more like spice dust than actual pumpkin. You know the ones—they look pretty in the bakery case but fall apart the second you try to take a bite. I wanted something tender. Something that actually tasted like real maple syrup and roasted pumpkin, not a candle. And I definitely wanted a brown butter icing that didn’t just slide off the top like an afterthought.
So I started testing. First batch was too dense. Second batch was too sweet. Third batch—the one with the extra tablespoon of cold butter and a splash of heavy cream—that was the one. The scones came out golden, craggly on top, soft in the middle, and that brown butter icing soaked into the cracks just enough to make every bite feel a little bit dangerous. My husband ate three before I could even photograph them.
This recipe isn’t complicated. It doesn’t require a stand mixer or any special equipment. But it does ask you to brown butter, which is the kind of small effort that pays off in a big, nutty, almost caramel way. And it asks you to use real maple syrup, not the pancake stuff. Trust me on that one. The flavor is deep and cozy, like fall in a way that doesn’t try too hard.
So if you’ve been burned by dry scones before, or if you’re just looking for that one pumpkin recipe that actually delivers on flavor and texture—this is it. Let me show you how it’s done.
Why You’ll Love This Recipe
These maple pumpkin scones aren’t just another fall baking project. They’re the kind of thing you’ll make on a Sunday morning and find yourself thinking about on Tuesday afternoon. Here’s what makes them special:
- Perfectly tender texture — Thanks to cold butter and a gentle hand, these scones bake up soft and flaky, not dry or tough. No one likes a scone that crumbles into dust.
- Real maple flavor — We’re using actual maple syrup in both the scone dough and the icing. That warm, woodsy sweetness is unmistakable, and it pairs beautifully with earthy pumpkin and warm spices.
- Brown butter icing that actually sticks — Instead of a thin glaze that runs right off, this icing is thick, creamy, and made with browned butter for a nutty depth that takes these scones over the top.
- Simple ingredients — You probably already have most of what you need in your pantry. No weird extracts or hard-to-find flours. Just real food.
- Make-ahead friendly — You can prep the dough the night before and bake fresh scones in the morning. Your kitchen will smell incredible, and everyone will think you woke up at dawn.
- Crowd-pleaser approved — I’ve brought these to brunches, book clubs, and casual coffee dates. They disappear fast. Even people who claim they “don’t like scones” have asked for seconds.
- Better than bakery — Most bakery scones are made with shortening or heavy preservatives. These are homemade, with real butter, real pumpkin, and real love. You can taste the difference.
I’ve tested this recipe more times than I care to admit. I’ve tried different ratios of butter to flour, different types of pumpkin puree, different resting times. This version is the one that works every time. It’s forgiving enough for a beginner baker but satisfying enough for someone who’s been making scones for years. That’s the sweet spot, right there.
What Ingredients You Will Need
This recipe uses simple, wholesome ingredients that come together to create something truly special. Most of these are pantry staples, but a few key players make all the difference in flavor and texture.
For the Scones
- All-purpose flour — 2 ½ cups (315g). Spoon and level your flour for the most accurate measurement. Too much flour makes dense scones.
- Granulated sugar — ⅓ cup (65g). Just enough to sweeten without overwhelming the maple flavor.
- Baking powder — 1 tablespoon. Fresh baking powder is key here. If yours has been sitting in the cabinet for a year, it’s time to replace it.
- Salt — ½ teaspoon. Balances the sweetness and brings out the warm spices.
- Ground cinnamon — 1 teaspoon. Warm and essential.
- Ground ginger — ½ teaspoon. Adds a little zing.
- Ground nutmeg — ¼ teaspoon. Freshly grated if you have it.
- Ground cloves — ⅛ teaspoon. Just a pinch for depth.
- Cold unsalted butter — ½ cup (113g), cut into small cubes. This is non-negotiable. The butter must be cold so it creates flaky layers as it melts in the oven.
- Pumpkin puree — ½ cup (120g). Not pumpkin pie filling. I prefer Libby’s for consistent texture, but any pure pumpkin puree works. Pat it dry with a paper towel if it looks watery.
- Pure maple syrup — ¼ cup (60ml). Grade A dark amber is my go-to for the strongest maple flavor.
- Heavy cream — ¼ cup (60ml), plus more for brushing. The cream adds richness and helps create a tender crumb.
- Vanilla extract — 1 teaspoon. Pure, not imitation.
For the Brown Butter Icing

- Unsalted butter — ¼ cup (56g). You’ll brown this on the stovetop, which takes about 5 minutes and changes everything.
- Powdered sugar — 1 ½ cups (180g), sifted if lumpy.
- Pure maple syrup — 2 tablespoons (30ml). Adds sweetness and reinforces the maple flavor.
- Heavy cream or milk — 2 to 3 tablespoons (30-45ml), as needed for consistency.
- Vanilla extract — ½ teaspoon.
- Pinch of salt — Optional, but it balances the sweetness beautifully.
I recommend using a good-quality maple syrup here. I know it’s pricier, but the flavor difference is night and day. I’ve tried making these with a cheaper syrup, and honestly, the scones tasted flat. The brown butter helps, but the maple is really the star of this show.
Equipment Needed
You don’t need a fancy kitchen to make these scones. Here’s what you’ll need:
- Mixing bowls — A large one for dry ingredients and a medium one for wet ingredients.
- Pastry cutter or two forks — For cutting cold butter into the flour. You can also use your fingertips, but work quickly so the butter doesn’t warm up.
- Baking sheet — Line it with parchment paper for easy cleanup.
- Parchment paper or silicone baking mat — Prevents sticking and helps scones bake evenly.
- Bench scraper or sharp knife — For cutting the scone dough into wedges. A bench scraper is my favorite because it cuts cleanly without dragging.
- Small saucepan — For browning the butter. A light-colored pan helps you see the color change.
- Whisk and rubber spatula — For mixing the dough and the icing.
- Pastry brush — For brushing cream on top of the scones before baking.
- Cooling rack — Essential for letting the scones cool properly so the icing sets.
If you don’t have a pastry cutter, don’t worry. I’ve used two knives, a food processor (pulse carefully!), and even my hands. The goal is to get pea-sized butter pieces distributed throughout the flour. A food processor works great, but be careful not to over-process—you want visible butter bits, not a paste.
I also recommend a digital kitchen scale for accuracy, especially with flour. Measuring by volume can be inconsistent, and scones are one of those recipes where precision matters. But if you don’t have one, spoon your flour into the measuring cup and level it off. That’s the next best thing.
Preparation Method
Let’s make these scones. I’ll walk you through every step so you feel confident, even if you’ve never made scones before.
- Preheat your oven to 400°F (200°C). Position a rack in the center of the oven. Line a baking sheet with parchment paper.
- Whisk dry ingredients together. In a large bowl, combine 2 ½ cups (315g) all-purpose flour, ⅓ cup (65g) granulated sugar, 1 tablespoon baking powder, ½ teaspoon salt, 1 teaspoon cinnamon, ½ teaspoon ginger, ¼ teaspoon nutmeg, and ⅛ teaspoon cloves. Whisk until evenly distributed.
- Cut in the cold butter. Add ½ cup (113g) cold cubed butter to the flour mixture. Use a pastry cutter or two forks to cut the butter into the flour until the mixture resembles coarse meal with pea-sized butter pieces. Some larger bits are fine—they create flaky pockets. Work quickly so the butter stays cold. If the butter starts to soften, pop the bowl in the fridge for 5 minutes.
- Mix wet ingredients. In a separate medium bowl, whisk together ½ cup (120g) pumpkin puree, ¼ cup (60ml) maple syrup, ¼ cup (60ml) heavy cream, and 1 teaspoon vanilla extract. Make sure everything is well combined. The mixture will be thick and smooth.
- Combine wet and dry. Pour the wet ingredients into the dry ingredients. Use a rubber spatula to fold everything together gently. Stir just until the dough comes together—there should be no dry flour patches, but don’t overmix. Overmixing develops gluten and makes scones tough. The dough will look shaggy and a little sticky. That’s exactly what you want.
- Shape the dough. Turn the dough out onto a lightly floured surface. Gently bring it together with your hands, patting it into a ¾-inch thick round. Don’t knead it like bread—just press it into shape. If the dough is too sticky, dust your hands with a little flour. Use a bench scraper or sharp knife to cut the round into 8 wedges, like a pizza. For even wedges, cut the round in half, then each half into quarters.
- Chill the scones. Place the wedges on the prepared baking sheet, spacing them about 2 inches apart. Pop the baking sheet in the fridge for 15-20 minutes. This step is crucial—chilled scones hold their shape better and rise higher in the oven. If you’re short on time, 10 minutes is better than nothing. But 20 is ideal.
- Brush with cream. Right before baking, brush the tops of the scones with a little extra heavy cream. This gives them a golden, slightly crisp top. If you want a little sparkle, sprinkle a pinch of coarse sugar on top.
- Bake. Bake for 15-18 minutes, rotating the pan halfway through. The scones are done when they’re golden brown on the edges and firm to the touch. A toothpick inserted in the center should come out clean or with a few moist crumbs. Don’t overbake—they’ll continue to set as they cool.
- Cool completely. Transfer the scones to a cooling rack and let them cool completely before icing. If you ice them while they’re warm, the icing will melt and slide right off. I know it’s tempting, but patience pays off here.
- Make the brown butter icing. While the scones cool, make the icing. In a small light-colored saucepan, melt ¼ cup (56g) butter over medium heat. Swirl the pan occasionally. The butter will foam, then turn golden, then develop brown specks at the bottom. This takes about 5 minutes. Watch closely—it can go from brown to burnt very quickly. As soon as it smells nutty and looks amber, remove it from the heat and pour it into a heatproof bowl to stop the cooking.
- Finish the icing. Let the brown butter cool for 5 minutes. Then whisk in 1 ½ cups (180g) powdered sugar, 2 tablespoons (30ml) maple syrup, ½ teaspoon vanilla, and 2 tablespoons (30ml) heavy cream. Whisk until smooth. If the icing is too thick, add another tablespoon of cream. If it’s too thin, add a little more powdered sugar. The consistency should be thick but pourable—like a slightly runny peanut butter.
- Glaze the scones. Once the scones are completely cool, drizzle the icing over the tops. Use a spoon or a piping bag. Let the icing set for 10-15 minutes before serving. If you’re impatient like me, you can eat them right away—the icing just won’t be as firm.
And that’s it. You’ve just made perfect maple pumpkin scones with brown butter icing from scratch. Give yourself a pat on the back.
Cooking Tips & Techniques
I’ve made a lot of scones over the years, and I’ve learned a few things the hard way. Here are my best tips for getting perfect results every time:
Keep everything cold. This is the number one rule of scone-making. Cold butter creates steam pockets as it melts in the oven, which gives you flaky layers. If your butter warms up, your scones will be flat and dense. If your kitchen is warm, chill your mixing bowl and flour for 10 minutes before starting.
Don’t overwork the dough. Scone dough should be handled as little as possible. Overmixing develops gluten, which makes scones tough and chewy instead of tender. Mix until just combined, then stop. A few dry patches are okay—they’ll hydrate as the dough rests.
Pat the pumpkin puree dry. Pumpkin has a lot of water content, which can make scones soggy. Before adding it to the wet ingredients, spread the pumpkin puree on a paper towel and pat it gently to remove excess moisture. This small step makes a big difference in texture.
Use a bench scraper for clean cuts. A bench scraper cuts through the dough cleanly without smashing the edges. If you use a knife, use a sharp one and cut straight down—don’t saw back and forth, which can seal the edges and prevent rising.
Chill before baking. I know I said this already, but it’s worth repeating. Chilling the shaped scones for at least 15 minutes helps them hold their shape and rise tall instead of spreading into flat pancakes.
Watch the brown butter carefully. Brown butter can go from perfect to burnt in seconds. The moment you see amber-brown specks and smell a nutty aroma, pull it off the heat. Pour it into a separate bowl immediately so it stops cooking in the hot pan.
Let scones cool completely. I know it’s hard to wait. But if you ice warm scones, the icing will melt into a puddle. If you eat them warm without icing, they’re still delicious—just different. For the full experience, let them cool.
I once forgot to chill my scones and baked them straight away. They spread into flat, sad discs that looked more like cookies than scones. They still tasted okay, but they weren’t pretty. Learn from my mistake—the chill step is not optional.
Variations & Adaptations
This recipe is flexible, and I love experimenting with different flavors. Here are some variations I’ve tried and loved:
Gluten-free version — Substitute the all-purpose flour with a 1:1 gluten-free baking flour blend that contains xanthan gum. I’ve had good results with King Arthur Measure for Measure. The texture will be slightly more delicate, so handle the dough gently. Bake time may need an extra 2-3 minutes.
Dairy-free option — Use cold vegan butter or coconut oil in place of regular butter. For the cream, use full-fat oat milk or canned coconut cream. The brown butter icing is trickier to make dairy-free, but you can skip the browning step and use melted vegan butter mixed with maple syrup and powdered sugar.
Add mix-ins — Fold in ½ cup of chopped pecans, walnuts, or dried cranberries after combining the wet and dry ingredients. The nuts add a nice crunch, and the cranberries bring a tart contrast to the sweet maple and pumpkin.
Spice it up — If you love bold spices, add ¼ teaspoon of cardamom or allspice to the dry ingredients. Cardamom pairs beautifully with pumpkin and maple, giving the scones a slightly floral, aromatic note.
Chocolate drizzle — For a decadent twist, skip the brown butter icing and drizzle melted dark chocolate over the cooled scones. The bitterness of dark chocolate balances the sweetness of the maple and pumpkin.
Mini scones — Pat the dough into a ½-inch thick round and cut into smaller wedges. Bake for 12-14 minutes instead of 15-18. Perfect for brunch buffets or afternoon tea.
Savory-sweet hybrid — Reduce the sugar to 2 tablespoons and add ½ teaspoon of black pepper and a pinch of cayenne to the dry ingredients. The heat plays off the sweet maple and pumpkin in a surprising, grown-up way. I made these for a fall dinner party and they were a hit.
If you’re feeling adventurous, try swapping half the all-purpose flour with whole wheat pastry flour. It adds a nutty flavor and a little more fiber, and the scones stay tender. Just don’t use regular whole wheat flour—it’s too dense and will make the scones heavy.
Serving & Storage Suggestions
These scones are best enjoyed fresh, but they store well too. Here’s how to serve and store them:
Serving temperature — Scones are delicious at room temperature or slightly warm. If you want to reheat them, pop them in a 300°F (150°C) oven for 5-7 minutes. The microwave works in a pinch, but it can make them rubbery.
Presentation ideas — Arrange the scones on a wooden board or a pretty cake stand. Drizzle the icing in a zigzag pattern for a rustic look. Sprinkle a few pepitas or a dusting of cinnamon on top for color. Serve with a side of fresh fruit, a dollop of clotted cream, or a hot cup of coffee or chai.
What to serve with them — These scones pair beautifully with a warm latte, spiced apple cider, or a simple cup of Earl Grey tea. For a brunch spread, serve them alongside a mini lemon blueberry cheesecakes for a sweet and tangy contrast, or a fluffy strawberry mousse cups for something light and fruity. They’re also lovely with a side of scrambled eggs and bacon for a savory-sweet breakfast.
Storage instructions — Store un-iced scones in an airtight container at room temperature for up to 3 days. If you’ve already added the icing, store them in a single layer in an airtight container, with parchment paper between layers, in the refrigerator for up to 4 days. The icing may soften slightly, but they’ll still taste great.
Freezing instructions — You can freeze the unbaked scones or the baked, un-iced scones. For unbaked scones, shape the dough into wedges, place them on a baking sheet, and freeze until solid. Then transfer to a freezer bag. Bake from frozen, adding 2-3 minutes to the baking time. For baked scones, cool completely, wrap individually in plastic wrap, and place in a freezer bag. Thaw at room temperature and reheat in the oven before serving.
How flavors develop — The maple and spice flavors actually deepen overnight. If you can resist eating them all on day one, the scones taste even better on day two. The texture softens slightly, but the flavor becomes more rounded and cozy.
Nutritional Information & Benefits
Here’s an approximate nutritional breakdown for one scone with icing (based on 8 servings):
| Nutrient | Amount per Scone |
|---|---|
| Calories | 380 |
| Total Fat | 18g |
| Saturated Fat | 11g |
| Cholesterol | 50mg |
| Sodium | 280mg |
| Total Carbohydrates | 52g |
| Dietary Fiber | 2g |
| Sugars | 28g |
| Protein | 4g |
Health benefits of key ingredients — Pumpkin is packed with vitamin A, fiber, and antioxidants. It supports eye health and immune function. Maple syrup contains antioxidants and minerals like zinc and manganese, though it’s still sugar, so enjoy in moderation. Cinnamon and ginger have anti-inflammatory properties and may help with blood sugar regulation.
Dietary considerations — This recipe contains gluten, dairy, and eggs (in the form of cream). For a gluten-free or dairy-free version, see the variations section above. These scones are not low-carb or keto-friendly due to the flour and sugar content. But they are vegetarian.
Potential allergens — Contains wheat (gluten), milk (butter and cream), and may contain traces of tree nuts if you add pecans or walnuts.
I’m not a nutritionist, and these numbers are estimates. If you have specific dietary needs, I recommend calculating the nutrition based on the exact brands and ingredients you use. But as a general rule, these scones are a treat—something to enjoy on a crisp fall morning with a cup of coffee, not something to eat every day. And that’s okay. Good food is about balance, not perfection.
Conclusion
These maple pumpkin scones with brown butter icing are everything I want in a fall recipe. They’re tender and flaky, with real maple flavor that isn’t overshadowed by spice. The brown butter icing adds a nutty, caramel-like richness that makes every bite feel special. And they’re surprisingly easy to make, even on a busy weekend morning.
I love that this recipe doesn’t rely on shortcuts or fake flavors. It uses real ingredients, real techniques, and real patience—and the payoff is a scone that tastes like it came from a cozy bakery, but better because you made it yourself.
If you try this recipe, I’d love to hear how it goes. Leave a comment below and let me know—did you add pecans? Did you double the icing? Did you eat three in one sitting? No judgment here. And if you have questions, just ask. I’m always happy to help.
So go ahead, preheat that oven, and make some scones. Your kitchen is about to smell incredible, and your people are about to be very, very happy. Happy baking, friends.
Frequently Asked Questions
Can I use canned pumpkin pie filling instead of pumpkin puree?
No, please don’t. Pumpkin pie filling is pre-sweetened and spiced, which will throw off the sugar and spice balance in this recipe. Use 100% pure pumpkin puree for the best results. If you only have pumpkin pie filling on hand, reduce the sugar and spices in the recipe, but honestly, it’s better to just grab a can of puree.
Why did my scones turn out dry?
Dry scones are usually the result of overmixing the dough or overbaking them. Mix just until the dough comes together, and pull them out of the oven as soon as they’re golden on the edges. Also, make sure you’re measuring your flour correctly—scooping directly from the bag packs in too much flour. Spoon and level instead.
Can I make the dough ahead of time?
Absolutely. Shape the scone wedges, place them on a baking sheet, and refrigerate for up to 24 hours. Cover them loosely with plastic wrap. When you’re ready to bake, brush with cream and bake as directed, adding 2-3 minutes if baking straight from the fridge. You can also freeze the unbaked scones for up to 3 months.
How do I get the icing to set firmly?
Make sure your scones are completely cool before icing. If the icing is too thin, add more powdered sugar until it reaches a thick, pourable consistency. Let the iced scones sit at room temperature for 15-20 minutes before serving. If you’re in a humid environment, the icing may stay a little soft—that’s okay, it will still taste amazing.
Can I skip the brown butter and use regular melted butter?
You can, but you’ll lose a lot of flavor. Brown butter adds a nutty, toasty depth that regular melted butter just can’t match. It takes an extra 5 minutes and makes the icing taste like something special. If you’re really short on time, use melted butter, but I promise the brown butter is worth the tiny bit of effort.
For more delicious recipes like this one, check out our full collection of recipes for inspiration. And if you’re planning a party, these pink champagne jello shots or this decadent red wine chocolate cake would make a stunning addition to your dessert table.
Pin This Recipe!
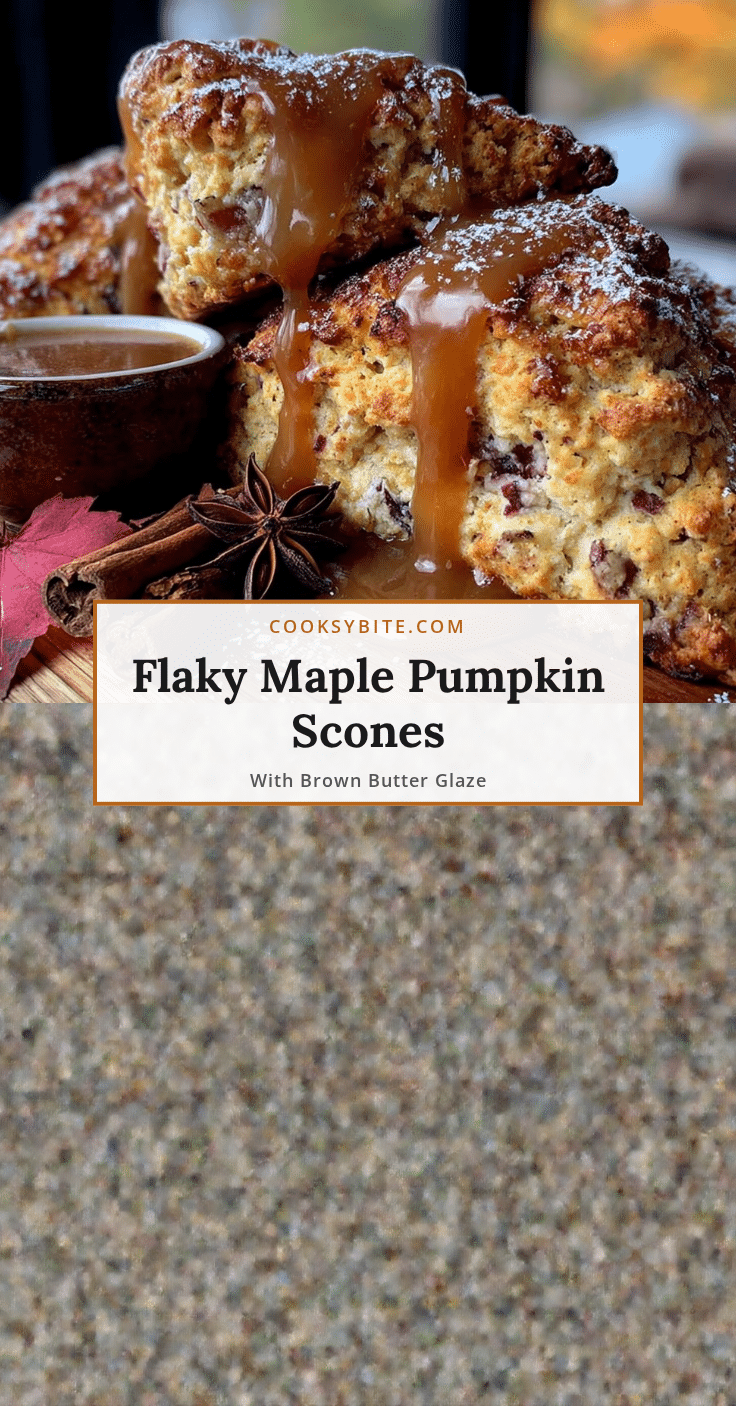
Perfect Maple Pumpkin Scones with Brown Butter Icing
Tender, flaky maple pumpkin scones with a rich brown butter icing that actually sticks. Made with real maple syrup and pumpkin puree, these scones are the ultimate fall treat.
- Prep Time: 20 minutes
- Cook Time: 18 minutes
- Total Time: 1 hour 10 minutes
- Yield: 8 servings 1x
- Category: Breakfast
- Cuisine: American
Ingredients
- 2 ½ cups (315g) all-purpose flour
- ⅓ cup (65g) granulated sugar
- 1 tablespoon baking powder
- ½ teaspoon salt
- 1 teaspoon ground cinnamon
- ½ teaspoon ground ginger
- ¼ teaspoon ground nutmeg
- ⅛ teaspoon ground cloves
- ½ cup (113g) cold unsalted butter, cut into small cubes
- ½ cup (120g) pumpkin puree
- ¼ cup (60ml) pure maple syrup
- ¼ cup (60ml) heavy cream, plus more for brushing
- 1 teaspoon vanilla extract
- ¼ cup (56g) unsalted butter (for icing)
- 1 ½ cups (180g) powdered sugar, sifted if lumpy
- 2 tablespoons (30ml) pure maple syrup (for icing)
- 2 to 3 tablespoons (30-45ml) heavy cream or milk (for icing)
- ½ teaspoon vanilla extract (for icing)
- Pinch of salt (optional, for icing)
Instructions
- Preheat your oven to 400°F (200°C). Position a rack in the center of the oven. Line a baking sheet with parchment paper.
- In a large bowl, whisk together 2 ½ cups (315g) all-purpose flour, ⅓ cup (65g) granulated sugar, 1 tablespoon baking powder, ½ teaspoon salt, 1 teaspoon cinnamon, ½ teaspoon ginger, ¼ teaspoon nutmeg, and ⅛ teaspoon cloves.
- Add ½ cup (113g) cold cubed butter to the flour mixture. Use a pastry cutter or two forks to cut the butter into the flour until the mixture resembles coarse meal with pea-sized butter pieces. Work quickly so the butter stays cold.
- In a separate medium bowl, whisk together ½ cup (120g) pumpkin puree, ¼ cup (60ml) maple syrup, ¼ cup (60ml) heavy cream, and 1 teaspoon vanilla extract until well combined.
- Pour the wet ingredients into the dry ingredients. Use a rubber spatula to fold together gently until the dough comes together. Do not overmix.
- Turn the dough out onto a lightly floured surface. Gently bring it together with your hands, patting it into a ¾-inch thick round. Use a bench scraper or sharp knife to cut the round into 8 wedges.
- Place the wedges on the prepared baking sheet, spacing them about 2 inches apart. Refrigerate for 15-20 minutes.
- Right before baking, brush the tops of the scones with a little extra heavy cream.
- Bake for 15-18 minutes, rotating the pan halfway through, until golden brown on the edges and firm to the touch. Transfer to a cooling rack and cool completely.
- While the scones cool, make the icing. In a small light-colored saucepan, melt ¼ cup (56g) butter over medium heat. Swirl occasionally until the butter foams, turns golden, and develops brown specks (about 5 minutes). Remove from heat and pour into a heatproof bowl.
- Let the brown butter cool for 5 minutes. Whisk in 1 ½ cups (180g) powdered sugar, 2 tablespoons (30ml) maple syrup, ½ teaspoon vanilla, and 2 tablespoons (30ml) heavy cream until smooth. Adjust consistency with additional cream or powdered sugar as needed.
- Once scones are completely cool, drizzle the icing over the tops. Let set for 10-15 minutes before serving.
Notes
Keep all ingredients cold for flaky scones. Pat pumpkin puree dry to remove excess moisture. Chill shaped scones before baking to prevent spreading. Watch brown butter carefully to avoid burning. Let scones cool completely before icing.
Nutrition
- Serving Size: 1 scone with icing
- Calories: 380
- Sugar: 28
- Sodium: 280
- Fat: 18
- Saturated Fat: 11
- Carbohydrates: 52
- Fiber: 2
- Protein: 4
Keywords: maple pumpkin scones, brown butter icing, fall baking, pumpkin scones, maple scones, scone recipe


