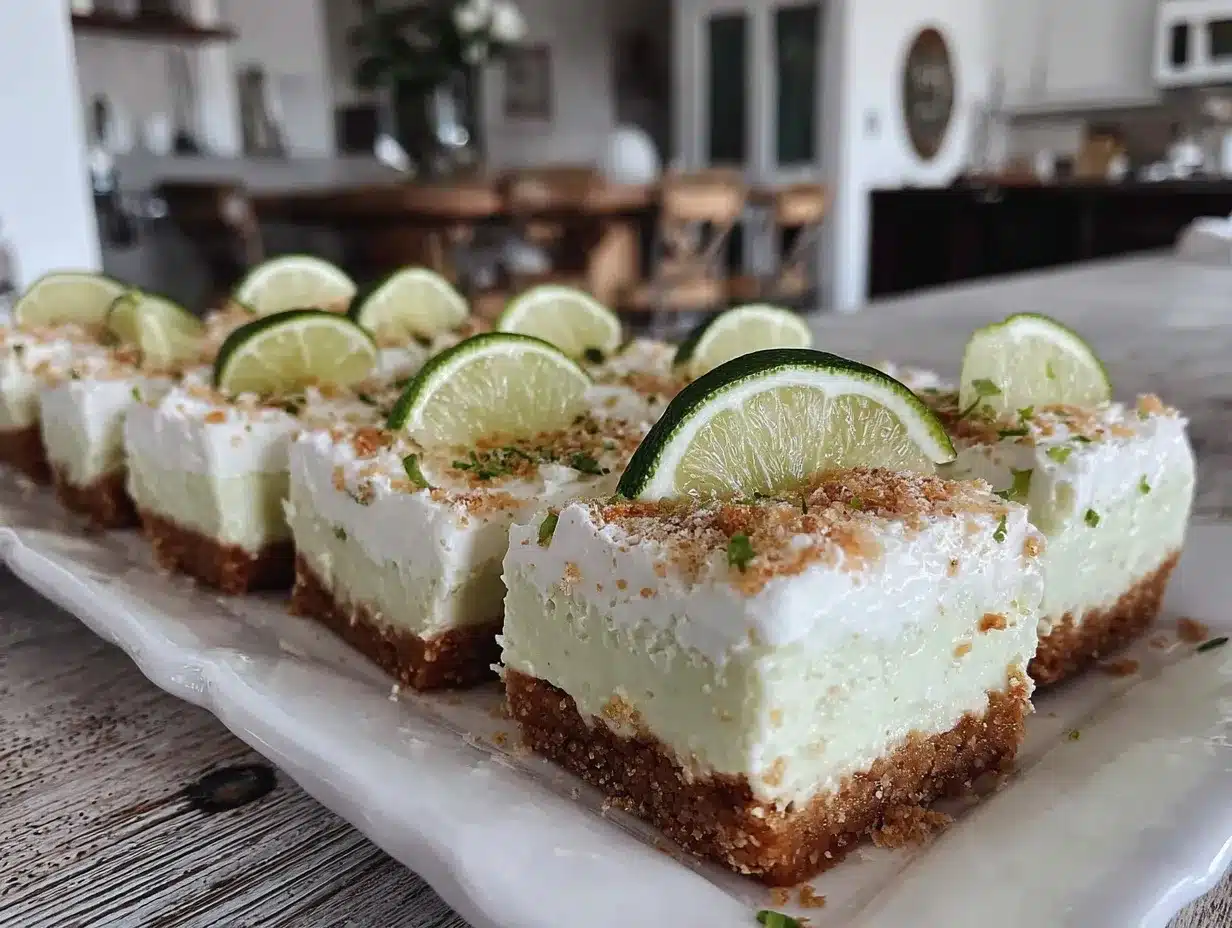
“You really think those bars are going to hold up without baking?” my friend asked skeptically as I slid a pan of creamy no-bake key lime pie bars into the fridge. Honestly, I was half-expecting the crust to crumble or the filling to be too runny. But that tangy, smooth filling mixing with the buttery graham cracker crust turned out to be a revelation — and one that made me whip up these bars not once, but three times in a week.
It all started on a sticky summer evening when I had zero energy but a serious craving for something bright and citrusy. The usual oven-baking was out of the question, so I grabbed some key limes, cream cheese, and sweetened condensed milk. One quick whisk later, my doubts melted away as the bars chilled to creamy perfection. The zesty aroma filled the kitchen, and the first bite was like a tiny tropical vacation—tart and luscious, with just the right amount of sweetness.
Now, these no-bake key lime pie bars are my go-to whenever I want a fuss-free dessert that feels like a treat without turning the kitchen into a sauna. I love how the crust stays crisp and the filling stays velvety smooth, no oven required. Plus, they’re so adaptable—you can make them ahead or double the batch when unexpected guests pop in. It’s funny how a simple recipe born out of low energy turned into a favorite for refreshing summer indulgence, and that’s why I keep coming back to these bars, even when I have plenty of time to bake. They’re just that good.
There’s something quietly satisfying about knowing a dessert this creamy and bright can come together in minutes, chilling quietly until it’s time to enjoy. I promise, once you try these bars, you might find yourself reaching for them on the warmest days, or whenever you need that little burst of citrus sunshine.
Why You’ll Love This Recipe
This creamy no-bake key lime pie bars recipe has won over my family, friends, and even the toughest dessert critics. Here’s why it stands out:
- Quick & Easy: Ready in under 20 minutes plus chilling time — perfect for busy days or last-minute dessert needs.
- Simple Ingredients: No exotic items here. Just pantry staples like graham crackers, cream cheese, and real key lime juice (fresh or bottled).
- Perfect for Summer Gatherings: Ideal for potlucks, backyard barbecues, or casual dinner parties where you want something cool and refreshing.
- Crowd-Pleaser: This recipe always gets compliments—kids love the creamy sweetness, adults appreciate the zingy citrus kick.
- Unbelievably Delicious Texture: The crust offers a buttery crunch, while the filling is silky smooth and tangy without being overly sweet.
What makes these bars a notch above other key lime desserts? The secret lies in balancing the cream cheese with sweetened condensed milk, which gives the filling a rich yet light mouthfeel. Plus, using real key lime juice (not just regular lime) brings that authentic tartness that wakes up your taste buds. I also prefer using a food processor to crush the graham crackers finely for a crust that holds together perfectly without feeling gritty.
Honestly, this recipe has become my favorite way to satisfy a citrus craving without heating up the kitchen or fussing with complicated steps. It’s a refreshing treat that feels homemade, indulgent, and just a little bit special.
What Ingredients You Will Need
This recipe uses simple, wholesome ingredients to deliver bold flavor and satisfying texture without the fuss. Most of these are pantry staples, but if you want to get the best results, here are my recommendations and substitution tips.
- For the crust:
- 1 ½ cups graham cracker crumbs (about 10 full sheets, finely crushed; I like Honey Maid for consistent flavor)
- 6 tablespoons unsalted butter, melted (brings richness and helps bind the crust)
- 2 tablespoons granulated sugar (balances the tartness in the filling)
- For the filling:
- 8 ounces cream cheese, softened (room temperature for smooth mixing; Philadelphia brand works well)
- 1 can (14 ounces) sweetened condensed milk (key for creamy sweetness)
- ½ cup fresh key lime juice (about 20-25 key limes) or bottled pure key lime juice (fresh is best, but bottled is a reliable backup)
- 1 teaspoon lime zest (adds extra brightness and aroma)
- Optional toppings:
- Whipped cream (store-bought or homemade for a light finish)
- Additional lime zest or thin lime slices for garnish
If you want to make this gluten-free, swap graham crackers for gluten-free graham-style crackers or crushed gluten-free cookies. For a dairy-free version, try substituting cream cheese with a plant-based alternative and butter with coconut oil. Just keep in mind texture may vary slightly.
Equipment Needed
- Baking pan (an 8×8-inch or 9×9-inch square pan works perfectly; glass or metal both hold chill well)
- Mixing bowls (one large bowl for the filling and one for the crust)
- Electric mixer or hand mixer (for whipping the cream cheese and blending the filling smoothly)
- Food processor or resealable plastic bag and rolling pin (to crush graham crackers finely)
- Measuring cups and spoons (accuracy is key for the right balance of flavors)
- Rubber spatula (for scraping bowls clean and folding ingredients)
If you don’t have a food processor, just pop the graham crackers in a zip-top bag and crush them with a rolling pin or heavy pan until fine. I’ve done this many times when the processor was busy with other tasks—totally doable with a little more elbow grease. For mixing, a hand mixer speeds things up, but a sturdy whisk and a bit of patience can get you there.
Preparation Method
- Prepare the crust: Combine 1 ½ cups graham cracker crumbs, 6 tablespoons melted unsalted butter, and 2 tablespoons sugar in a bowl. Mix until crumbs are evenly coated and hold together when pressed. This should take about 3 minutes.
- Press the crust: Firmly press the crumb mixture into the bottom of your 8×8-inch pan, making sure to cover the surface evenly. Use the bottom of a flat glass or measuring cup to compact the crust tightly. This step keeps the crust from crumbling when you slice the bars later. Chill in the fridge for 10 minutes while preparing the filling.
- Make the filling: In a large mixing bowl, beat 8 ounces softened cream cheese with an electric mixer until creamy and smooth (about 2 minutes). Scrape down the sides to avoid lumps.
- Add sweetened condensed milk: Slowly pour in 14 ounces sweetened condensed milk, continuing to beat until fully combined. The mixture should be glossy and thick.
- Incorporate key lime juice and zest: Add ½ cup fresh key lime juice and 1 teaspoon lime zest to the bowl. Mix on low speed until the filling thickens slightly, about 1-2 minutes. The acid in the lime juice will start to firm up the filling—this is a good sign!
- Pour filling over the crust: Spread the filling evenly over the chilled crust using a spatula. Smooth the surface for a clean finish.
- Chill the bars: Cover the pan with plastic wrap and refrigerate for at least 3 hours, preferably 4-6 hours, until the filling sets firmly. Overnight chilling is ideal if you have the time.
- Serve: Cut into squares using a sharp knife. For clean slices, wipe the knife with a warm damp cloth between cuts.
If your filling feels too loose after chilling, let it sit a bit longer or briefly freeze the bars before slicing. The crust should stay crisp and not soggy if pressed firmly and chilled well.
Cooking Tips & Techniques
One trick I’ve learned is to always soften the cream cheese to room temperature before mixing. Cold cream cheese clumps and leaves lumps that are tricky to smooth out. Also, beat it thoroughly until silky before adding the condensed milk—that way, your filling is ultra-smooth.
Fresh key lime juice really makes a difference in flavor intensity. If you’re using bottled juice, taste it first and adjust the amount slightly if it tastes milder. A little extra zest can brighten the flavor if needed.
Pressing the crust firmly is key to preventing crumbly bars. I use the bottom of a measuring cup with steady pressure for even compaction. Don’t rush this step—it’s worth the extra minute.
For slicing, warming your knife under hot water and drying it before cutting gives you neat edges. I learned this the hard way after serving a tray of crumbly bars that looked like a mess!
Lastly, multitasking by chilling the crust while making the filling saves time. You can even prepare this a day ahead, which is a blessing on busy weekends.
Variations & Adaptations
You can easily tweak this recipe to suit your mood or dietary needs. Here are a few ideas I’ve tried and loved:
- Coconut Key Lime Bars: Add ½ cup shredded unsweetened coconut to the crust or sprinkle on top of the filling before chilling for a tropical twist.
- Low-Sugar Version: Use a sugar-free graham cracker crust and swap sweetened condensed milk for a low-sugar condensed milk alternative. Add a bit more lime zest to compensate for sweetness.
- Vegan Adaptation: Replace cream cheese with vegan cream cheese, butter with coconut oil, and use sweetened condensed coconut milk (found in some health stores). The bars will have a slightly different texture but still creamy and satisfying.
- Bake-Free Lime Bars with a Twist: Mix in some finely chopped fresh mint leaves into the filling for an herbal note that pairs well with the lime.
For a fun presentation, I’ve also made mini lemon blueberry cheesecakes using similar no-bake techniques—so if you enjoy these bars, you might want to give those a try next time.
Serving & Storage Suggestions
These key lime pie bars are best served chilled, straight from the fridge. For an extra touch, top with a dollop of whipped cream and a sprinkle of lime zest or a thin lime slice. They pair beautifully with a refreshing iced tea or a light white wine on warm days.
Store leftovers covered tightly in the refrigerator for up to 4 days. The flavors actually mellow and blend nicely overnight, making the bars taste even better the next day.
If you want to keep them longer, you can freeze the bars in an airtight container for up to 2 months. Thaw overnight in the fridge before serving. When reheating, just let them sit at room temperature for 15-20 minutes to soften slightly—don’t microwave, or the texture may suffer.
These bars are a perfect make-ahead dessert for parties or casual get-togethers. They hold their shape well and can be cut into bite-sized pieces for easy sharing.
Nutritional Information & Benefits
Each serving of these creamy no-bake key lime pie bars provides approximately:
| Calories | 280 |
|---|---|
| Fat | 15g |
| Carbohydrates | 32g |
| Protein | 4g |
| Fiber | 1g |
The key limes provide a good dose of vitamin C, which supports immune health, while the cream cheese and butter contribute calcium and healthy fats. This recipe is gluten-containing due to the graham crackers but can be adjusted for gluten-free diets by swapping the crust. While rich, the bars offer a moderate portion of protein from the dairy ingredients.
I find this dessert strikes a nice balance between indulgence and wholesomeness—perfect when you want a treat that feels fresh and satisfying without being overly heavy.
Conclusion
These creamy no-bake key lime pie bars are a simple way to bring bright, tangy, and luscious dessert vibes to your table with minimal effort. Whether you’re craving a cool summer treat or need a fuss-free dessert to impress guests, this recipe delivers every time.
Feel free to tweak the tartness or sweetness to suit your taste, add your favorite toppings, or try one of the variations mentioned—making this recipe your own is part of the fun. I love how these bars remind me that sometimes, the best desserts are the ones that come together quickly but leave a lasting impression.
If you enjoy citrus desserts, you might also appreciate the fluffy strawberry mousse cups, which share that light, creamy texture with a different fruit twist.
I’d love to hear how your bars turn out or any creative spins you put on this recipe—drop a comment or share your experience!
Frequently Asked Questions
Can I use regular lime juice instead of key lime juice?
Yes, regular lime juice works in a pinch, but key lime juice has a unique tartness that gives the bars their signature flavor.
How long do these bars need to chill before serving?
At least 3 hours is recommended to let the filling set properly, but overnight chilling yields the best texture.
Can I make these bars ahead of time?
Absolutely! They keep well in the fridge for up to 4 days and can be frozen for longer storage.
Is it necessary to use sweetened condensed milk?
Yes, it’s key to the creamy texture and sweetness. You can find lower-sugar versions if preferred.
What’s the best way to get a firm crust without baking?
Press the graham cracker crumbs firmly into the pan and chill before adding the filling. This helps the crust hold together when slicing.
Pin This Recipe!
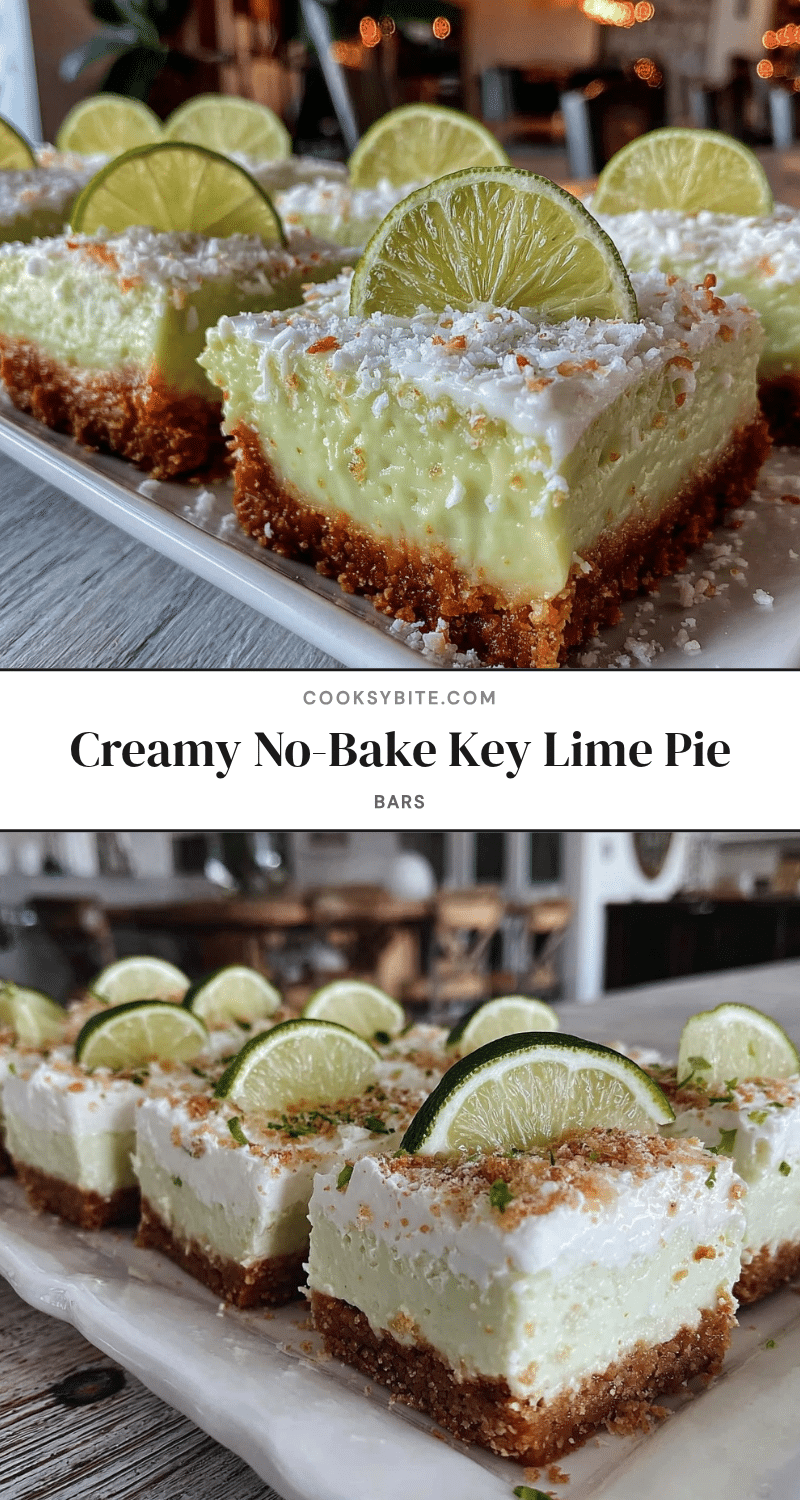
Creamy No-Bake Key Lime Pie Bars
A quick and easy no-bake dessert featuring a buttery graham cracker crust and a tangy, creamy key lime filling. Perfect for summer gatherings and fuss-free indulgence.
- Prep Time: 15 minutes
- Cook Time: 0 minutes
- Total Time: 3 hours 15 minutes
- Yield: 16 bars 1x
- Category: Dessert
- Cuisine: American
Ingredients
- 1 ½ cups graham cracker crumbs (about 10 full sheets, finely crushed)
- 6 tablespoons unsalted butter, melted
- 2 tablespoons granulated sugar
- 8 ounces cream cheese, softened
- 1 can (14 ounces) sweetened condensed milk
- ½ cup fresh key lime juice (about 20–25 key limes) or bottled pure key lime juice
- 1 teaspoon lime zest
- Optional toppings: whipped cream, additional lime zest or thin lime slices
Instructions
- Combine 1 ½ cups graham cracker crumbs, 6 tablespoons melted unsalted butter, and 2 tablespoons sugar in a bowl. Mix until crumbs are evenly coated and hold together when pressed.
- Firmly press the crumb mixture into the bottom of an 8×8-inch pan, covering the surface evenly. Use the bottom of a flat glass or measuring cup to compact the crust tightly. Chill in the fridge for 10 minutes.
- In a large mixing bowl, beat 8 ounces softened cream cheese with an electric mixer until creamy and smooth, about 2 minutes. Scrape down the sides to avoid lumps.
- Slowly pour in 14 ounces sweetened condensed milk, continuing to beat until fully combined and glossy.
- Add ½ cup fresh key lime juice and 1 teaspoon lime zest to the bowl. Mix on low speed until the filling thickens slightly, about 1-2 minutes.
- Spread the filling evenly over the chilled crust using a spatula and smooth the surface.
- Cover the pan with plastic wrap and refrigerate for at least 3 hours, preferably 4-6 hours or overnight, until the filling sets firmly.
- Cut into squares using a sharp knife. For clean slices, wipe the knife with a warm damp cloth between cuts.
Notes
Soften cream cheese to room temperature before mixing to avoid lumps. Press crust firmly to prevent crumbling. Chill bars overnight for best texture. Warm knife under hot water and dry before slicing for clean edges. Can substitute gluten-free graham crackers and dairy alternatives for dietary needs.
Nutrition
- Serving Size: 1 bar (assuming 16 b
- Calories: 280
- Fat: 15
- Carbohydrates: 32
- Fiber: 1
- Protein: 4
Keywords: no-bake, key lime pie, dessert bars, creamy, easy recipe, summer dessert, graham cracker crust, tangy, refreshing