I didn’t trust boneless, skinless chicken breast in a meal prep bowl. Honestly, I thought it was a recipe for dry, sad desk lunches that would make anyone reach for takeout by Wednesday. My skepticism ran deep—I’d been burned by too many “juicy” chicken recipes that turned into flavorless rubber after a day in the fridge. So when my friend swore her weekly prep of chicken bowls was the only thing keeping her from ordering pizza every night, I nodded politely and mentally added her to my “bless her heart” list.
But then she brought one over. It was a Tuesday, I was hangry, and she shoved a container in my hands before I could protest. The chicken was tender. Like, actually tender. There was this subtle smoky seasoning that made me forget I was eating meal prep at all. And the veggies—roasted, not steamed to death—had this caramelized sweetness that tied everything together. I asked for the recipe before I finished chewing. She laughed. I didn’t care.
That moment changed how I looked at meal prep entirely. It wasn’t about forcing yourself to eat bland chicken for five days straight. It was about having a reliable, delicious option waiting for you when life got chaotic. And honestly, that Tuesday bowl saved me from at least three takeout orders that week. This high-protein chicken breast meal prep bowls recipe became my kitchen staple, and I’ve tweaked it over dozens of batches to make sure it never, ever disappoints.
Why You’ll Love This Recipe
Let me be real with you—I’ve tested this recipe more times than I care to count. I’ve burned it, under-seasoned it, and once accidentally used chicken thighs (which was actually good, but that’s another story). Through all those trials, I landed on a method that works every single time. Here’s why this one’s different:
- Quick & Easy: From start to finish, you’re looking at about 45 minutes. That’s four days of lunches sorted in less than an hour.
- Simple Ingredients: Chicken breast, olive oil, spices, rice, broccoli, and sweet potatoes. That’s it. No weird specialty items you’ll use once and forget about.
- Perfect for Busy Weeks: Whether you’re juggling work, kids, or just life in general, having these bowls ready means one less decision to make when you’re starving.
- Crowd-Pleaser: I’ve packed these for friends, family, and even my picky neighbor. Everyone asks for the recipe.
- Unbelievably Delicious: The secret is in the marinade and the roasting technique. The chicken stays juicy, the veggies get crispy edges, and every bite feels satisfying.
This isn’t just another meal prep recipe—it’s the one I’ve refined through trial, error, and honest feedback from people who don’t usually like leftovers. The balance of protein, fiber, and healthy fats keeps you full for hours without that heavy, sluggish feeling. Plus, it’s flexible enough that you can swap ingredients based on what you have in your fridge.
I remember the first time I made a full week’s worth for myself. I was skeptical (surprise, surprise), but by day three, I was actually looking forward to lunch. That’s when I knew this recipe was special. It’s not just food—it’s a little act of kindness for your future self.
What Ingredients You Will Need
This recipe uses straightforward ingredients that work together to create something genuinely delicious. No gimmicks, just good food.
For the Chicken Marinade:
- 2 large boneless, skinless chicken breasts (about 1.5 lbs total) – Look for breasts that are similar in size so they cook evenly. I prefer organic when possible, but conventional works fine too.
- 3 tablespoons olive oil – Extra virgin gives more flavor, but regular works great. The oil helps the seasoning stick and keeps the chicken moist.
- 2 tablespoons lemon juice (fresh squeezed is best, but bottled works in a pinch) – The acidity tenderizes the chicken without making it mushy.
- 1 teaspoon garlic powder – Not the same as fresh garlic here; the powder distributes more evenly and doesn’t burn during cooking.
- 1 teaspoon smoked paprika – This is non-negotiable for me. It adds that subtle smoky depth that makes the chicken taste like it’s been grilled.
- 1/2 teaspoon onion powder – Rounds out the savory flavor.
- 1/2 teaspoon salt – I use fine sea salt. Adjust based on your preference and dietary needs.
- 1/4 teaspoon black pepper – Freshly ground if you have it.
- 1/4 teaspoon cayenne pepper (optional) – Adds a tiny kick without being spicy. Leave it out if you’re sensitive to heat.
For the Roasted Vegetables:
- 2 medium sweet potatoes (about 1 lb), peeled and cubed into 1-inch pieces – They roast up sweet and caramelized. I’ve used regular potatoes in a pinch, but sweet potatoes hold up better over the week.
- 2 cups broccoli florets – Fresh or frozen works. If using frozen, don’t thaw them first—just add them straight to the pan.
- 2 tablespoons olive oil – Enough to coat the veggies without making them greasy.
- 1/2 teaspoon salt
- 1/4 teaspoon black pepper
- 1/2 teaspoon garlic powder
For the Base:
- 1 cup dry brown rice (or white rice, quinoa, or cauliflower rice) – Brown rice holds up best over several days. Quinoa is a great high-protein alternative.
- 2 cups water or low-sodium chicken broth – Broth adds flavor to the rice, but water works perfectly fine.
Optional Toppings:
- Fresh parsley or cilantro – Adds color and freshness right before eating.
- Sliced avocado – Don’t add this until you’re ready to eat, or it’ll brown.
- A squeeze of lemon or lime – Brightens everything up.
- Hot sauce or sriracha – For those who like extra heat.
I’ve made this recipe so many times that I’ve memorized the ingredient list. The smoked paprika is honestly the star—don’t skip it. Everything else you probably already have in your pantry.
Equipment Needed
You don’t need fancy equipment for this recipe, which is part of why I love it. Here’s what you’ll need:
- Baking sheet – A half-sheet pan works best. Line it with parchment paper for easier cleanup.
- Mixing bowls – One for the marinade, one for the veggies. I use glass bowls because they don’t hold onto smells.
- Sharp knife and cutting board – A good knife makes cubing sweet potatoes so much easier. Trust me on this.
- Medium saucepan with lid – For cooking the rice. Any pot works as long as it has a tight-fitting lid.
- Measuring spoons and cups – I’ve eyeballed it before and regretted it. Just measure.
- Tongs – For flipping the chicken halfway through cooking.
- Meat thermometer – This is the best investment you’ll make for cooking chicken. It takes the guesswork out completely.
- Meal prep containers – Glass or BPA-free plastic with tight lids. I prefer glass because it doesn’t stain or hold smells.
If you don’t have a meat thermometer, you can cut into the thickest part of the chicken to check doneness. But honestly, a thermometer costs like ten bucks and saves you from dry chicken forever. I learned that lesson the hard way.
Preparation Method
Alright, let’s get cooking. This whole process takes about 45 minutes, and most of it is hands-off time while things roast or simmer.
Step 1: Marinate the Chicken
Start by patting your chicken breasts dry with paper towels. This helps the marinade stick better. In a medium bowl, whisk together the olive oil, lemon juice, garlic powder, smoked paprika, onion powder, salt, pepper, and cayenne if using. Add the chicken breasts and turn them to coat evenly. Cover and let them sit at room temperature for 15 minutes while you prep everything else. If you have more time, refrigerate for up to 4 hours—just take them out 20 minutes before cooking to take the chill off.
Step 2: Preheat and Prep
Preheat your oven to 400°F (200°C). Line a large baking sheet with parchment paper. In a separate bowl, toss the cubed sweet potatoes and broccoli florets with olive oil, salt, pepper, and garlic powder. Spread them out in a single layer on one half of the baking sheet. Leave the other half for the chicken.
Step 3: Start the Rice
While the oven heats, rinse your brown rice under cold water for about 30 seconds. This removes excess starch and helps it cook fluffier. Add the rice and water (or broth) to a saucepan with a tight-fitting lid. Bring to a boil over medium-high heat, then reduce to low, cover, and simmer for 35-40 minutes. Don’t lift the lid during cooking—I know it’s tempting, but you’ll let the steam out. Once done, fluff with a fork and let it sit covered until you’re ready to assemble.
Step 4: Sear and Roast the Chicken
Heat a large oven-safe skillet over medium-high heat. Add a teaspoon of olive oil. Place the marinated chicken breasts in the hot skillet and sear for 2-3 minutes per side until golden brown. You’re not cooking it through here—just building flavor. Transfer the chicken to the empty half of your baking sheet. Place the sheet in the oven and roast for 18-22 minutes, or until the internal temperature reaches 165°F (74°C) at the thickest part. The sweet potatoes should be tender and the broccoli should have crispy edges.
Step 5: Rest and Slice
Remove the baking sheet from the oven. Transfer the chicken to a cutting board and let it rest for 5-7 minutes. This is crucial—if you slice it right away, all those juices will run out and you’ll end up with dry chicken. While it rests, check your veggies. They should be fork-tender with some caramelized spots. If they need more time, pop them back in for 5 minutes while the chicken rests.
Step 6: Assemble the Bowls
Slice the chicken against the grain into strips or cubes. Divide the rice evenly among your meal prep containers. Top with roasted sweet potatoes and broccoli, then add the sliced chicken. The portions should be generous but fit comfortably in your containers. I usually get about 4 servings from this recipe.
Step 7: Cool and Store
Let the containers sit out on the counter for about 20 minutes to cool down before putting the lids on. This prevents condensation from making everything soggy. Once cooled, seal the lids and refrigerate.
One thing I’ve learned: don’t skip the searing step. Yes, you could just throw the chicken in the oven raw, but that golden crust adds so much flavor. It’s worth the extra few minutes.
Cooking Tips & Techniques
I’ve made every mistake in the book with this recipe, so you don’t have to. Here’s what I’ve learned:
Don’t Overcook the Chicken
This is the number one mistake people make. Chicken breast is lean and dries out fast. Use that meat thermometer religiously. The moment it hits 165°F, take it out. Carryover cooking will bring it up a degree or two more. I’ve pulled chicken at 160°F before and let it rest—it came up to 165°F perfectly and was incredibly juicy.
Cut Veggies Evenly
Sweet potatoes need to be cut into similar-sized cubes so they cook at the same rate. If some pieces are bigger, they’ll be hard while smaller ones burn. I aim for 1-inch cubes and use a ruler in my head. It doesn’t have to be perfect, but close counts.
Don’t Crowd the Pan
When roasting vegetables, give them space. If they’re piled on top of each other, they’ll steam instead of roast. Use a large baking sheet and spread everything in a single layer. If you’re doubling the recipe, use two sheets.
Season Generously
Chicken breast is bland on its own. Don’t be shy with the seasoning. The smoked paprika and garlic powder do heavy lifting here. I’ve also added dried oregano or thyme when I wanted a different flavor profile.
Let Everything Cool Before Storing
I know it’s tempting to throw hot food into the fridge and call it a day. But that creates steam, which turns into water, which makes your rice mushy and your veggies soggy. Give everything time to cool on the counter for 20-30 minutes. Your future self will thank you.
Batch Cook Smart
If you’re meal prepping for the whole week, cook the rice and roast the veggies while the chicken marinates. Multitask efficiently. I’ve timed it so everything finishes within 10 minutes of each other. It feels like a well-choreographed dance.
I once forgot to season the chicken before cooking. It was… sad. Don’t be me. Taste your marinade before adding the chicken—it should be flavorful enough that you’d want to eat it on its own.
Variations & Adaptations
This recipe is a great base, but feel free to make it your own. Here are some variations I’ve tried and loved:
Switch the Protein
Chicken thighs work beautifully here. They’re more forgiving and stay juicier. Just adjust the cooking time—thighs need about 20-25 minutes at 400°F. I’ve also used turkey breast or even firm tofu for a vegetarian version. If using tofu, press it well, marinate it, and bake for 25-30 minutes.
Change the Grains
Quinoa is a fantastic high-protein alternative to rice. Cook it the same way—1 cup quinoa to 2 cups water, simmer for 15 minutes. Cauliflower rice is great for low-carb diets, but it doesn’t hold up as well over multiple days. I’d recommend making it fresh each day if you go that route.
Seasonal Veggie Swaps
In summer, I use zucchini and bell peppers. In fall, roasted butternut squash and Brussels sprouts are amazing. Just adjust roasting times based on the vegetable. Harder veggies like carrots need more time; softer ones like zucchini need less.
Different Flavor Profiles
This recipe is versatile. Swap smoked paprika for cumin and coriander for a Middle Eastern twist. Use soy sauce, ginger, and sesame oil for an Asian-inspired version. Or go Italian with dried oregano, basil, and a splash of balsamic vinegar. I’ve made all three versions, and each one is delicious in its own way.
Make It Spicy
Add more cayenne or a chopped jalapeño to the marinade. Or drizzle sriracha over the finished bowls. My husband likes his with extra hot sauce, and I keep mine mild. It’s easy to customize at the end.
I once made a version with lemon pepper seasoning and roasted asparagus. It was so good I made it three weeks in a row. Don’t be afraid to experiment—that’s how you find your perfect bowl.
Serving & Storage Suggestions
These bowls are designed to be eaten cold or reheated, depending on your preference. Here’s how to get the best results:
Serving Temperature: I prefer reheating these bowls. The flavors meld together overnight, and everything tastes even better the next day. Microwave for 2-3 minutes, stirring halfway through. Or reheat in a skillet over medium heat for 5-7 minutes if you have time.
Presentation: If you’re serving these for guests (yes, I’ve done it), plate everything separately. Arrange the sliced chicken over the rice, pile the veggies on the side, and add a sprinkle of fresh parsley. A squeeze of lemon right before serving brightens everything up.
Storage: Keep the bowls in airtight containers in the refrigerator for up to 4 days. I don’t recommend freezing these—the texture of the veggies and rice changes too much. If you must freeze, do so without the veggies, and add fresh ones after thawing.
Reheating Tips: If microwaving, cover the bowl with a damp paper towel to add moisture. This helps the chicken stay tender. For crispy veggies, reheat in a toaster oven or air fryer at 350°F for 5-7 minutes.
Flavor Development: Honestly, these bowls taste better on day 2 or 3. The chicken absorbs more of the seasoning, and the rice softens slightly. I’ve eaten them on day 4 and still enjoyed them. Just give everything a good stir before reheating.
One thing I love: packing a small container of fresh avocado or a lemon wedge to add right before eating. It makes the bowl feel fresh, even on day four.
Nutritional Information & Benefits
Here’s a rough estimate per serving (based on 4 servings with brown rice and the ingredients listed):
- Calories: ~450
- Protein: 38g
- Carbohydrates: 45g
- Fiber: 7g
- Fat: 14g
- Saturated Fat: 2g
These numbers will vary based on portion sizes and any substitutions you make. If you use quinoa instead of rice, you’ll get even more protein. Cauliflower rice drops the carbs significantly.
Health Benefits: Chicken breast is a lean protein source that supports muscle maintenance and keeps you full. Sweet potatoes are packed with vitamin A and fiber. Broccoli is rich in vitamin C and antioxidants. Brown rice provides complex carbohydrates for sustained energy. This bowl is balanced, satisfying, and actually good for you.
Dietary Considerations: This recipe is naturally gluten-free and dairy-free. It’s also nut-free and soy-free if you avoid those allergens. For a low-carb version, swap the rice for cauliflower rice or extra vegetables.
I’m not a nutritionist, but I’ve done enough research to know this bowl ticks a lot of boxes. It keeps me full for 4-5 hours without that post-lunch slump. That’s a win in my book.
Conclusion
Look, I get it. Meal prep can feel like a chore, and chicken breast has a reputation for being boring. But this recipe changed my mind, and I think it’ll change yours too. It’s simple, reliable, and genuinely delicious—the kind of food you look forward to eating, even on a busy Tuesday.
I’ve made this recipe dozens of times, tweaked it based on feedback from friends and family, and landed on a version that works every single time. The chicken stays juicy, the veggies get perfectly roasted, and the whole thing comes together in under an hour. You can customize it based on what you have in your fridge, and it keeps beautifully for days.
So give it a try. Make a batch on Sunday, and see how much easier your week feels when lunch is already taken care of. And if you come up with your own variation—maybe a different spice blend or a new vegetable combination—I’d love to hear about it. Drop a comment below or tag me in your photos. Happy cooking!
Frequently Asked Questions
Can I use frozen chicken breasts for this recipe?
Yes, but you’ll need to thaw them completely first. Frozen chicken won’t cook evenly and can end up dry on the outside while raw in the middle. Thaw in the refrigerator overnight, then pat dry and proceed with the recipe.
How long do these meal prep bowls last in the fridge?
They’ll stay fresh for up to 4 days when stored in airtight containers. After that, the texture starts to decline. I recommend making enough for 3-4 days rather than a full week.
Can I freeze these bowls?
I don’t recommend it. The texture of the roasted vegetables and rice changes too much after freezing and thawing. If you must freeze, do so without the veggies and add fresh ones after reheating.
What’s the best way to reheat these bowls?
Microwave for 2-3 minutes with a damp paper towel over the bowl to add moisture. For crispier veggies, use a toaster oven or air fryer at 350°F for 5-7 minutes. You can also reheat in a skillet over medium heat.
Can I make this recipe dairy-free or gluten-free?
Absolutely! This recipe is naturally dairy-free and gluten-free as written. Just double-check your spice blends if you’re sensitive—some brands add anti-caking agents that contain gluten. Use tamari instead of soy sauce if you add an Asian twist.
Pin This Recipe!
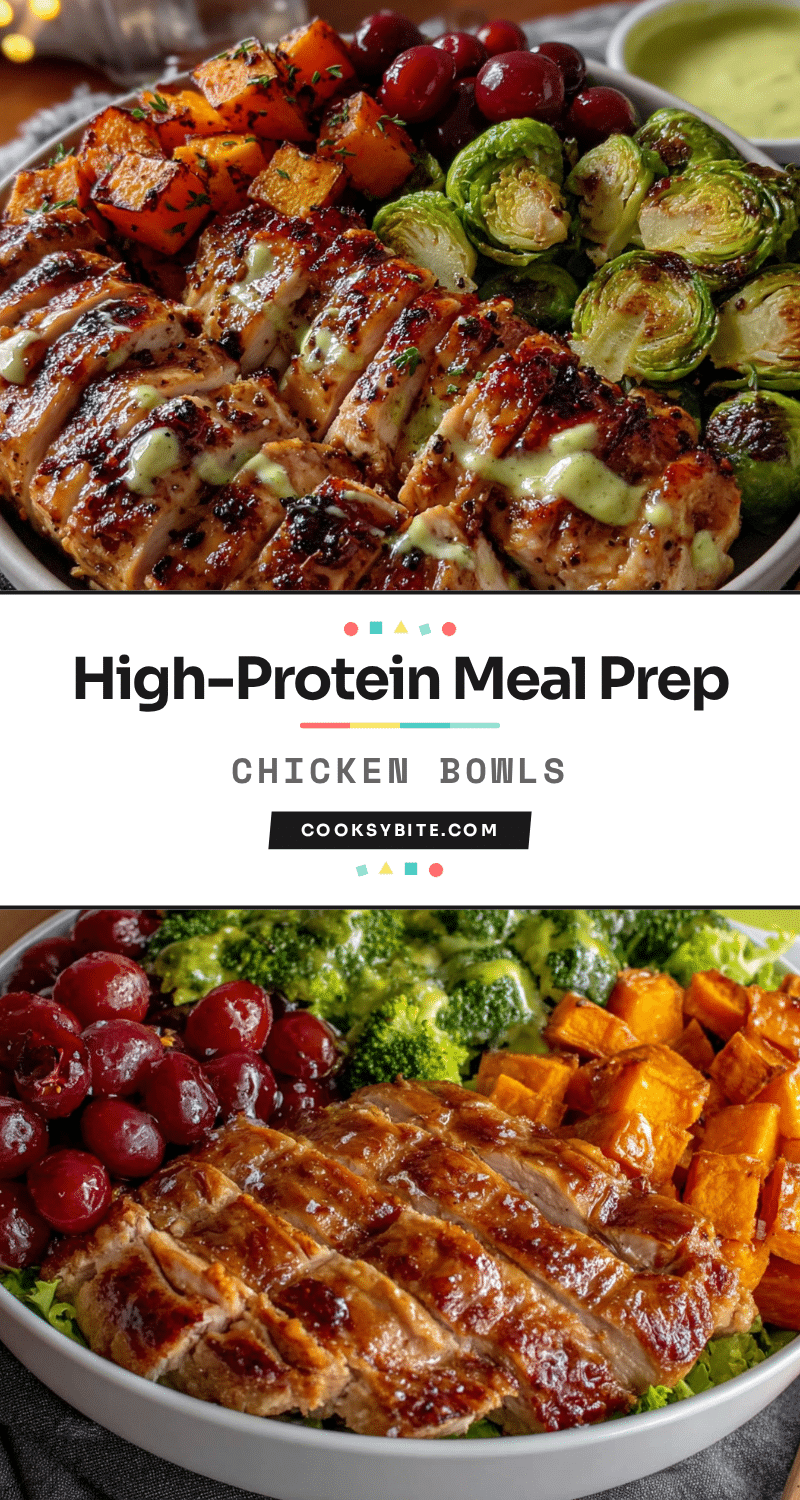
Best High-Protein Chicken Breast Meal Prep Bowls
Juicy, smoky chicken breast paired with roasted sweet potatoes and broccoli over brown rice—a meal prep bowl that stays tender and delicious for days. Perfect for busy weeks, this recipe is quick, easy, and packed with protein.
- Prep Time: 15 minutes
- Cook Time: 30 minutes
- Total Time: 45 minutes
- Yield: 4 servings 1x
- Category: Main Course
- Cuisine: American
Ingredients
- 2 large boneless, skinless chicken breasts (about 1.5 lbs total)
- 3 tablespoons olive oil
- 2 tablespoons lemon juice
- 1 teaspoon garlic powder
- 1 teaspoon smoked paprika
- 1/2 teaspoon onion powder
- 1/2 teaspoon salt
- 1/4 teaspoon black pepper
- 1/4 teaspoon cayenne pepper (optional)
- 2 medium sweet potatoes (about 1 lb), peeled and cubed into 1-inch pieces
- 2 cups broccoli florets
- 2 tablespoons olive oil
- 1/2 teaspoon salt
- 1/4 teaspoon black pepper
- 1/2 teaspoon garlic powder
- 1 cup dry brown rice
- 2 cups water or low-sodium chicken broth
- Fresh parsley or cilantro (optional, for garnish)
- Sliced avocado (optional, for serving)
- Lemon or lime wedges (optional, for serving)
- Hot sauce or sriracha (optional, for serving)
Instructions
- Pat chicken breasts dry with paper towels. In a medium bowl, whisk together 3 tablespoons olive oil, lemon juice, 1 teaspoon garlic powder, smoked paprika, onion powder, 1/2 teaspoon salt, 1/4 teaspoon black pepper, and cayenne (if using). Add chicken and turn to coat evenly. Cover and let marinate at room temperature for 15 minutes (or refrigerate up to 4 hours, then let sit 20 minutes before cooking).
- Preheat oven to 400°F (200°C). Line a large baking sheet with parchment paper. In a separate bowl, toss cubed sweet potatoes and broccoli florets with 2 tablespoons olive oil, 1/2 teaspoon salt, 1/4 teaspoon black pepper, and 1/2 teaspoon garlic powder. Spread in a single layer on one half of the baking sheet.
- Rinse brown rice under cold water for 30 seconds. In a medium saucepan with a tight-fitting lid, combine rice and water or broth. Bring to a boil over medium-high heat, then reduce to low, cover, and simmer for 35-40 minutes. Do not lift the lid. Once done, fluff with a fork and let sit covered.
- Heat a large oven-safe skillet over medium-high heat. Add 1 teaspoon olive oil. Sear marinated chicken breasts for 2-3 minutes per side until golden brown. Transfer chicken to the empty half of the baking sheet. Roast for 18-22 minutes, or until internal temperature reaches 165°F (74°C) at the thickest part.
- Remove baking sheet from oven. Transfer chicken to a cutting board and let rest for 5-7 minutes. Check vegetables; they should be fork-tender with caramelized spots. If needed, return to oven for 5 more minutes while chicken rests.
- Slice chicken against the grain into strips or cubes. Divide rice evenly among 4 meal prep containers. Top with roasted sweet potatoes and broccoli, then add sliced chicken.
- Let containers cool on the counter for 20 minutes before sealing lids. Refrigerate for up to 4 days.
Notes
Don’t skip the searing step—it adds flavor. Use a meat thermometer to avoid overcooking chicken. Let everything cool before storing to prevent sogginess. Bowls taste even better on day 2 or 3. For best results, reheat with a damp paper towel in the microwave.
Nutrition
- Serving Size: 1 bowl
- Calories: 450
- Fat: 14
- Saturated Fat: 2
- Carbohydrates: 45
- Fiber: 7
- Protein: 38
Keywords: high-protein meal prep, chicken breast bowls, healthy meal prep, roasted vegetables, brown rice bowls, gluten-free meal prep, dairy-free meal prep


