There used to be a tiny café tucked between a used bookstore and a vintage shop in my old neighborhood that made the most incredible maple pumpkin scones. When they closed their doors two years ago—just a handwritten sign in the window saying “Thank you for the memories”—I honestly felt a little lost. Those scones were my Saturday morning ritual, the thing I looked forward to all week. After about twelve tries—some too dry, some too sweet, one that my husband politely called “a dense hockey puck”—I finally got it. This is that scone. The one that tastes like crisp autumn mornings and cozy sweaters and that café I still miss.
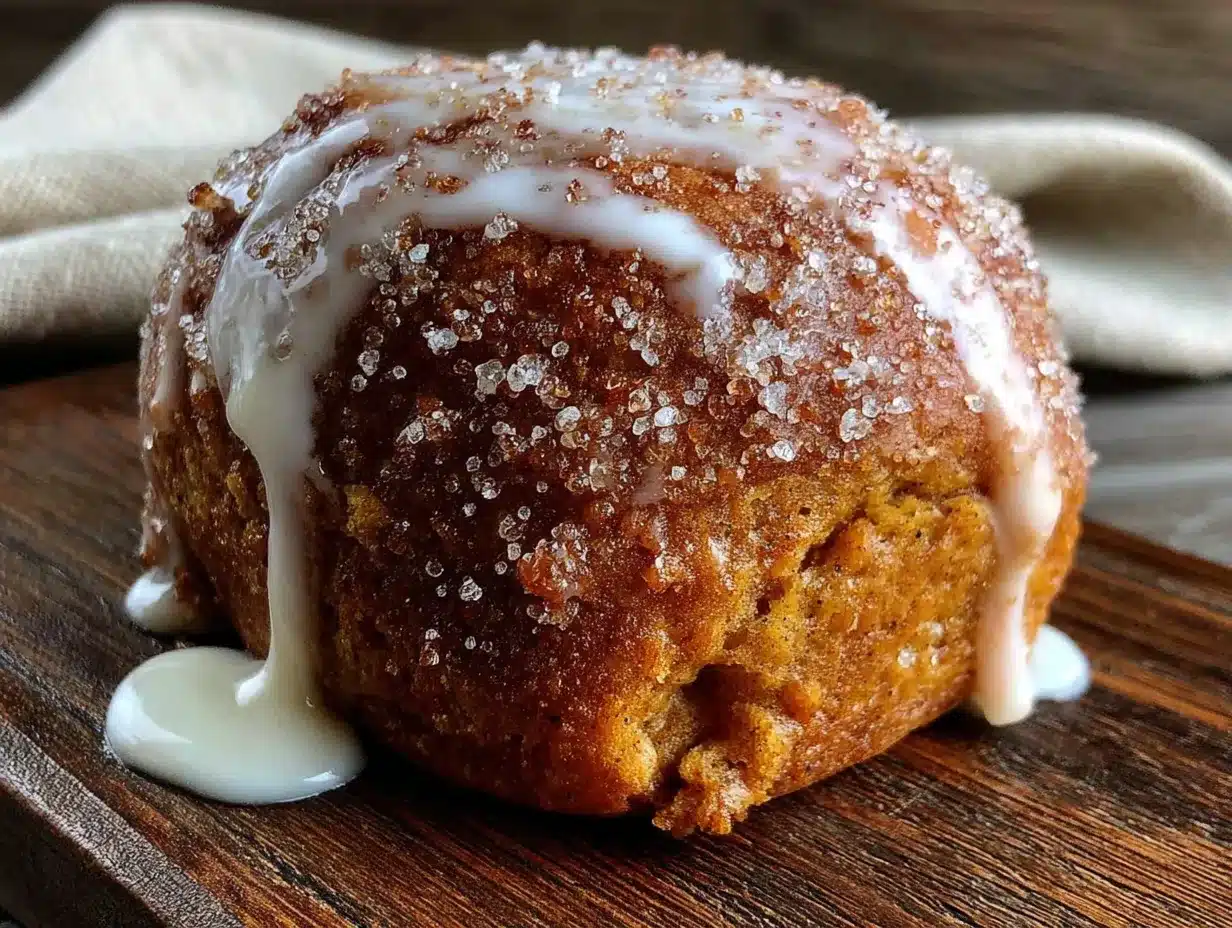
These cozy maple pumpkin scones with cinnamon glaze are everything you want in a fall treat. They’re tender and flaky on the inside with that perfect crumbly edge, and the maple flavor isn’t just a whisper—it’s front and center, warm and honest. The cinnamon glaze on top adds that little extra something that makes you close your eyes after the first bite. I mean, honestly, isn’t that what comfort food is supposed to do?
Maybe you’ve been there too—chasing a recipe that feels like chasing a memory. Let me tell you, after all those failed attempts, this version is the one worth keeping. It’s the kind of scone that makes you want to pour a second cup of coffee and sit down with a good book. The kind that turns an ordinary Tuesday into something special.
Why You’ll Love This Recipe
I’ve tested this recipe more times than I care to count, tweaking the ratios and swapping ingredients until everything clicked. Here’s why I think you’ll fall for these scones the same way I did:
- Quick & Easy: From mixing bowl to oven in about 15 minutes. No stand mixer needed, no complicated techniques—just your hands and a pastry cutter.
- Simple Ingredients: You probably have most of these in your pantry already. Canned pumpkin, maple syrup, flour, butter—nothing fancy, nothing hard to find.
- Perfect for Fall Mornings: These scones were made for cozy weekends, Thanksgiving brunch, or those chilly mornings when you need something warm and sweet to start the day.
- Crowd-Pleaser: Every time I bring these to a gathering, people ask for the recipe. Kids love them, adults love them—they disappear fast.
- Unbelievably Delicious: The texture is what gets me every time. Tender and soft inside, with that slightly crisp exterior from the butter. And that glaze? It’s the kind of thing you’ll want to eat with a spoon.
What makes this recipe different from all the other pumpkin scone recipes out there? It’s the balance. So many pumpkin scones end up tasting like spiced bread, but these actually taste like pumpkin and maple together. The real maple syrup does the heavy lifting here—none of that fake maple flavoring stuff. And the cinnamon glaze isn’t just a drizzle; it’s a generous blanket of sweet, spiced goodness that seeps into the scone’s cracks and crevices.
This isn’t just another version of a pumpkin scone. It’s the one I spent two years trying to recreate. And now it’s yours too.
What Ingredients You Will Need
This recipe uses simple, wholesome ingredients that come together to create something truly special. Most of these are pantry staples, especially once fall rolls around and you start stocking up on baking essentials.
For the Scones
- All-purpose flour (2 ½ cups) – regular all-purpose works perfectly here. No need for bread flour or pastry flour.
- Granulated sugar (⅓ cup) – just enough to sweeten without overpowering the maple flavor.
- Baking powder (2 teaspoons) – make sure it’s fresh! Old baking powder is the #1 reason scones don’t rise properly.
- Baking soda (½ teaspoon) – helps balance the acidity from the pumpkin and maple.
- Salt (½ teaspoon) – don’t skip this! Salt makes everything taste more like itself.
- Ground cinnamon (1 teaspoon) – I prefer Saigon cinnamon for its warm, bold flavor.
- Ground ginger (½ teaspoon) – adds a gentle warmth that complements the pumpkin.
- Ground nutmeg (¼ teaspoon) – freshly grated if you have it, but pre-ground works fine.
- Ground cloves (⅛ teaspoon) – just a pinch to round out the spice blend.
- Unsalted butter (½ cup, cold and cubed) – this is crucial. The butter needs to be straight-from-the-fridge cold so it creates those flaky layers (adds richness).
- Pumpkin purée (½ cup) – not pumpkin pie filling! Make sure you grab 100% pumpkin purée. I like Libby’s for consistency.
- Pure maple syrup (⅓ cup) – real maple syrup, not pancake syrup. Grade A dark amber has the strongest maple flavor.
- Heavy cream (3 tablespoons) – adds richness and tenderness to the dough.
- Vanilla extract (1 teaspoon) – pure vanilla, not imitation.
For the Cinnamon Glaze
- Powdered sugar (1 ½ cups) – sifted if it’s lumpy.
- Ground cinnamon (1 teaspoon) – again, Saigon cinnamon is lovely here.
- Pure maple syrup (2 tablespoons) – for that extra maple punch.
- Milk or heavy cream (2-3 tablespoons) – start with 2 and add more if needed to reach drizzling consistency.
- Vanilla extract (½ teaspoon) – optional but nice.
If you’re out of heavy cream, whole milk works fine. For a dairy-free version, use cold coconut oil instead of butter and your favorite plant-based milk in the glaze. The texture will be slightly different but still delicious.
Equipment Needed
You don’t need a lot of fancy equipment for these scones, which is one of the reasons I love making them. Here’s what you’ll need:
- Large mixing bowl – any big bowl will do.
- Pastry cutter or two forks – for cutting the cold butter into the flour. If you don’t have a pastry cutter, two knives work in a pinch, but I find a pastry cutter makes the job so much easier.
- Measuring cups and spoons – dry measuring cups for flour and sugar, liquid measuring cup for the maple syrup and cream.
- Baking sheet – lined with parchment paper for easy cleanup.
- Parchment paper – prevents sticking and makes transferring the scones a breeze.
- Bench scraper or sharp knife – for cutting the scone dough into wedges.
- Wire cooling rack – essential for letting the glaze set properly.
- Small whisk or fork – for mixing the glaze.
I’ve made these scones with a cheap pastry cutter I bought at a discount store years ago, and they turned out just as good as when I use my nicer one. Don’t stress about having the perfect tools—your hands work surprisingly well for bringing the dough together.
Preparation Method
Making these scones is easier than you might think. The key is keeping everything cold and not overworking the dough. Here’s how I do it:
- Preheat your oven to 400°F (200°C) and line a baking sheet with parchment paper. Getting the oven hot before you start mixing ensures the butter stays cold while you work.
- Whisk the dry ingredients together in a large bowl: flour, sugar, baking powder, baking soda, salt, cinnamon, ginger, nutmeg, and cloves. Make sure everything is evenly distributed—nobody wants a pocket of baking powder in their scone.
- Cut the cold butter into small cubes (about ½-inch pieces) and add them to the flour mixture. Using your pastry cutter or two forks, cut the butter into the flour until the mixture looks like coarse meal with some pea-sized butter pieces remaining. This takes about 2-3 minutes. Don’t overdo it—those little butter chunks are what create flaky layers.
- In a separate small bowl, whisk together the pumpkin purée, maple syrup, heavy cream, and vanilla extract until smooth. The mixture should be thick but pourable.
- Pour the wet ingredients into the dry ingredients and stir with a fork or spatula until just combined. The dough will look shaggy and a bit dry in spots—that’s exactly what you want. If it looks too dry to come together, add a teaspoon more cream. If it looks wet and sticky, you’ve overmixed.
- Turn the dough out onto a lightly floured surface and gently bring it together with your hands. Pat it into a circle about ¾-inch thick. Don’t knead it like bread—just press it together gently. The less you handle it, the more tender your scones will be.
- Cut the circle into 8 wedges using a bench scraper or sharp knife. I like to cut it like a pizza—first in half, then quarters, then eighths. Place the wedges on the prepared baking sheet, spacing them about 2 inches apart.
- Brush the tops with a little extra cream if you want a golden, slightly crunchy top. This step is optional but I never skip it.
- Bake for 14-16 minutes, or until the scones are golden brown on the edges and a toothpick inserted into the center comes out clean. The kitchen will smell absolutely incredible at this point.
- Let the scones cool on the baking sheet for 5 minutes, then transfer them to a wire cooling rack to cool completely before glazing. If you glaze them while they’re still warm, the glaze will just melt and run off.
While the scones are cooling, make the glaze. In a small bowl, whisk together the powdered sugar, cinnamon, maple syrup, vanilla, and 2 tablespoons of milk or cream. Add more liquid a teaspoon at a time until the glaze is thick but pourable—it should drizzle off the whisk in a steady ribbon. Drizzle generously over the cooled scones and let the glaze set for about 10 minutes before serving.
Cooking Tips & Techniques
I’ve made enough mistakes with scones to fill a cookbook, so let me save you some trouble. Here are the things I wish someone had told me:
Keep everything cold. This is the number one rule of scone-making. Cold butter creates steam pockets as it melts in the oven, which gives you those flaky layers. If your kitchen is warm, pop the shaped scones in the fridge for 15 minutes before baking. I learned this the hard way after making a batch of flat, greasy scones on a hot summer day.
Don’t overmix the dough. I know it’s tempting to keep stirring until everything looks smooth and uniform, but stop the moment the flour is incorporated. Overmixing develops gluten, which makes scones tough and dense instead of tender and flaky. Your dough should look a little rough—that’s a good thing.
Use a light hand when shaping. Press the dough together gently, almost like you’re handling a snowball. If you smash it down firmly, you’ll compress all those lovely butter pockets and end up with hockey pucks. Trust me, I’ve been there.
Measure your flour correctly. Spoon it into the measuring cup and level it off with a knife. Scooping directly from the bag packs the flour down and you can end up with 25% more flour than you need. That extra flour is what makes scones dry and crumbly.
Let the glaze set completely. I know you’ll want to eat one immediately—I always do—but the glaze needs about 10 minutes to firm up. If you can’t wait, drizzle a little extra on top right before eating. No judgment here.
Variations & Adaptations
One of the best things about this recipe is how easy it is to adapt. Here are some variations I’ve tried and loved:
Gluten-Free Version: Substitute the all-purpose flour with a good 1:1 gluten-free baking flour blend. I’ve had great results with Bob’s Red Mill 1:1 Baking Flour. The texture will be slightly more tender and less flaky, but still delicious. Add an extra tablespoon of cream since gluten-free flours tend to absorb more liquid.
Vegan Option: Use cold coconut oil or vegan butter instead of regular butter, and replace the heavy cream with full-fat coconut cream or oat milk. For the glaze, use plant-based milk. The scones will be a bit denser but still incredibly tasty—I made these for a vegan friend’s brunch and nobody could tell the difference.
Add Mix-Ins: Fold in ½ cup of chopped pecans, walnuts, or dried cranberries after you’ve mixed the wet and dry ingredients. The nuts add a nice crunch, and the cranberries bring a tartness that balances the sweetness. I once added white chocolate chips and it was absolutely divine—like a pumpkin spice latte in scone form.
Extra Spicy: If you love a bold spice profile, increase the cinnamon to 1 ½ teaspoons and add a pinch of cardamom. The cardamom adds an unexpected floral note that pairs beautifully with the pumpkin and maple.
Pumpkin Seeds on Top: Before baking, sprinkle a handful of pumpkin seeds (pepitas) over the cream-brushed tops. They toast up in the oven and add a lovely crunch and a pop of green color.
Serving & Storage Suggestions
These scones are best served slightly warm, with the glaze still soft and sticky. I like to pop them in a 300°F oven for 5 minutes if they’ve been sitting for a while—it brings back that fresh-from-the-oven feeling.
They pair beautifully with a hot cup of coffee, a chai latte, or a mug of spiced apple cider. For a truly cozy breakfast spread, serve them alongside scrambled eggs and fresh fruit. Or go full fall mode and enjoy them with a pumpkin spice latte—I won’t tell anyone.
Storage: Keep leftover scones in an airtight container at room temperature for up to 3 days. The glaze might get a little sticky, but they’ll still taste great. If you stack them, place a piece of parchment paper between layers to prevent the glaze from sticking together.
Freezing: These scones freeze beautifully. You can freeze them either baked or unbaked. To freeze unbaked scones, shape and cut them, then place them on a baking sheet in the freezer until solid. Transfer to a freezer bag and bake straight from frozen, adding 2-3 minutes to the baking time. To freeze baked scones, let them cool completely without glaze, wrap tightly in plastic wrap and foil, and freeze for up to 3 months. Glaze them after thawing.
Reheating: For best results, reheat scones in a 300°F oven for 5-7 minutes. The microwave works in a pinch but can make them a bit rubbery. If you’re in a hurry, microwave for 15 seconds and then pop them under the broiler for 30 seconds to crisp up the edges.
The flavors actually deepen after a day or two—the pumpkin and maple marry together even more. So if you can resist eating them all on day one, you’re in for a treat on day two.
Nutritional Information & Benefits
Here’s the thing about scones—they’re a treat, not a health food. But that doesn’t mean they can’t have some redeeming qualities. Pumpkin is packed with vitamin A (from beta-carotene), fiber, and antioxidants. It’s also low in calories, so you’re getting some nutritional value with every bite.
Maple syrup contains antioxidants and minerals like zinc and manganese, though it’s still sugar and should be enjoyed in moderation. The cinnamon in the glaze has anti-inflammatory properties and may help regulate blood sugar—a little sprinkle of goodness on top of an already good thing.
Estimated nutrition per scone (with glaze):
| Nutrient | Amount |
|---|---|
| Calories | 320 |
| Total Fat | 14g |
| Saturated Fat | 8g |
| Carbohydrates | 46g |
| Sugar | 24g |
| Fiber | 2g |
| Protein | 4g |
| Vitamin A | 45% DV |
These scones are vegetarian and can be made gluten-free or vegan with the substitutions mentioned above. They contain dairy and gluten in their standard form, so keep that in mind for any allergies.
I believe in enjoying treats without guilt. One scone with your morning coffee isn’t going to derail anything—it’s going to make your morning better. And that counts for something.
Conclusion
These cozy maple pumpkin scones with cinnamon glaze are more than just a recipe to me. They’re a Saturday morning at that little café, a taste of fall that I can have any time I want, a way to bring a little warmth and comfort into my kitchen. After all those failed attempts—the dry ones, the flat ones, the ones that tasted more like cardboard than pumpkin—this version is the one I keep coming back to.
I hope you make these scones and love them as much as I do. Maybe you’ll tweak the spices or add your own favorite mix-ins. Maybe you’ll double the glaze like I sometimes do. That’s the beauty of a good recipe—it’s a starting point, not a rulebook.
If you try these scones, I’d love to hear about it. Leave a comment below and tell me how they turned out, or share a photo on Pinterest and tag me. Your feedback helps me keep improving and creating recipes you’ll actually want to make. And if you have a recipe you’re trying to recreate—maybe from a café that closed, or a grandmother’s kitchen, or a vacation you took years ago—let me know. I might just take on the challenge.
Until next time, happy baking. And remember—the best scone is the one you share with someone you love.
Frequently Asked Questions
Can I use pumpkin pie filling instead of pumpkin purée?
No, please don’t. Pumpkin pie filling already has sugar and spices added, which will throw off the balance of this recipe. Stick with 100% pumpkin purée for the best results. If you only have pumpkin pie filling, you’ll need to reduce the sugar and spices in the recipe significantly, but I can’t guarantee the texture will be the same.
Why did my scones turn out dry?
Dry scones usually happen for one of three reasons: too much flour (measure it correctly by spooning and leveling), overmixing the dough (stop as soon as it comes together), or overbaking (check them at 14 minutes). Also, make sure your pumpkin purée isn’t too watery—if it seems thin, pat it with a paper towel to remove excess moisture.
Can I make the dough ahead of time?
Absolutely! You can shape the scones, place them on a baking sheet, cover with plastic wrap, and refrigerate overnight. Bake them straight from the fridge in the morning, adding a couple of minutes to the baking time. This is actually my favorite way to make them for weekend brunch—everything is done except the baking.
Can I use fake maple syrup?
You can, but I really wouldn’t recommend it. Real maple syrup has a complex, woodsy sweetness that fake syrup just can’t replicate. The flavor difference is noticeable, especially since maple is the star of this recipe. If you’re in a pinch, you could use honey or agave nectar instead, but the flavor profile will change.
How do I know when the scones are done baking?
Look for golden brown edges and a firm top that springs back when you gently press it. A toothpick inserted into the center should come out clean or with just a few moist crumbs. The bottoms should be lightly browned. If the tops are browning too quickly but the centers aren’t done, tent the scones loosely with foil for the last few minutes of baking.
Pin This Recipe!

Cozy Maple Pumpkin Scones with Cinnamon Glaze: Easy Fall Recipe
These tender, flaky maple pumpkin scones are topped with a generous cinnamon glaze, capturing the essence of crisp autumn mornings. A perfected recipe that brings back the warmth of a beloved café treat.
- Prep Time: 15 minutes
- Cook Time: 16 minutes
- Total Time: 31 minutes
- Yield: 8 servings 1x
- Category: Dessert
- Cuisine: American
Ingredients
- 2 ½ cups all-purpose flour
- ⅓ cup granulated sugar
- 2 teaspoons baking powder
- ½ teaspoon baking soda
- ½ teaspoon salt
- 1 teaspoon ground cinnamon (preferably Saigon)
- ½ teaspoon ground ginger
- ¼ teaspoon ground nutmeg
- ⅛ teaspoon ground cloves
- ½ cup unsalted butter, cold and cubed
- ½ cup pumpkin purée (not pumpkin pie filling)
- ⅓ cup pure maple syrup (Grade A dark amber preferred)
- 3 tablespoons heavy cream
- 1 teaspoon vanilla extract
- 1 ½ cups powdered sugar, sifted if lumpy
- 1 teaspoon ground cinnamon (for glaze)
- 2 tablespoons pure maple syrup (for glaze)
- 2–3 tablespoons milk or heavy cream (for glaze)
- ½ teaspoon vanilla extract (optional, for glaze)
Instructions
- Preheat oven to 400°F (200°C) and line a baking sheet with parchment paper.
- In a large bowl, whisk together flour, sugar, baking powder, baking soda, salt, cinnamon, ginger, nutmeg, and cloves.
- Cut cold butter into small cubes (about ½-inch) and add to flour mixture. Use a pastry cutter or two forks to cut butter into flour until mixture resembles coarse meal with some pea-sized butter pieces remaining (about 2-3 minutes).
- In a separate small bowl, whisk together pumpkin purée, maple syrup, heavy cream, and vanilla extract until smooth.
- Pour wet ingredients into dry ingredients and stir with a fork or spatula until just combined. Dough should look shaggy and slightly dry.
- Turn dough out onto a lightly floured surface and gently bring together with hands. Pat into a circle about ¾-inch thick. Do not knead.
- Cut circle into 8 wedges (like a pizza) using a bench scraper or sharp knife. Place wedges on prepared baking sheet, spacing about 2 inches apart.
- Optional: Brush tops with a little extra cream for a golden, crunchy top.
- Bake for 14-16 minutes, until golden brown on edges and a toothpick inserted in center comes out clean.
- Let scones cool on baking sheet for 5 minutes, then transfer to a wire rack to cool completely before glazing.
- While scones cool, make glaze: In a small bowl, whisk together powdered sugar, cinnamon, maple syrup, vanilla, and 2 tablespoons milk or cream. Add more liquid a teaspoon at a time until thick but pourable.
- Drizzle glaze generously over cooled scones. Let set for about 10 minutes before serving.
Notes
Keep all ingredients cold for flaky layers. Do not overmix dough. For gluten-free, use a 1:1 gluten-free flour blend and add an extra tablespoon of cream. For vegan, use cold coconut oil or vegan butter and plant-based milk. Scones can be frozen unbaked or baked (without glaze) for up to 3 months. Reheat in a 300°F oven for 5-7 minutes.
Nutrition
- Serving Size: 1 scone
- Calories: 320
- Sugar: 24
- Sodium: 320
- Fat: 14
- Saturated Fat: 8
- Carbohydrates: 46
- Fiber: 2
- Protein: 4
Keywords: maple pumpkin scones, cinnamon glaze, fall recipe, pumpkin scones, easy scone recipe, autumn breakfast, cozy fall treat


