My niece Lily asked why I couldn’t just crush the Oreos in the bag instead of dirtying a food processor. I started to explain why that wouldn’t work — something about even crumbs and proper texture. Then I stopped. She was holding a rolling pin with this look that said she was already sure she was right. I handed her the bag of cookies and told her to go for it. Let me tell you, watching a nine-year-old smash cookies with pure joy while proving me wrong was a humbling moment. The crumbs were perfect, uneven in the best way, and the kitchen felt more alive than it does with a machine whirring away. That afternoon, these Easy Pumpkin Dirt Cups were born from a kid’s stubborn instinct and my willingness to shut up and learn something.
These little cups have become our go-to fall dessert, and honestly, I’ve never gone back to the food processor. There’s something about making them by hand that sets the tone — it’s supposed to be messy and fun, not precise and sterile. The creamy pumpkin pudding layered with crushed Oreo “dirt” and topped with a gummy worm or two feels like a tiny garden you can actually eat. I mean, who knew that a package of cream cheese, some canned pumpkin, and a box of instant pudding could turn into something this good?
Maybe you’ve been there — staring down a complicated dessert recipe with a mile-long ingredient list and thinking, “There has to be an easier way.” Well, this is it. No baking, no fuss, and the kids can help with almost every step. Lily still reminds me every time we make these that her way was better. And you know what? She’s right.
Why You’ll Love This Recipe
After making these dirt cups for three straight autumns now, I can tell you exactly why they keep showing up at our family gatherings. They’re the kind of dessert that makes everyone happy without making you crazy.
- Quick & Easy: You’re looking at about 20 minutes of active work. The hardest part is waiting for the pudding to set in the fridge, and even that’s only an hour. Perfect for those evenings when the kids suddenly announce they need a treat for tomorrow’s school party.
- Simple Ingredients: Cream cheese, canned pumpkin, instant vanilla pudding mix, milk, whipped topping, Oreos, and some gummy worms. That’s it. No special trips to a fancy grocery store, no ingredients you’ll use once and forget about.
- Perfect for Fall Gatherings: Halloween parties, Thanksgiving dinners, or just a random Tuesday in October when you need something fun. These cups fit right in with the season without stealing the show from the turkey.
- Crowd-Pleaser: I’ve watched picky eaters, adults who claim they don’t like sweets, and kids who usually push their plates away all go back for seconds. The combination of creamy pumpkin and crunchy chocolate dirt hits something primal.
- Unbelievably Delicious: The texture is what gets me every time. Silky smooth pudding against those crumbly Oreo bits, with just enough cream cheese tang to balance the sweetness. It’s comfort food you can eat with a spoon while sitting on the couch.
What makes this different from every other pumpkin dessert out there is the method. Instead of baking a crust or dealing with complicated layers, you’re building these cups like a little landscape. The pudding comes together in one bowl, the Oreos crush in a bag, and assembly is just scooping and sprinkling. It’s the kind of recipe that makes you feel like a genius without actually doing much work.
And honestly? There’s something about eating dessert out of a clear cup that makes it taste better. Maybe it’s seeing all those layers, or maybe it’s the portability. Either way, these dirt cups have a way of making even a regular weeknight feel like a celebration.
What Ingredients You Will Need
This recipe relies on simple, everyday ingredients that work together to create something surprisingly elegant. No obscure spices or hard-to-find items here — just good old-fashioned pantry staples with a seasonal twist.
- 1 package (8 ounces) cream cheese, softened — Full-fat works best here for that rich, creamy texture. Let it sit on the counter for about 30 minutes before you start, or microwave it for 10 seconds if you’re in a hurry. I’ve tried low-fat versions, and the pudding doesn’t set up as nicely.
- 1 cup canned pumpkin puree — Make sure you’re grabbing pumpkin puree, not pumpkin pie filling. The puree has no added sugar or spices, which means you control the flavor. Libby’s is my go-to brand because it’s consistently thick and not watery.
- 1 box (3.4 ounces) instant vanilla pudding mix — Don’t use cook-and-serve pudding for this. Instant pudding is what gives you that quick set time. Jell-O brand works perfectly, but store brands do the job too.
- 1 cup cold milk — Whole milk gives the creamiest result, but 2% works fine. I wouldn’t go lower than that or the pudding might be too thin. For a dairy-free version, oat milk is your best bet — it’s thick enough to mimic whole milk.
- 1 teaspoon pumpkin pie spice — You can buy this pre-mixed, or make your own with 1/2 teaspoon cinnamon, 1/4 teaspoon nutmeg, 1/4 teaspoon ginger, and a pinch of cloves. I actually prefer making my own because I can adjust the cinnamon up a bit.
- 1 cup thawed whipped topping — Cool Whip is the classic choice, but any frozen whipped topping works. If you want to go homemade, whip 1 cup of heavy cream with 2 tablespoons of powdered sugar until stiff peaks form.
- 1 package (14.3 ounces) Oreo cookies — Regular Oreos, not the double-stuf ones. You want the cookie-to-cream ratio to be just right for that dirt texture. I’ve tried this with generic chocolate sandwich cookies, and they’re fine, but Oreos really do taste better.
- Gummy worms or candy pumpkins for decoration — This is where you can get creative. Gummy worms make it look like a real dirt patch, while candy pumpkins lean into the harvest theme. My kids prefer worms because they like pretending they’re digging for treasure.
One thing I’ve learned the hard way — check your pumpkin puree before you start. Sometimes it separates in the can, and you’ll get watery liquid on top. Just stir it well in the can before measuring, and you’ll be fine. If your puree looks really thin, let it drain in a fine-mesh strainer for about 10 minutes.
Equipment Needed
You don’t need much for this recipe, which is part of its charm. Here’s what you’ll want to have on hand:
- Large mixing bowl — For the cream cheese and pudding mixture. Any bowl will do, but a wider one makes mixing easier.
- Hand mixer or stand mixer — You can do this by hand with a whisk, but your arm will thank you for using a mixer. The cream cheese needs to be really smooth, and that’s harder to achieve manually.
- Ziploc bag or kitchen towel — For crushing the Oreos. A rolling pin works great, but honestly, the bottom of a heavy skillet does the same job. My niece proved that a child with determination and a wooden spoon can also get the job done.
- Clear cups or small jars — 8-ounce cups are perfect. You want to see those layers, so clear plastic or glass is ideal. I save small mason jars throughout the year for exactly this purpose.
- Spatula — For scraping every bit of that pudding mixture into the cups. Waste not, want not.
- Measuring cups and spoons — Standard set will do. Nothing fancy needed here.
If you don’t have a hand mixer, a good whisk and some elbow grease will work. Just make sure your cream cheese is really soft before you start, or you’ll be fighting lumps for a while. I’ve made these at a friend’s cabin with nothing but a fork and a bowl, and they turned out fine — just a little more rustic looking.
Preparation Method
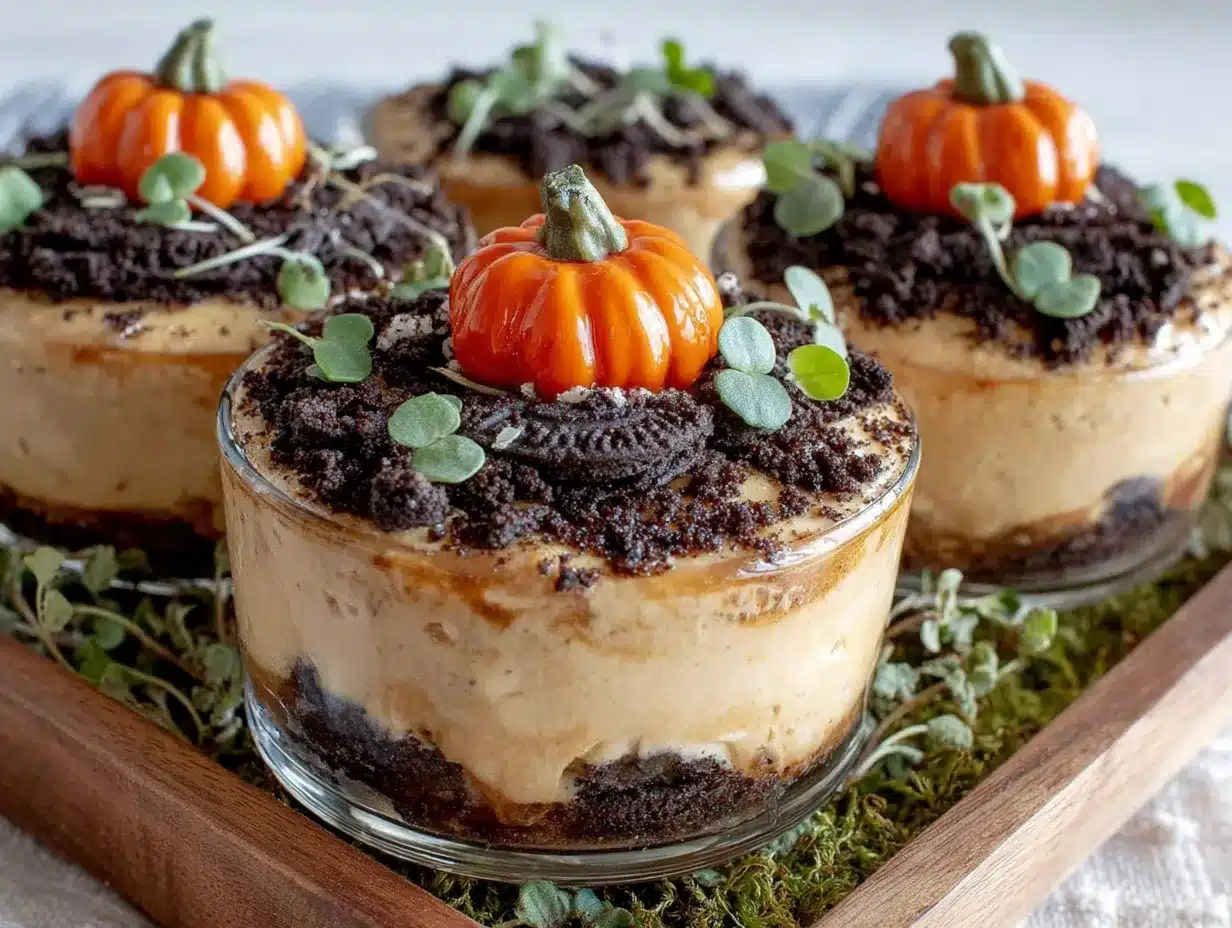
Let’s get down to business. This whole process takes about 20 minutes of active work, plus an hour of chill time. Here’s how it goes:
- Crush the Oreos. Put all the cookies in a large Ziploc bag and seal it tight. Now go to town with a rolling pin, the bottom of a measuring cup, or your fists if you’re feeling stressed. You want a mix of fine crumbs and slightly bigger pieces — that’s what gives it that realistic dirt texture. Set aside about 1/4 cup of the crumbs for topping later. This step takes about 3 minutes and is the perfect job for kids.
- Beat the cream cheese. In a large mixing bowl, beat the softened cream cheese with your hand mixer until it’s completely smooth with no lumps. This takes about 2 minutes on medium speed. Scrape down the sides of the bowl halfway through. If you see any tiny lumps, keep beating — they’ll smooth out.
- Add the pumpkin and spices. Add the pumpkin puree and pumpkin pie spice to the cream cheese. Beat on medium speed until everything is well combined and looks like a uniform orange mixture. About 1 minute should do it. The smell at this point is incredible — like autumn in a bowl.
- Make the pudding. In a separate small bowl, whisk together the instant vanilla pudding mix and cold milk for about 2 minutes until it starts to thicken. It will be quite thin at first, then suddenly get thick. Don’t overmix — you just want it to come together.
- Combine everything. Pour the pudding mixture into the pumpkin-cream cheese bowl. Beat on low speed until just combined, then fold in the whipped topping with a spatula. Be gentle here — you want to keep some air in the mixture so it stays light and fluffy. The final mixture should be a beautiful pale orange color with a mousse-like texture.
- Layer the cups. Spoon about 2 tablespoons of Oreo crumbs into the bottom of each cup. This creates the “dirt” base. Then spoon the pumpkin pudding mixture on top, filling each cup about three-quarters full. You want to leave room for the top layer of crumbs.
- Top with more dirt. Sprinkle the reserved Oreo crumbs over the top of each cup. Use about 1 to 2 tablespoons per cup, depending on how much dirt you want. Press down lightly so the crumbs stick to the pudding.
- Chill. Place the cups in the refrigerator for at least 1 hour, or up to overnight. This allows the pudding to set completely and the flavors to meld together. The longer they sit, the better they taste — the Oreo crumbs soften slightly and the pumpkin flavor deepens.
- Decorate and serve. Right before serving, stick a gummy worm or candy pumpkin into each cup. The worms look like they’re crawling out of the dirt, which the kids absolutely love. Serve cold and watch them disappear.
One thing I’ve learned — don’t skip the chill time. If you eat these right away, the pudding will be too loose and the crumbs will be too crunchy. Give them that hour, and everything settles into the perfect texture. Your patience will be rewarded.
Cooking Tips & Techniques
After making these dirt cups more times than I can count, I’ve picked up a few tricks that make the process smoother and the results better. Here’s what I wish someone had told me the first time:
Room temperature ingredients matter. I know it’s tempting to use cold cream cheese straight from the fridge, but you’ll end up with lumpy pudding. Let everything come to room temperature for about 30 minutes before you start. If you’re in a rush, cut the cream cheese into small cubes and microwave it for 10 seconds at a time until it’s soft but not melted.
Don’t overmix the pudding. The instant pudding mix needs just enough stirring to activate. If you beat it too long, it can get thin and never set properly. Whisk it for exactly 2 minutes, then stop. Trust the process.
Crush the Oreos strategically. For the best texture, leave some bigger pieces in the mix. You don’t want everything to be fine dust — that looks more like cocoa powder than dirt. Aim for a mix of fine crumbs and pea-sized pieces. The variety in texture makes it feel more authentic.
Make extra crumbs. I always crush a few extra Oreos beyond what the recipe calls for. Kids love snacking on them during assembly, and you might want a thicker dirt layer on top. Better to have too much than not enough.
Use a piping bag for the pudding. If you want really clean layers, put the pumpkin mixture in a piping bag or a Ziploc bag with the corner snipped off. This lets you fill the cups neatly without smearing pudding on the sides. It’s a small step that makes the final presentation look professional.
I once made these for a Halloween party and forgot to add the pumpkin pie spice. The cups were still good, but they tasted more like plain cheesecake than fall. Don’t be like me — taste your pudding mixture before you start layering. A quick taste test can save you from a bland dessert.
Variations & Adaptations
One of the best things about this recipe is how flexible it is. Here are some ways I’ve adapted it over the years:
Gluten-Free Version: Swap the regular Oreos for gluten-free chocolate sandwich cookies. Most major brands make a gluten-free version now, and they taste almost identical. The rest of the ingredients are naturally gluten-free, so this is an easy switch.
Dairy-Free Adaptation: Use dairy-free cream cheese, coconut milk or oat milk for the pudding, and a dairy-free whipped topping. I’ve tested this with Kite Hill cream cheese and So Delicious coconut whipped topping, and the results were surprisingly good. The texture is slightly less rich, but the flavor is still spot-on.
Pumpkin Spice Lovers Version: Double the pumpkin pie spice and add a pinch of extra cinnamon and nutmeg. For an even bigger punch, stir in 1/4 cup of crushed graham crackers along with the Oreo crumbs. The extra warmth and crunch take these cups to another level.
No-Bake Pumpkin Cheesecake Cups: Skip the Oreo dirt entirely and use a graham cracker crust instead. Mix 1 cup of crushed graham crackers with 3 tablespoons of melted butter, press into the bottom of each cup, and proceed with the recipe. It’s a different vibe — more traditional, less playful — but equally delicious.
Chocolate Pumpkin Version: Use chocolate instant pudding instead of vanilla for a deeper, more decadent flavor. The chocolate and pumpkin combination is surprisingly good — think pumpkin chocolate chip cookies in pudding form. My husband actually prefers this version.
I once made a batch with crushed ginger snaps instead of Oreos, and it was a happy accident. The spicy ginger cookie paired beautifully with the pumpkin, and the texture was even crumblier. If you’re feeling adventurous, give it a try.
Serving & Storage Suggestions
These dirt cups are best served cold, straight from the fridge. The contrast between the cool, creamy pudding and the slightly softened Oreo crumbs is what makes them so satisfying. I like to set them out about 10 minutes before serving to take the edge off the chill, but that’s a personal preference.
For presentation, arrange the cups on a platter or a wooden board. If you’re serving them at a party, scatter a few extra gummy worms and candy pumpkins around the base of the cups for a playful touch. Kids love seeing the “garden” theme carried through to the serving dish.
These cups pair beautifully with warm apple cider or a hot cup of coffee. The cool sweetness of the dessert balances the warmth of the drink perfectly. If you’re serving them after a heavy meal, they’re light enough not to weigh anyone down.
Storage Instructions: Keep the dirt cups covered in the refrigerator for up to 3 days. The Oreo crumbs will soften over time, which some people actually prefer. If you want to keep the crumbs crunchy, store the crushed Oreos separately and add them just before serving.
These cups freeze surprisingly well. Wrap each cup tightly in plastic wrap and then foil, and freeze for up to 2 months. Thaw overnight in the refrigerator before serving. The texture might be slightly softer after freezing, but the flavor remains excellent.
One thing I’ve noticed — these taste even better the next day. The flavors have time to meld together, and the pudding sets up perfectly. So if you can make them a day ahead, do it. Your future self will thank you.
Nutritional Information & Benefits
Let’s be real — these are a treat, not a health food. But they’re not as indulgent as you might think. Here’s a rough breakdown per serving (based on 8 servings):
- Calories: Approximately 320-350 per cup
- Fat: 18-20 grams
- Carbohydrates: 38-42 grams
- Protein: 5-6 grams
- Sugar: 28-32 grams
- Fiber: 2-3 grams
The pumpkin puree actually brings some nutritional value to the table. It’s packed with vitamin A, which is great for eye health, and it adds fiber that helps balance out the sugar from the cookies and pudding. The cream cheese provides a bit of calcium and protein, though let’s be honest — we’re not eating these for the nutrients.
If you’re watching your sugar intake, you can use sugar-free pudding mix and light whipped topping. The flavor will be slightly different — a touch less sweet and a bit more tangy — but still completely satisfying. I’ve made this swap for family members with diabetes, and they didn’t feel deprived.
These cups are vegetarian-friendly but not vegan in their standard form. They contain dairy and gluten. For allergen-friendly versions, check the variations section above.
Conclusion
These Easy Pumpkin Dirt Cups have become a fall tradition in our house, and I honestly can’t imagine the season without them. They’re the kind of recipe that proves you don’t need complicated techniques or fancy ingredients to make something memorable. A little pumpkin, some Oreos, and a bit of patience — that’s all it takes.
What I love most about this recipe is how it brings people together. The kids get to crush cookies and stick gummy worms into the dirt. The adults get a dessert that tastes like autumn in a cup. And everyone leaves the table happy, which is really the whole point of cooking, isn’t it?
I’d love to hear how these turn out for you. Did your kids have strong opinions about the worm placement? Did you try a variation that blew your mind? Drop a comment below and let me know. And if you snap a photo of your dirt cups, tag me — I’m always looking for new inspiration. Happy fall, friends. Go make some dirt.
Frequently Asked Questions
Can I make these dirt cups ahead of time?
Absolutely. In fact, they taste better the next day. Make them up to 24 hours in advance and keep them covered in the refrigerator. Just add the gummy worms right before serving so they don’t get too soft.
Can I use homemade whipped cream instead of Cool Whip?
Yes, and it’s actually my preferred method. Whip 1 cup of heavy cream with 2 tablespoons of powdered sugar until stiff peaks form. Fold it into the pudding mixture gently. The texture will be slightly lighter and less sweet than using Cool Whip.
How many cups does this recipe make?
This recipe makes about 8 servings if you’re using 8-ounce cups. If you use smaller cups, like 4-ounce shot glasses for a party, you’ll get closer to 12 to 14 servings. Adjust accordingly based on your crowd.
Can I use fresh pumpkin instead of canned?
You can, but I wouldn’t recommend it for this recipe. Fresh pumpkin puree tends to be more watery than canned, which can make the pudding too loose. If you insist on using fresh, cook it down until it’s very thick and let it drain in a cheesecloth for at least an hour before using.
My pudding didn’t set. What went wrong?
This usually happens for one of three reasons: your milk was too warm, you didn’t whisk the pudding mix long enough, or you added too much milk. Next time, make sure your milk is cold, whisk for the full 2 minutes, and measure your milk precisely. If your pudding is still runny after an hour in the fridge, you can salvage it by folding in an extra 1/4 cup of whipped topping to thicken it up.
Pin This Recipe!

Easy Pumpkin Dirt Cups with Oreo Crust

No-bake pumpkin dirt cups with a creamy pumpkin pudding, crushed Oreo ‘dirt,’ and gummy worms. A fun, kid-friendly fall dessert that comes together in 20 minutes.
- Prep Time: 20 minutes
- Cook Time: 0 minutes
- Total Time: 1 hour 20 minutes (includes 1 hour chill time)
- Yield: 8 servings 1x
- Category: Dessert
- Cuisine: American
Ingredients
- 1 package (8 ounces) cream cheese, softened
- 1 cup canned pumpkin puree
- 1 box (3.4 ounces) instant vanilla pudding mix
- 1 cup cold milk
- 1 teaspoon pumpkin pie spice
- 1 cup thawed whipped topping (e.g., Cool Whip)
- 1 package (14.3 ounces) Oreo cookies
- Gummy worms or candy pumpkins for decoration
Instructions
- Crush the Oreos: Place all cookies in a large Ziploc bag and seal. Crush with a rolling pin or heavy skillet until you have a mix of fine crumbs and small pieces. Set aside about 1/4 cup for topping.
- Beat the cream cheese: In a large mixing bowl, beat softened cream cheese with a hand mixer until smooth, about 2 minutes on medium speed. Scrape down sides as needed.
- Add pumpkin and spices: Add pumpkin puree and pumpkin pie spice to the cream cheese. Beat on medium speed until well combined, about 1 minute.
- Make the pudding: In a separate small bowl, whisk together instant vanilla pudding mix and cold milk for about 2 minutes until it thickens.
- Combine everything: Pour the pudding mixture into the pumpkin-cream cheese bowl. Beat on low speed until just combined, then fold in the whipped topping with a spatula until light and fluffy.
- Layer the cups: Spoon about 2 tablespoons of Oreo crumbs into the bottom of each clear cup (8-ounce size). Then spoon the pumpkin pudding mixture on top, filling each cup about three-quarters full.
- Top with more dirt: Sprinkle reserved Oreo crumbs over the top of each cup, about 1-2 tablespoons per cup. Press down lightly.
- Chill: Refrigerate for at least 1 hour, or up to overnight, to allow the pudding to set.
- Decorate and serve: Just before serving, stick a gummy worm or candy pumpkin into each cup. Serve cold.
Notes
For best results, use room temperature cream cheese and cold milk. Don’t overmix the pudding. Crush Oreos with some larger pieces for texture. These taste even better the next day. Store covered in the refrigerator for up to 3 days. For dairy-free, use dairy-free cream cheese, oat milk, and dairy-free whipped topping. For gluten-free, use gluten-free chocolate sandwich cookies.
Nutrition
- Serving Size: 1 cup (8 ounces)
- Calories: 335
- Sugar: 30
- Sodium: 380
- Fat: 19
- Saturated Fat: 10
- Carbohydrates: 40
- Fiber: 2.5
- Protein: 5.5
Keywords: pumpkin dirt cups, Oreo dirt cups, no-bake pumpkin dessert, fall dessert, kid-friendly dessert, Halloween dessert, pumpkin pudding


