It was 10:47 PM on a random Tuesday in October, and I had a very specific, slightly unhinged craving. I wanted something spicy, something creamy, and something that looked like it belonged at a Halloween party I wasn’t even invited to. The problem? I didn’t have any cream cheese—the usual suspect for any respectable jalapeno popper—but I had a tub of cottage cheese that was staring at me from the fridge. And, you know, I had the jalapenos. And the crescent roll dough that was probably two days past its “best by” date. Honestly, this is how the best recipes are born, isn’t it? Out of pure, stubborn refusal to go to the grocery store at 11 PM.
I was tired, my kitchen was a mess from a day of recipe testing, and I was in that weird headspace where logic takes a backseat to curiosity. I thought, “What if I just… blend the cottage cheese? What if I wrap these things like little mummies?” My neighbor, bless her heart, had just dropped off a bag of Halloween candy, and the idea of savory mummies felt like a cosmic sign. I mean, maybe you’ve been there—you’re half-asleep, you have a vision of a dish, and you just have to see it through. That night, the odd hours loosened the usual rules, and I ended up with a snack that was not only visually hilarious but genuinely, surprisingly delicious.
The result was a lighter, tangier, and frankly more interesting version of the classic popper. The cottage cheese, once whipped, became this impossibly smooth, protein-packed filling that didn’t weigh me down. And the “mummy” wrapping? It’s just fun. It makes you smile. That’s the kind of energy I want in my kitchen, especially during the chaotic, candy-fueled month of October. This recipe stayed with me because it proved that a little late-night creativity can solve a craving and create a new tradition, all without a trip to the store.
Why You’ll Love This Recipe
Let me tell you, these Lighter Mummy Wrapped Jalapeno Poppers are not your average party snack. They hit that perfect sweet spot between indulgent and smart, which is exactly what I need when I’m trying to eat well but still want food that feels like a celebration. I’ve tested this recipe about five times now (my family is tired of them, honestly), and every time, they get devoured before the main course even hits the table.
- Quick & Easy: From start to finish, you’re looking at about 30 minutes. Perfect for a last-minute Halloween gathering or a Tuesday night craving that just won’t quit.
- Simple Ingredients: You likely have everything in your kitchen right now. No fancy grocery trips needed for this one—just peppers, cheese, and dough.
- Perfect for Halloween: These little guys are the star of any spooky spread. They’re cute, they’re creepy, and they’re guaranteed to get a laugh (and a second helping).
- Crowd-Pleaser: I’ve served these to kids, adults, and picky eaters. The spicy-savory combo is universally loved, and the “mummy” look is just plain fun.
- Unbelievably Delicious: The texture is next-level. The filling is creamy and tangy, the pepper gives a gentle heat, and the dough bakes up golden and flaky. It’s comfort food reimagined—healthier, faster, but with the same soul-soothing satisfaction.
What makes this recipe different from the rest is that secret cottage cheese swap. I know, I know—it sounds a little weird. But trust me, when you blend cottage cheese until it’s silky smooth, it creates a filling that’s lighter than cream cheese but just as rich. It’s the kind of trick that makes you close your eyes after the first bite, wondering why you didn’t try it sooner. This isn’t just another version of a jalapeno popper; it’s my best version. Perfect for impressing guests without any stress, or turning a simple snack into something memorable.
What Ingredients You Will Need
This recipe uses simple, wholesome ingredients to deliver bold flavor and satisfying texture without the fuss. Most of these are pantry staples, which makes this a go-to recipe when you need something fun in a pinch. Here’s what you’ll need to gather:
For the Filling
- 1 cup cottage cheese (I recommend Good Culture or Daisy for a thick, creamy texture—full-fat or low-fat both work great here)
- 4 oz reduced-fat cream cheese, softened (this adds that classic popper richness while keeping things lighter)
- 1/2 cup shredded sharp cheddar cheese (adds a bold, savory punch—you can also use pepper jack for extra heat)
- 1/4 cup chopped green onions (for a fresh, mild onion flavor)
- 1/2 teaspoon garlic powder
- 1/4 teaspoon smoked paprika (adds a subtle smoky depth)
- 1/4 teaspoon salt
- 1/8 teaspoon black pepper
For the Poppers
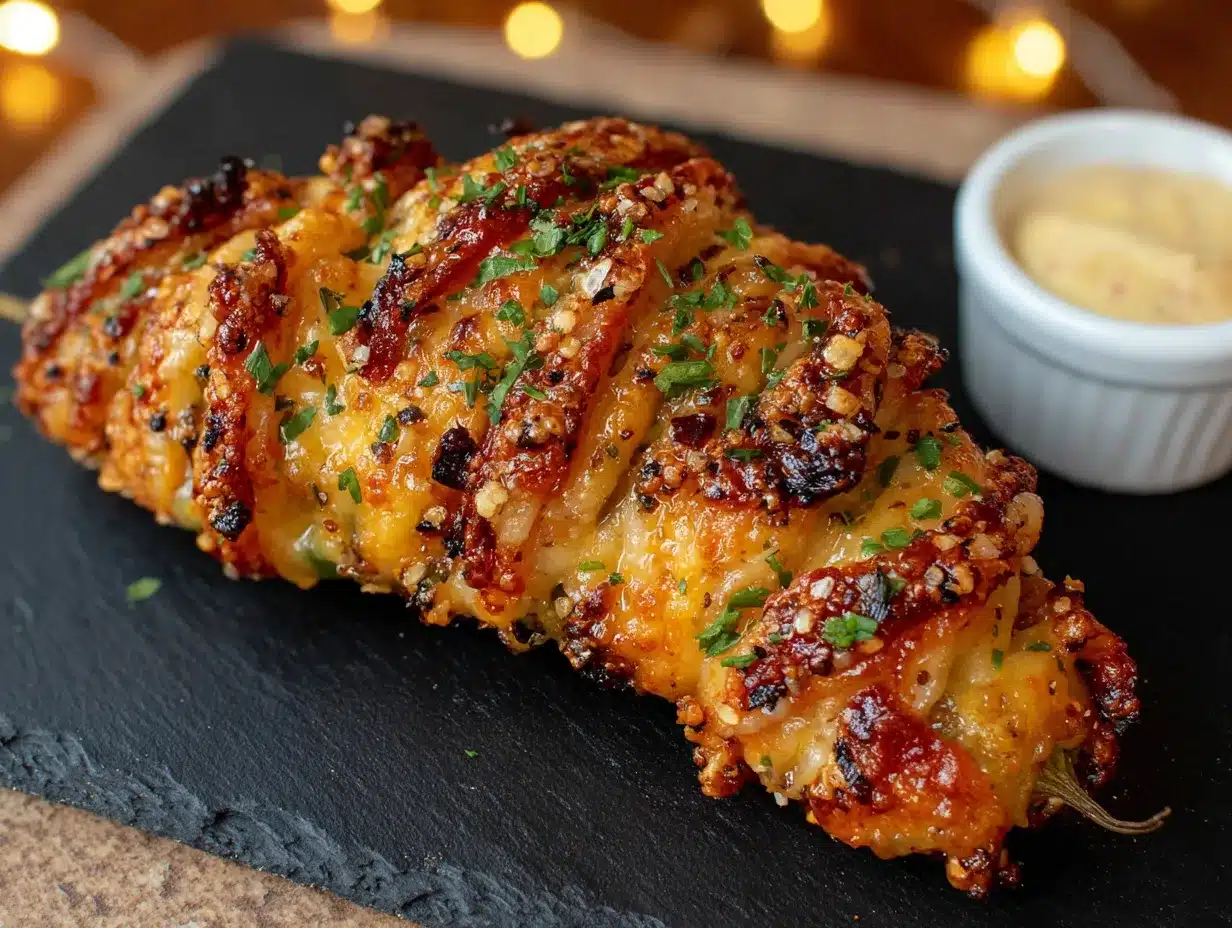
- 12 large jalapeno peppers (look for firm, evenly shaped peppers—try to pick ones that can stand up on their own for easier filling)
- 1 can (8 oz) refrigerated crescent roll dough (I like Pillsbury, but any brand works—just make sure it’s the sheet style if you want fewer seams)
- 1 large egg, beaten (for the egg wash that gives the mummies that golden, glossy finish)
- Optional: candy eyes or small dots of black sesame seeds (for the mummy eyes—totally optional but highly recommended for the fun factor)
Ingredient Selection Tips
When picking your jalapenos, look for ones that are relatively straight and have a flat side—they’ll be easier to cut and fill. If you’re sensitive to heat, you can remove the seeds and membranes completely. For a spicier popper, leave a few seeds in. The cottage cheese is the star here, so don’t use the watery, runny kind. Look for small-curd or “cream style” cottage cheese for the best texture. If you’re dairy-free, you can swap the cottage cheese for a blended silken tofu and use a dairy-free cream cheese alternative—it works surprisingly well!
Equipment Needed
You don’t need a ton of fancy tools for this recipe, which is one of the reasons I love it. Here’s what you’ll need:
- Food processor or blender (this is crucial for getting that cottage cheese silky smooth—I use my trusty Cuisinart mini-prep, but a Nutribullet works great too)
- Baking sheet (a standard half-sheet pan works perfectly—line it with parchment paper for easy cleanup)
- Parchment paper (trust me on this one—it prevents sticking and makes the bottoms perfectly golden)
- Sharp knife (for halving the jalapenos—a paring knife is ideal for this delicate work)
- Small spoon or melon baller (for scooping out the seeds and membranes—a melon baller is my secret weapon here)
- Pastry brush (for applying the egg wash—a silicone one is easiest to clean)
- Cutting board
- Mixing bowls (one medium, one small)
If you don’t have a food processor, no worries! You can mash the cottage cheese with a fork until it’s mostly smooth—it won’t be as silky, but it’ll still taste great. And if you don’t have a pastry brush, just use a spoon to drizzle the egg wash over the dough. I’ve done it that way plenty of times when my brush was in the dishwasher.
Preparation Method
Alright, let’s get to the fun part. I’ve broken this down step-by-step so you can follow along without any hiccups. Trust me, once you get the hang of the wrapping, you’ll be flying through these.
- Preheat your oven to 375°F (190°C). Line a baking sheet with parchment paper. This is not the time to skip the parchment—I learned that the hard way when I had to scrub burnt cheese off a pan. Set the sheet aside.
- Prepare the jalapenos. Cut each jalapeno in half lengthwise. Use a small spoon or melon baller to scoop out the seeds and white membranes. If you want a milder popper, be thorough. If you like heat, leave a few seeds in. Place the hollowed-out halves on a plate and set them aside. Pro tip: wear gloves for this step, or wash your hands immediately after. I forgot once and rubbed my eye—it was a rough 20 minutes.
- Make the filling. In a food processor or blender, combine the cottage cheese, softened cream cheese, shredded cheddar, green onions, garlic powder, smoked paprika, salt, and pepper. Blend until completely smooth. This takes about 30-45 seconds. Scrape down the sides halfway through. The mixture should look like a thick, creamy dip. Give it a taste and adjust the seasoning if needed—I usually add a pinch more smoked paprika here.
- Fill the jalapenos. Using a small spoon, fill each jalapeno half with the cheese mixture. Don’t overstuff them—you want the filling to be level with the cut edge of the pepper. You’ll have a little extra filling, which is perfect for dipping later (or for sneaking a taste, no judgment).
- Prepare the “mummy” wrappings. Unroll the crescent roll dough on a cutting board. If it’s a perforated sheet, press the seams together to create one solid sheet. Use a pizza cutter or sharp knife to cut the dough into long, thin strips—about 1/2 inch wide. You should get about 24-30 strips from one can.
- Wrap the mummies. Take one strip of dough and wrap it around a filled jalapeno half, starting at one end and working your way to the other. Leave a small gap near the top for the “eyes.” The dough should overlap slightly, like a bandage. Don’t wrap too tightly, or the dough will tear as it bakes. Place the wrapped popper on the prepared baking sheet, seam-side down. Repeat with the remaining jalapenos and dough strips.
- Apply the egg wash. In a small bowl, beat the egg with a tablespoon of water. Using a pastry brush, gently brush the egg wash over each mummy wrapper. This gives them that beautiful golden-brown color. Don’t skip this step—it makes them look bakery-worthy.
- Bake. Place the baking sheet in the preheated oven and bake for 18-22 minutes, or until the dough is golden brown and puffed, and the filling is hot and bubbly. The edges of the dough should look crispy. If your oven runs hot, check at the 15-minute mark.
- Add the eyes (optional but amazing). As soon as the poppers come out of the oven, press two small candy eyes or black sesame seeds into the exposed filling at the top of each mummy. The heat will help them stick. If you’re using candy eyes, be gentle—they can melt if the popper is too hot. Let them cool for a minute first.
- Cool and serve. Let the poppers cool on the baking sheet for 5 minutes before transferring them to a serving platter. This allows the filling to set slightly so it doesn’t ooze out when you bite into them. Serve warm or at room temperature.
Cooking Tips & Techniques
After making these poppers more times than I care to admit, I’ve picked up a few tricks that make the process smoother and the results more consistent. Here are my best tips:
Don’t overfill the peppers. I know it’s tempting to pile on the filling, but if you overstuff them, the filling will bubble out during baking and make a mess on the pan. Trust me, I’ve had a few “mummy blowouts” in my day. Keep the filling level with the cut edge of the pepper, and you’ll get clean, beautiful poppers every time.
Let the dough come to room temperature. Crescent roll dough is much easier to work with when it’s slightly softened. If it’s too cold, the strips will crack and tear when you try to wrap them. Let the can sit on the counter for 10 minutes before opening it. This small step makes a huge difference.
Use a pizza cutter for the dough strips. A sharp pizza cutter glides through the dough cleanly without pulling or stretching it. If you use a knife, make sure it’s very sharp, and use a gentle sawing motion. Ragged edges on the strips can tear more easily during wrapping.
Space them out on the baking sheet. These poppers need room to puff up and get crispy. If you crowd them, they’ll steam instead of bake, and the bottoms will be soggy. Give each popper at least an inch of space on all sides. You might need two baking sheets if you’re making a double batch.
Make ahead tip. You can assemble the poppers up to a day in advance. Just prepare them through step 6, cover the baking sheet tightly with plastic wrap, and refrigerate. When you’re ready to bake, add the egg wash and pop them in the oven—you might need to add 2-3 minutes to the baking time since they’re starting from cold.
Variations & Adaptations
One of the best things about this recipe is how flexible it is. I’ve tried several variations, and they’ve all been winners. Here are some of my favorites:
Vegetarian & Gluten-Free Version
To make these gluten-free, simply use a gluten-free crescent roll dough or puff pastry. For a vegetarian version, you’re already good to go—this recipe is naturally meat-free. I’ve also made a version using gluten-free pizza dough cut into strips, and it worked beautifully, though the texture was a bit chewier.
Spicy Chorizo Poppers
For a heartier version, cook 1/4 cup of crumbled chorizo or spicy turkey sausage and mix it into the cheese filling before stuffing the peppers. The smoky, spicy meat adds a whole new layer of flavor. I did this for a football party, and they disappeared in minutes.
Sweet & Spicy Mummies
Drizzle a little honey or hot honey over the finished poppers before serving. The sweetness balances the heat from the jalapenos and the tangy filling. I tried this on a whim one night, and now I can’t go back. It’s a game-changer.
Dairy-Free Adaptation
Use a dairy-free cream cheese alternative and substitute the cottage cheese with blended silken tofu (about 1 cup). Use a dairy-free shredded cheese alternative. The texture will be slightly different, but the flavor is still fantastic. I’ve tested this for a friend with a dairy allergy, and she gave it two thumbs up.
Serving & Storage Suggestions
These poppers are best served warm, right out of the oven, when the dough is at its flakiest and the filling is hot and creamy. But they’re also surprisingly good at room temperature, which makes them perfect for parties and potlucks.
Serving Ideas: Arrange the mummies on a platter with a small bowl of ranch dressing or Greek yogurt dip for dunking. They also pair beautifully with a crisp green salad for a light dinner, or alongside a bowl of spicy tortilla soup for a cozy fall meal. For a Halloween spread, I like to serve them with black olive “spiders” and some roasted pumpkin seeds for crunch.
Storage: Leftover poppers can be stored in an airtight container in the refrigerator for up to 3 days. The dough will soften slightly, but they’ll still taste great. To reheat, place them on a baking sheet in a 350°F oven for 5-7 minutes, or until warmed through. I don’t recommend microwaving them—the dough gets chewy and the filling can become rubbery.
Freezer Instructions: You can freeze the unbaked poppers for up to 2 months. Assemble them through step 6, then place the baking sheet in the freezer for 1 hour, or until the poppers are frozen solid. Transfer them to a freezer-safe bag or container. When you’re ready to bake, place the frozen poppers on a parchment-lined baking sheet, brush with egg wash, and bake at 375°F for 22-25 minutes. No need to thaw first!
Nutritional Information & Benefits
These lighter poppers are a smarter choice compared to traditional versions, but they don’t sacrifice an ounce of flavor. Here’s the estimated nutritional breakdown per popper (based on 12 servings):
| Nutrient | Amount per Popper |
|---|---|
| Calories | 145 |
| Total Fat | 9g |
| Saturated Fat | 4g |
| Cholesterol | 35mg |
| Sodium | 310mg |
| Total Carbohydrates | 11g |
| Dietary Fiber | 1g |
| Sugars | 3g |
| Protein | 7g |
The cottage cheese is the real hero here—it’s packed with protein and calcium, and it gives the filling a creamy texture without the heavy fat content of traditional cream cheese. Jalapenos are rich in vitamin C and capsaicin, which has anti-inflammatory properties. Plus, using reduced-fat cream cheese and light crescent dough keeps the calorie count reasonable. This is the kind of snack that fits into a balanced lifestyle without making you feel like you’re missing out.
Frequently Asked Questions
Can I use cream cheese instead of cottage cheese?
Absolutely! If you prefer the classic popper texture, you can substitute the cottage cheese with an equal amount of softened cream cheese. Just note that the filling will be richer and higher in fat and calories. I’ve done it both ways, and they’re both delicious—the cottage cheese version is just lighter and tangier.
How do I make these less spicy?
To reduce the heat, remove all the seeds and white membranes from the jalapenos. Those are the parts that contain most of the capsaicin. You can also rinse the pepper halves under cold water after seeding to remove any lingering heat. For a totally mild version, use mini sweet bell peppers instead of jalapenos—they’re just as cute and perfect for kids.
Can I air fry these instead of baking?
Yes! Air frying gives the dough an extra-crispy texture. Preheat your air fryer to 350°F (175°C). Place the poppers in a single layer in the basket (you may need to work in batches). Air fry for 8-10 minutes, or until the dough is golden and the filling is hot. No need to flip them halfway through. Just keep an eye on them—air fryers can vary in temperature.
Why did my dough tear when I wrapped the peppers?
This usually happens when the dough is too cold or when you’re wrapping too tightly. Let the dough sit at room temperature for 10 minutes before cutting the strips. When wrapping, keep the dough loose enough that it’s just touching the pepper without stretching. If a strip does tear, don’t worry—just press it back together or use a second strip to cover the gap. Imperfect mummies are still mummies!
Can I make these vegetarian or vegan?
This recipe is naturally vegetarian since it contains no meat. For a vegan version, use a dairy-free cream cheese, a plant-based shredded cheese, and replace the cottage cheese with blended silken tofu. Use a vegan crescent roll dough and skip the egg wash (brush with a little plant-based milk instead). I’ve tested a vegan version, and while the texture is slightly different, the flavor is still fantastic.
Conclusion
These Lighter Mummy Wrapped Jalapeno Poppers are the kind of recipe that makes you feel like a kitchen genius without any of the stress. They’re fun, they’re flavorful, and they prove that eating well doesn’t mean sacrificing the things you love. Whether you’re making them for a Halloween party, a game-day snack, or just a Tuesday night craving, they always deliver a smile and a satisfied stomach.
I love this recipe because it reminds me that the best ideas often come from a place of curiosity and a willingness to try something different. That late-night experiment turned into a family favorite, and I hope it becomes one in your kitchen too. So go ahead—get creative with your fillings, add your own twist, and don’t forget the candy eyes. And when you make them, come back and let me know how they turned out. I’d love to hear about your mummy adventures!
Happy Halloween, happy snacking, and remember—sometimes the weirdest ideas are the ones worth keeping.
Pin This Recipe!

Lighter Mummy Wrapped Jalapeno Poppers (Easy Halloween Appetizer)

These Lighter Mummy Wrapped Jalapeno Poppers are a fun, healthier twist on the classic appetizer, featuring a creamy cottage cheese filling wrapped in crescent dough for a spooky Halloween treat. Ready in 30 minutes, they’re perfect for parties and guaranteed to be a crowd-pleaser.
- Prep Time: 15 minutes
- Cook Time: 20 minutes
- Total Time: 35 minutes
- Yield: 12 servings 1x
- Category: Appetizer
- Cuisine: American
Ingredients
- 1 cup cottage cheese (recommend Good Culture or Daisy, full-fat or low-fat)
- 4 oz reduced-fat cream cheese, softened
- 1/2 cup shredded sharp cheddar cheese (or pepper jack for extra heat)
- 1/4 cup chopped green onions
- 1/2 teaspoon garlic powder
- 1/4 teaspoon smoked paprika
- 1/4 teaspoon salt
- 1/8 teaspoon black pepper
- 12 large jalapeno peppers (firm, evenly shaped)
- 1 can (8 oz) refrigerated crescent roll dough (sheet style preferred)
- 1 large egg, beaten (for egg wash)
- Optional: candy eyes or black sesame seeds (for mummy eyes)
Instructions
- Preheat oven to 375°F (190°C). Line a baking sheet with parchment paper.
- Cut each jalapeno in half lengthwise. Use a small spoon or melon baller to remove seeds and membranes. For milder poppers, remove all seeds; for more heat, leave some seeds. Place hollowed halves on a plate.
- In a food processor or blender, combine cottage cheese, softened cream cheese, shredded cheddar, green onions, garlic powder, smoked paprika, salt, and pepper. Blend until completely smooth, about 30-45 seconds. Scrape down sides halfway through. Adjust seasoning if needed.
- Using a small spoon, fill each jalapeno half with the cheese mixture. Do not overstuff; filling should be level with the cut edge of the pepper.
- Unroll crescent roll dough on a cutting board. If perforated, press seams together to create one solid sheet. Use a pizza cutter or sharp knife to cut dough into long, thin strips, about 1/2 inch wide (24-30 strips).
- Take one strip of dough and wrap it around a filled jalapeno half, starting at one end and working to the other. Leave a small gap near the top for ‘eyes.’ Dough should overlap slightly like a bandage. Do not wrap too tightly. Place seam-side down on prepared baking sheet. Repeat with remaining jalapenos and dough strips.
- In a small bowl, beat egg with 1 tablespoon of water. Using a pastry brush, gently brush egg wash over each mummy wrapper.
- Bake for 18-22 minutes, or until dough is golden brown and puffed, and filling is hot and bubbly. Check at 15 minutes if oven runs hot.
- As soon as poppers come out of the oven, press two small candy eyes or black sesame seeds into the exposed filling at the top of each mummy. Let cool for 1 minute before adding candy eyes to prevent melting.
- Let poppers cool on baking sheet for 5 minutes before transferring to a serving platter. Serve warm or at room temperature.
Notes
For gluten-free version, use gluten-free crescent roll dough or puff pastry. For dairy-free, use dairy-free cream cheese, blended silken tofu instead of cottage cheese, and dairy-free shredded cheese. To make ahead, assemble through step 6, cover with plastic wrap, and refrigerate up to 1 day; add egg wash and bake, adding 2-3 minutes to baking time. For air fryer, cook at 350°F for 8-10 minutes. Leftovers can be stored in an airtight container in the refrigerator for up to 3 days; reheat in a 350°F oven for 5-7 minutes. Unbaked poppers can be frozen for up to 2 months; bake from frozen at 375°F for 22-25 minutes.
Nutrition
- Serving Size: 1 popper
- Calories: 145
- Sugar: 3
- Sodium: 310
- Fat: 9
- Saturated Fat: 4
- Carbohydrates: 11
- Fiber: 1
- Protein: 7
Keywords: jalapeno poppers, mummy poppers, Halloween appetizer, light poppers, cottage cheese poppers, easy Halloween snack, spicy appetizer


