The woman at the community garden stand watched me eyeing her pumpkins. She had about a dozen of them lined up on a folding table, all different shapes and colors, and I was clearly out of my depth. “You’re overthinking it,” she finally said, not unkindly. “That one right there—the small Sugar Pie—that’s what you want.” She handed it to me like she was passing along a secret, and then she added, almost as an afterthought, “And when you’re done roasting it, save a cup for a roll. Not a muffin. A roll.” I didn’t know what she meant at the time, but I nodded like I did. Honestly, I was just grateful someone had stepped in before I spent twenty minutes picking the wrong pumpkin.
I went home that Tuesday afternoon with a single Sugar Pie pumpkin and a vague sense of purpose. The roll part stuck with me, and I spent the next few days testing, failing, and testing again. The first attempt cracked right down the middle when I tried to roll it—let me tell you, that was a moment. The second one was too dry. The third? The third one worked. It rolled without a single fissure, the cream cheese filling stayed put, and when I sliced into it, the spiral was so clean it almost didn’t look real. I brought a piece to the garden lady the following week, and she just smiled and said, “Told you.”
This Perfect Pumpkin Cream Cheese Roll is the result of those kitchen experiments, and it has become my go-to fall dessert. It is the kind of thing you bring to a Friendsgiving and watch disappear before the pie even gets touched. Maybe you have been there—standing in front of a recipe that looks simple but somehow never turns out right. I get it. This one is different. It is forgiving, it is gorgeous, and it tastes like autumn in a way that feels honest. No fuss, no drama, just a really good pumpkin roll made from a conversation with a stranger who knew exactly what she was talking about.
Why You’ll Love This Recipe
I have made this pumpkin roll more times than I can count, and every single time, I am reminded why it works. It is not just another dessert recipe—it is the one I turn to when I need something that feels special but does not require a culinary degree. Let me break down exactly why this one earns a permanent spot in your fall baking rotation.
- Quick & Easy : From start to finish, this comes together in about an hour. The active prep time is only twenty minutes, which means you can whip it up on a weeknight without losing your mind.
- Simple Ingredients : You probably have most of these in your kitchen right now. Canned pumpkin, cream cheese, powdered sugar, basic baking staples. No trips to a specialty store required.
- Perfect for Fall Gatherings : Whether it is Thanksgiving, a potluck, or just a cozy Sunday with coffee, this roll fits right in. It travels well, slices beautifully, and looks impressive without trying too hard.
- Crowd-Pleaser : I have served this to kids, grandparents, and everyone in between. It gets rave reviews every single time. The pumpkin spice lovers and the cream cheese fans both leave happy.
- Unbelievably Delicious : The texture is what gets me. The cake is tender and moist, the filling is rich and tangy, and together they create this perfect balance that makes you close your eyes after the first bite.
What makes this recipe different from all the other pumpkin rolls out there? It is the technique. I have tested this enough to know exactly where things go wrong, and I have fixed them. The trick is in the rolling method—rolling it while it is still warm, using a clean kitchen towel dusted with powdered sugar, and letting it cool completely before adding the filling. That one step eliminates cracking and gives you that beautiful spiral every time. It is comfort food reimagined—healthier than a traditional cream-filled cake, faster than a layered dessert, but with the same soul-soothing satisfaction. Perfect for impressing guests without stress, or turning a simple fall meal into something memorable.
What Ingredients You Will Need
This recipe uses simple, wholesome ingredients to deliver that classic pumpkin roll flavor without any fuss. Most of these are pantry staples, and I have included a few notes on what to look for when you shop.
For the Pumpkin Cake
- All-purpose flour, ¾ cup (90g) — spoon and level it for accuracy. I prefer King Arthur Flour for consistent results.
- Baking powder, 1 teaspoon — make sure it is fresh, or your cake won’t rise properly.
- Baking soda, 1 teaspoon — same deal, check the expiration date.
- Ground cinnamon, 2 teaspoons — this is the backbone of the spice blend. Use a good quality cinnamon like Saigon or Ceylon.
- Ground ginger, 1 teaspoon — adds warmth without being overpowering.
- Ground nutmeg, ½ teaspoon — freshly grated if you have it, but pre-ground works fine.
- Ground cloves, ¼ teaspoon — a little goes a long way here.
- Salt, ½ teaspoon — balances the sweetness.
- Granulated sugar, 1 cup (200g) — standard white sugar works best for the cake texture.
- Large eggs, 3, at room temperature — cold eggs can make the batter seize up. Let them sit out for 30 minutes first.
- Canned pumpkin puree, ⅔ cup (160g) — use pure pumpkin, not pumpkin pie filling. Libby’s is my go-to brand for consistent moisture content.
- Vanilla extract, 1 teaspoon — pure vanilla, not imitation, makes a noticeable difference.
- Powdered sugar, for dusting the towel — about 2 tablespoons, plus more for the finished roll.
For the Cream Cheese Filling
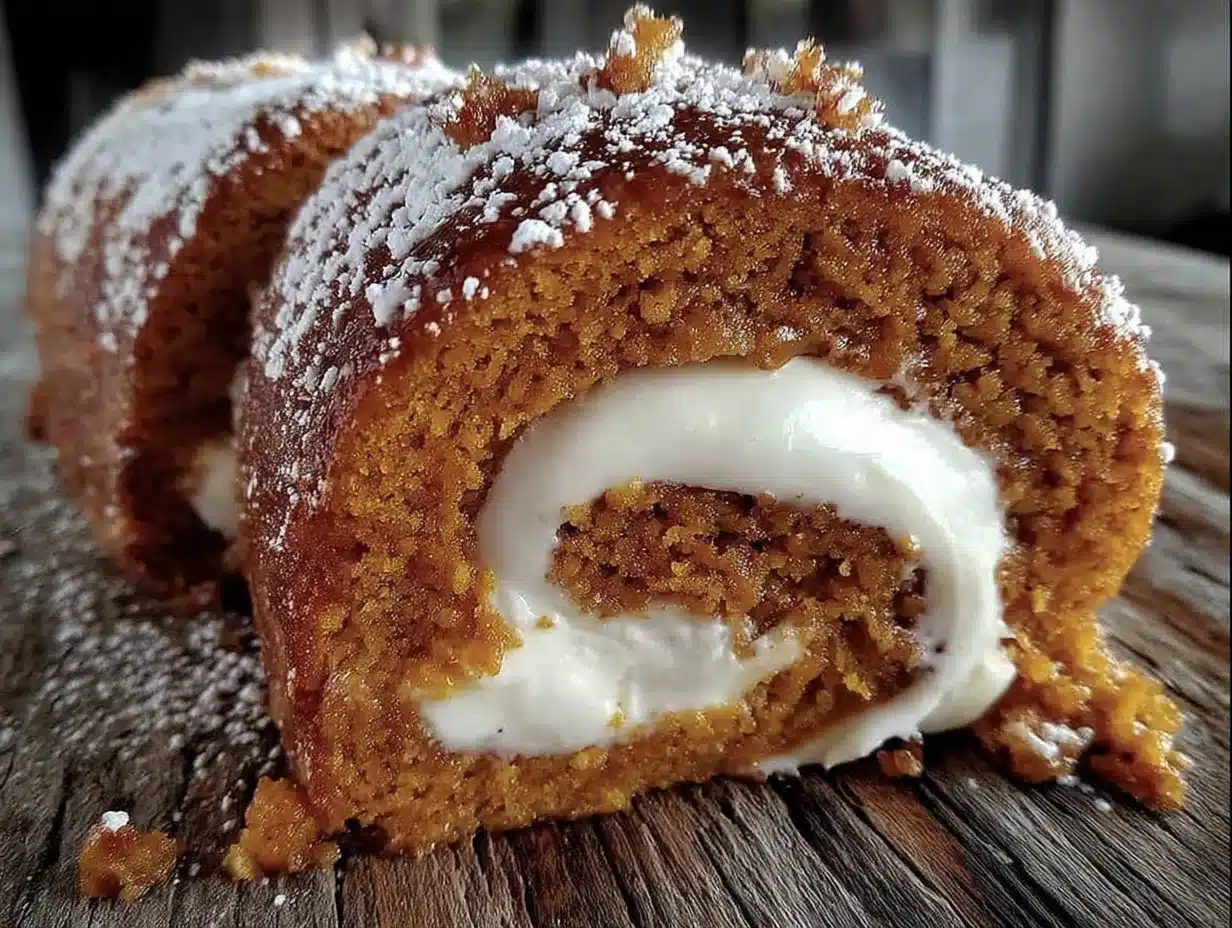
- Cream cheese, 8 ounces (226g), softened — full-fat is best here for a rich, stable filling. Philadelphia is my trusted brand.
- Unsalted butter, ¼ cup (57g), softened — let it come to room temperature along with the cream cheese so they blend smoothly.
- Powdered sugar, 1 cup (120g), sifted — sifting prevents lumps and gives a silky texture.
- Vanilla extract, 1 teaspoon — again, pure vanilla for the best flavor.
Ingredient Selection Tips: When buying canned pumpkin, look for brands that list only pumpkin as the ingredient. Some blends include squash or other fillers, which can affect the moisture level. If you want to use fresh roasted pumpkin, make sure to strain it through cheesecloth overnight to remove excess water—otherwise, your cake will be too wet. For the cream cheese, always use the block style, not the spreadable kind in a tub. The spreadable version has added water and stabilizers that will make your filling runny.
Substitution Guidance: For a gluten-free version, swap the all-purpose flour with a 1:1 gluten-free baking blend that contains xanthan gum. I have tested this with Bob’s Red Mill 1:1 Baking Flour, and it works well. For a dairy-free filling, use vegan cream cheese and vegan butter, but note that the texture will be slightly softer. If you are out of pumpkin pie spice, you can substitute the cinnamon, ginger, nutmeg, and cloves with 1 tablespoon of pumpkin pie spice blend instead.
Equipment Needed
You do not need a fancy kitchen to make this pumpkin roll, but a few specific tools make the process much smoother. Here is what you will need.
- 15×10-inch jelly roll pan — this is the standard size for a pumpkin roll. If you do not have one, a half-sheet pan works in a pinch, but the cake will be thinner.
- Parchment paper — essential for lining the pan and preventing sticking. Do not skip this.
- Clean kitchen towel — a thin, lint-free towel is best for rolling the cake. I use a flour sack towel. Avoid terry cloth, as it will leave marks on the cake.
- Electric mixer — a hand mixer or stand mixer both work. The filling needs to be whipped until smooth, and doing it by hand is a workout I do not recommend.
- Large mixing bowls — one for dry ingredients, one for wet ingredients, and one for the filling.
- Rubber spatula — for folding the batter and scraping every last bit of filling.
- Wire cooling rack — allows the cake to cool evenly without getting soggy on the bottom.
- Sifter or fine-mesh strainer — for dusting powdered sugar on the towel and the finished roll.
- Sharp serrated knife — for clean slices. A dull knife will squish the roll.
Budget-Friendly Options: If you do not own a jelly roll pan, check your local thrift store—I found mine for three dollars. You can also use a disposable aluminum half-sheet pan from the grocery store. For the kitchen towel, an old, clean cotton pillowcase cut in half works perfectly. Do not overthink the equipment; a little creativity goes a long way.
Preparation Method
Follow these steps carefully, and you will get a perfect spiral every time. I have included sensory cues and troubleshooting notes so you know exactly what to look for at each stage.
Step 1: Preheat and Prepare the Pan
Preheat your oven to 375°F (190°C). Line your 15×10-inch jelly roll pan with parchment paper, leaving a slight overhang on the long sides. Lightly spray the parchment with non-stick cooking spray. This ensures the cake releases cleanly after baking.
Step 2: Mix the Dry Ingredients
In a medium bowl, whisk together the flour, baking powder, baking soda, cinnamon, ginger, nutmeg, cloves, and salt. Set this aside. Whisking aerates the flour and distributes the spices evenly, so do not skip this step.
Step 3: Beat the Eggs and Sugar
In a large bowl, beat the eggs and granulated sugar together with an electric mixer on medium-high speed for about 2 minutes. The mixture should become thick, pale, and slightly ribbon-like when you lift the beaters. This is called the “ribbon stage,” and it is crucial for the cake’s structure. If it looks thin and runny, keep beating for another minute.
Step 4: Add the Pumpkin and Vanilla
Reduce the mixer speed to low and add the pumpkin puree and vanilla extract. Mix until just combined. The batter will look a bit curdled at this point—do not panic. That is normal. Scrape down the sides of the bowl with a rubber spatula.
Step 5: Fold in the Dry Ingredients
Add the dry ingredients to the wet mixture in two additions, folding gently with a rubber spatula after each addition. Fold until you no longer see streaks of flour. Overmixing at this stage will develop gluten and make the cake tough. Stop as soon as it comes together.
Step 6: Spread and Bake
Pour the batter into the prepared pan and spread it evenly with an offset spatula. The layer should be thin and even—about ¼ inch thick. Bake for 13 to 15 minutes. The cake is done when the top springs back lightly when touched and the edges just begin to pull away from the pan. Do not overbake, or the cake will crack when you roll it.
Step 7: The Crucial Rolling Step
While the cake is baking, lay your clean kitchen towel flat on the counter and dust it generously with powdered sugar. As soon as the cake comes out of the oven, run a knife around the edges to loosen it. Invert the cake onto the prepared towel and carefully peel off the parchment paper. Starting at a short end, roll the cake and towel together tightly. Let it cool completely on a wire rack, seam-side down. This takes about 45 minutes. Rolling it while warm trains the cake to hold the spiral shape without cracking.
Step 8: Make the Filling
While the cake cools, make the cream cheese filling. In a medium bowl, beat the softened cream cheese and butter together until smooth and creamy, about 2 minutes. Add the sifted powdered sugar and vanilla extract, and beat on low speed until combined, then increase to medium-high and beat for another minute until fluffy. Do not overbeat, or the filling can become too thin.
Step 9: Unroll, Fill, and Re-Roll
Once the cake is completely cool, gently unroll it. Spread the cream cheese filling evenly over the cake, leaving a ½-inch border on all sides. Roll the cake back up tightly, this time without the towel. Use the towel to help guide the roll if needed. Wrap the finished roll in plastic wrap and refrigerate for at least 1 hour before slicing. Chilling firms up the filling and makes slicing much cleaner.
Cooking Tips & Techniques
I have made this pumpkin roll at least twenty times, and I have learned a few things the hard way. Here are the tips that make the difference between a cracked mess and a showstopper.
The Towel Matters More Than You Think: I used a fuzzy terry cloth towel my first time, and the cake came out looking like a waffle. Use a smooth, lint-free cotton towel. Flour sack towels are perfect. If you do not have one, a clean, thin dish towel works. Dust it generously with powdered sugar—this prevents sticking and adds a light sweetness to the cake’s surface.
Roll While It Is Hot: This is non-negotiable. If you let the cake cool flat, it will crack the second you try to roll it. The heat makes the cake pliable. Roll it up with the towel immediately after removing the parchment, and do not unroll it until it is completely cool. Patience here pays off.
Do Not Overbake: I overbaked my second attempt by two minutes, and it cracked so badly I had to scrap the whole thing. Start checking at 13 minutes. The cake should be set but still soft. If the edges look dry, you have gone too far.
Room Temperature Ingredients Are Not Optional: Cold cream cheese and butter will leave lumps in your filling. I learned this when I was in a hurry and used cold cream cheese—the filling looked like cottage cheese. Let everything sit out for at least 30 minutes before starting. Set a timer so you do not forget.
Chill Before Slicing: I know it is tempting to slice right away, but do not. The filling needs time to set. One hour in the fridge is the minimum. Overnight is even better. Use a sharp serrated knife and wipe it clean between slices for the prettiest presentation.
Timing Strategy: Make the cake and filling the day before you plan to serve it. Assemble the roll, wrap it tightly, and refrigerate overnight. The flavors meld beautifully, and the texture improves. This also frees you up on the day of your gathering.
Variations & Adaptations
This recipe is forgiving enough to adapt to different tastes and dietary needs. Here are some variations I have tried and loved.
Gluten-Free Version: Substitute the all-purpose flour with a 1:1 gluten-free baking blend. I have used Bob’s Red Mill 1:1 Baking Flour with excellent results. The texture is slightly more delicate, so handle the cake gently when rolling. Everything else stays the same.
Dairy-Free Version: Use vegan cream cheese and vegan butter for the filling. Miyoko’s Creamery makes a fantastic plant-based cream cheese that holds up well. The cake itself is naturally dairy-free since it uses oil and eggs, so you only need to adjust the filling.
Spice It Up: If you love a bolder spice profile, add ¼ teaspoon of cardamom and a pinch of white pepper to the dry ingredients. I tried this for a holiday party, and it was a hit. The cardamom adds a warm, floral note that pairs beautifully with the pumpkin.
Chocolate Twist: For the chocolate lovers, add 2 tablespoons of unsweetened cocoa powder to the dry ingredients and reduce the flour by the same amount. The chocolate-pumpkin combo is surprisingly good. Top the finished roll with a drizzle of melted dark chocolate for extra flair.
Nutty Addition: Sprinkle ½ cup of finely chopped pecans or walnuts over the cream cheese filling before rolling. The crunch adds a lovely texture contrast. Toast the nuts first for deeper flavor.
Individual Mini Rolls: Cut the cake in half widthwise before filling, then roll each half separately. This gives you two smaller rolls that are perfect for gifting or freezing individually. Adjust the chilling time to 30 minutes for the smaller rolls.
Serving & Storage Suggestions
This pumpkin cream cheese roll is versatile enough for any occasion. Here is how to serve it and keep it fresh.
Serving Temperature: Serve the roll chilled or at room temperature. I prefer it straight from the fridge because the filling is firmer and the slices hold their shape better. If you like a softer texture, let it sit at room temperature for 15 minutes before slicing.
Presentation Tips: Dust the top with powdered sugar just before serving for a classic look. For a fancier presentation, drizzle with caramel sauce and add a sprinkle of flaky sea salt. A few fresh cranberries or a sprig of rosemary on the plate add a festive touch.
Complementary Dishes: This roll pairs beautifully with a hot cup of coffee, spiced chai, or a glass of cold milk. For a dessert spread, serve it alongside a classic apple pie or a batch of snickerdoodle cookies. It also works as a lighter alternative to pumpkin cheesecake on a Thanksgiving table.
Storage Instructions: Wrap the roll tightly in plastic wrap and store it in the refrigerator for up to 5 days. The flavors actually improve after a day or two as the pumpkin and cream cheese meld together. Do not leave it at room temperature for more than 2 hours, especially if the filling contains dairy.
Freezing Instructions: This roll freezes beautifully. Wrap it tightly in plastic wrap, then in a layer of aluminum foil, and freeze for up to 3 months. To serve, thaw it in the refrigerator overnight. Do not thaw at room temperature, as the filling can become weepy. Slice while still cold for the cleanest cuts.
Reheating Notes: This is a cold dessert, so reheating is not typically needed. If you want a warm slice, microwave individual pieces for 10 to 15 seconds. The cake will soften, and the filling will become slightly warm and gooey—a different but delicious experience.
Nutritional Information & Benefits
While this is a dessert, it does offer some nutritional perks thanks to the pumpkin. Here is a rough estimate per slice, based on 10 servings.
| Nutrient | Amount Per Slice |
|---|---|
| Calories | 285 |
| Total Fat | 12g |
| Saturated Fat | 7g |
| Cholesterol | 85mg |
| Sodium | 210mg |
| Total Carbohydrates | 38g |
| Dietary Fiber | 2g |
| Sugars | 28g |
| Protein | 5g |
| Vitamin A | 70% DV |
Health Benefits: Pumpkin is packed with vitamin A, which supports eye health and immune function. It also provides a good amount of fiber, which aids digestion. The cream cheese filling adds calcium and protein, making this dessert more satisfying than a purely sugary treat. If you are watching your sugar intake, you can reduce the powdered sugar in the filling by 2 tablespoons without affecting the texture too much.
Dietary Considerations: This recipe is vegetarian. For a lower-sugar option, use a sugar substitute like Swerve in the filling. Note that the cake requires real sugar for proper structure, so I recommend keeping the cake as written and adjusting only the filling. The roll contains gluten, dairy, and eggs, so it is not suitable for vegan, gluten-free, or dairy-free diets without the substitutions noted above.
Personal Wellness Perspective: I believe in enjoying dessert without guilt. This pumpkin roll is a treat, but it uses real ingredients and provides some nutritional value. One slice is perfectly reasonable as part of a balanced diet. I make it for special occasions and savor every bite.
Conclusion
This Perfect Pumpkin Cream Cheese Roll is more than just a fall dessert—it is the recipe I turn to when I want to impress without stress. It looks like you spent hours in the kitchen, but the truth is, it comes together in under an hour. The tender pumpkin cake, the creamy tangy filling, the beautiful spiral—every slice is a little work of art. And honestly, it tastes even better than it looks.
I encourage you to make this recipe your own. Try the chocolate twist, add some toasted pecans, or keep it classic. The beauty of this roll is that it is forgiving enough for beginners and impressive enough for seasoned bakers. Whether you are bringing it to a Thanksgiving dinner or just treating yourself on a cozy Sunday, it delivers every single time.
I would love to hear how yours turns out. Did you try a variation? Did your family fight over the last slice? Drop a comment below and let me know. And if you loved this recipe, share it with a friend who needs a little fall baking inspiration. Happy baking, friends—you have got this.
Frequently Asked Questions
Why did my pumpkin roll crack when I rolled it?
Cracking usually happens for two reasons: the cake was overbaked, or it cooled flat before rolling. Make sure you roll it while it is still warm from the oven, and check for doneness at 13 minutes. If the edges look dry, pull it out immediately.
Can I use fresh pumpkin instead of canned?
Yes, but you need to strain it first. Fresh pumpkin puree contains more water than canned. Spread the puree on a paper towel-lined plate, cover with another paper towel, and let it sit for 15 minutes. Alternatively, strain it through cheesecloth overnight in the refrigerator.
How do I get clean slices without squishing the roll?
Use a sharp serrated knife and chill the roll for at least one hour before slicing. Wipe the knife clean between each cut with a damp paper towel. This prevents the filling from smearing and keeps the spiral intact.
Can I make this pumpkin roll ahead of time?
Absolutely. Assemble the roll, wrap it tightly in plastic wrap, and refrigerate for up to 2 days before serving. You can also freeze it for up to 3 months. The flavors actually improve after a day in the fridge.
What can I use instead of a jelly roll pan?
A half-sheet pan (18×13 inches) works, but the cake will be thinner and may need slightly less baking time. You can also use a 9×13-inch pan, but the cake will be thicker and may require a few extra minutes in the oven. Adjust your rolling technique accordingly.
Pin This Recipe!
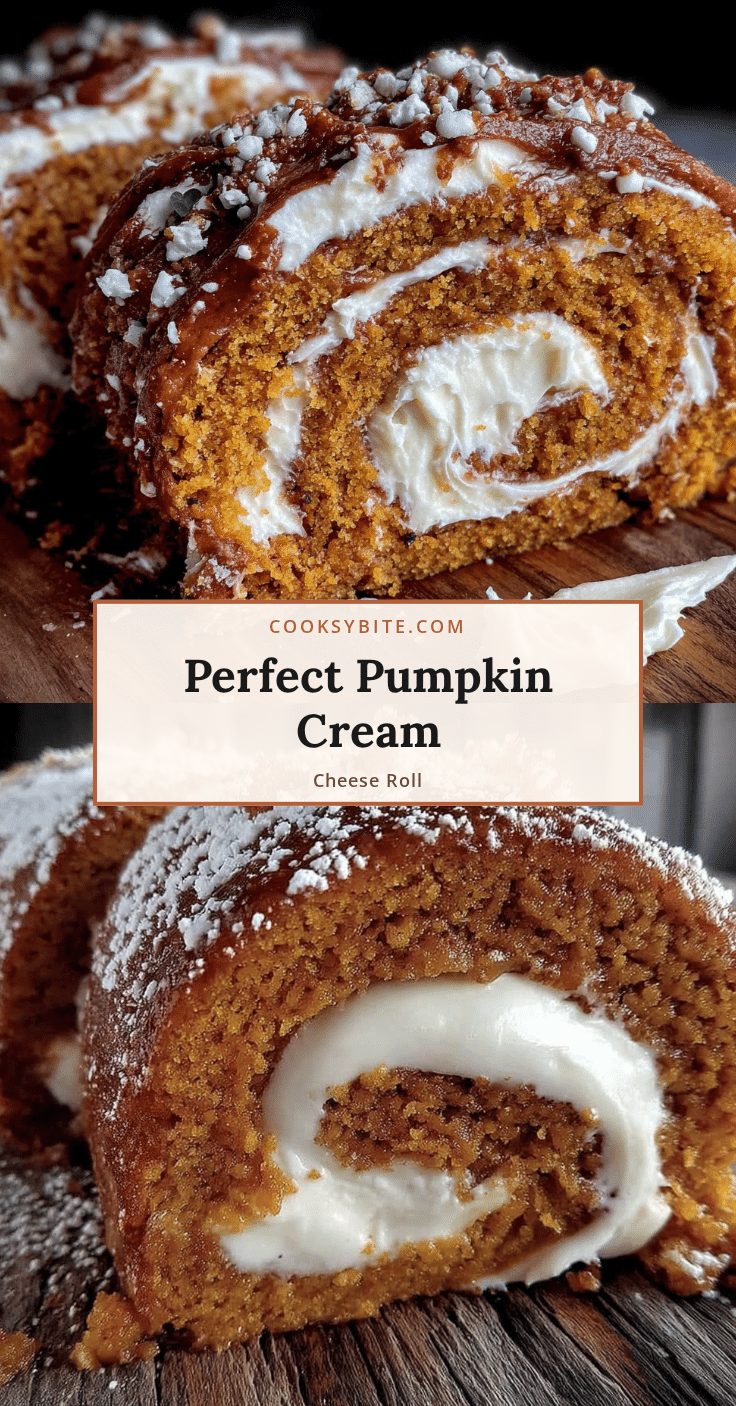
Perfect Pumpkin Cream Cheese Roll: Easy Fall Dessert Recipe
This Perfect Pumpkin Cream Cheese Roll is a tender, moist pumpkin cake rolled with a rich and tangy cream cheese filling. It’s an easy, impressive fall dessert that comes together in about an hour and is perfect for Thanksgiving, potlucks, or cozy Sundays.
- Prep Time: 20 minutes
- Cook Time: 15 minutes
- Total Time: 1 hour 20 minutes (includes cooling and chilling)
- Yield: 10 servings
- Category: Dessert
- Cuisine: American
Ingredients
- All-purpose flour, ¾ cup (90g)
- Baking powder, 1 teaspoon
- Baking soda, 1 teaspoon
- Ground cinnamon, 2 teaspoons
- Ground ginger, 1 teaspoon
- Ground nutmeg, ½ teaspoon
- Ground cloves, ¼ teaspoon
- Salt, ½ teaspoon
- Granulated sugar, 1 cup (200g)
- Large eggs, 3, at room temperature
- Canned pumpkin puree, ⅔ cup (160g)
- Vanilla extract, 1 teaspoon
- Powdered sugar, for dusting the towel (about 2 tablespoons, plus more for the finished roll)
- Cream cheese, 8 ounces (226g), softened
- Unsalted butter, ¼ cup (57g), softened
- Powdered sugar, 1 cup (120g), sifted
- Vanilla extract, 1 teaspoon
Instructions
- Preheat your oven to 375°F (190°C). Line a 15×10-inch jelly roll pan with parchment paper, leaving a slight overhang on the long sides. Lightly spray the parchment with non-stick cooking spray.
- In a medium bowl, whisk together the flour, baking powder, baking soda, cinnamon, ginger, nutmeg, cloves, and salt. Set aside.
- In a large bowl, beat the eggs and granulated sugar together with an electric mixer on medium-high speed for about 2 minutes until thick, pale, and ribbon-like.
- Reduce the mixer speed to low and add the pumpkin puree and vanilla extract. Mix until just combined. The batter may look curdled; that’s normal. Scrape down the sides of the bowl.
- Add the dry ingredients to the wet mixture in two additions, folding gently with a rubber spatula until no streaks of flour remain. Do not overmix.
- Pour the batter into the prepared pan and spread evenly with an offset spatula to about ¼ inch thick. Bake for 13 to 15 minutes, until the top springs back when touched and the edges just begin to pull away from the pan.
- While the cake bakes, lay a clean kitchen towel flat on the counter and dust generously with powdered sugar. As soon as the cake comes out of the oven, run a knife around the edges to loosen it. Invert the cake onto the prepared towel and carefully peel off the parchment paper. Starting at a short end, roll the cake and towel together tightly. Let cool completely on a wire rack, seam-side down, about 45 minutes.
- While the cake cools, make the filling: In a medium bowl, beat the softened cream cheese and butter together until smooth and creamy, about 2 minutes. Add the sifted powdered sugar and vanilla extract, beat on low until combined, then increase to medium-high and beat for another minute until fluffy.
- Once the cake is completely cool, gently unroll it. Spread the cream cheese filling evenly over the cake, leaving a ½-inch border on all sides. Roll the cake back up tightly, this time without the towel. Wrap in plastic wrap and refrigerate for at least 1 hour before slicing.
- To serve, dust with powdered sugar, slice with a sharp serrated knife, and enjoy chilled or at room temperature.
Notes
Roll the cake while it is still hot to prevent cracking. Use room temperature ingredients for the filling to avoid lumps. Chill the assembled roll for at least 1 hour before slicing for clean cuts. The roll can be made ahead and refrigerated for up to 2 days or frozen for up to 3 months.
Nutrition
- Serving Size: 1 slice
- Calories: 285
- Sugar: 28
- Sodium: 210
- Fat: 12
- Saturated Fat: 7
- Carbohydrates: 38
- Fiber: 2
- Protein: 5
Keywords: pumpkin roll, pumpkin cream cheese roll, fall dessert, pumpkin dessert, easy pumpkin recipe, Thanksgiving dessert, pumpkin cake roll


