The lady at the craft fair booth next to mine watched me fumble with a piping bag of black icing for what felt like forever. I was trying to get the whiskers straight on a cat cookie, and honestly, I was making a mess. She didn’t say anything at first. Then she just reached over, took the bag from my hand, and squeezed out a perfect little face in about two seconds. “You’re overthinking it,” she said with a shrug. “Cats are supposed to look a little crooked. That’s what makes them spooky.” She was a retired art teacher who made cookies for her grandkids every Halloween, and she shared her shortcut method for these quick spooky black cat sugar cookies right there between the scented candle and the knitted scarf booths. I scribbled her tips on a napkin. I’ve been making them ever since, and every batch reminds me that Halloween treats don’t have to be perfect—they just have to be fun. Let me tell you, when you’re staring down a busy weeknight and the kids are already hyped up on candy, these cookies are a lifesaver. No chilling, no rolling, no stress. You can have a batch of these spooky little guys cooling on the counter in under thirty minutes, and they look like you spent hours on them. I mean, honestly, that’s the kind of Halloween magic we all need, right?
Maybe you’ve been there—scrolling through Pinterest at 10 PM, convinced you need to make a showstopper for the school party, but you’re out of time and patience. These cookies are your answer. They’re the recipe that stays in your back pocket, year after year, because they actually work on a Tuesday night when you’re tired.
Why You’ll Love This Recipe
I have tested this recipe more times than I care to count, and it has never let me down. It started as a basic sugar cookie from an old community cookbook, but after years of tweaking—and that craft fair lady’s wisdom—it became something special. Here is why you are going to absolutely love these quick spooky black cat sugar cookies:
- Quick & Easy: These come together in under 30 minutes. No chilling the dough, no complicated rolling techniques. Mix, shape, bake, and decorate. Perfect for a Tuesday night Halloween treat.
- Simple Ingredients: You probably have everything in your pantry right now. Flour, sugar, butter, eggs, and vanilla. The only special thing is black food coloring, which you can find at any grocery store.
- Perfect for Halloween: These are the ultimate last-minute Halloween party treat. They work for classroom parties, office potlucks, or just a fun baking activity with the kids.
- Crowd-Pleaser: Kids love decorating them, and adults can’t resist grabbing one with their coffee. They disappear fast.
- Unbelievably Delicious: The texture is soft in the middle with slightly crisp edges, and the vanilla flavor is just right. They taste like a classic sugar cookie, but with a spooky twist.
What makes this version different from every other black cat cookie out there is the technique. Instead of rolling out the dough and using cat-shaped cookie cutters (which always stick and tear), we shape the cookies by hand. This means no chilling, no floury mess, and no frustration. It is the kind of trick that makes you wonder why you ever did it the hard way.
This recipe is the kind that makes you close your eyes after the first bite. It is comfort food reimagined for Halloween—faster, easier, but with the same soul-soothing satisfaction. Perfect for impressing guests without stress, or turning a simple weeknight into something memorable.
What Ingredients You Will Need
This recipe uses simple, wholesome ingredients to deliver a soft, buttery cookie with just the right amount of sweetness. Most of these are pantry staples, so you probably won’t need a special trip to the store.
For the Cookies
- 1 cup (2 sticks) unsalted butter, softened – I always use unsalted so I can control the salt level. Let it sit out for about 30 minutes before you start.
- 1 cup granulated sugar – Regular white sugar gives the cookies that classic sweet flavor and helps them spread just a little.
- 1 large egg, room temperature – Cold eggs can make the dough stiff. If you forgot to take it out, put it in a bowl of warm water for 5 minutes.
- 2 teaspoons vanilla extract – Pure vanilla makes a difference here. I like Nielsen-Massey, but any brand works.
- 2 ½ cups all-purpose flour – Spoon and level it into your measuring cup. Scooping directly can pack the flour and make the cookies dry.
- ½ teaspoon baking powder – This gives them a little lift without making them puffy.
- ¼ teaspoon salt – Just enough to balance the sweetness.
- Black gel food coloring – Liquid coloring won’t give you that deep, spooky black. I use Americolor Super Black gel. Start with 1 teaspoon and add more until you get the shade you want.
For the Decoration
- 1 cup powdered sugar – For the royal icing. Sift it first to avoid lumps.
- 2 tablespoons meringue powder – This makes the icing dry hard and shiny. You can find it in the baking aisle.
- 3-4 tablespoons water – Add slowly. You want the icing to be thick enough to pipe but thin enough to spread.
- Yellow or green candy eyes – These are optional but so fun. You can find them at craft stores or online. I like the Wilton brand.
- Black sparkle sugar (optional) – For a little extra Halloween magic.
Equipment Needed
You don’t need a lot of fancy tools for these cookies. Here is what you will need:
- Electric mixer – A hand mixer works perfectly. A stand mixer is nice, but not necessary.
- Large mixing bowl – Any bowl you have will do.
- Baking sheets – I use two so I can bake a full batch at once. If you only have one, let it cool completely between batches.
- Parchment paper – Non-stick and makes cleanup a breeze. Silicone baking mats work too.
- Piping bags or zip-top bags – For the royal icing. I actually prefer zip-top bags because they are cheaper and I can just toss them when I am done.
- Small round piping tip (optional) – A #2 or #3 tip works great for the faces, but you can also just snip the corner of a zip-top bag.
Preparation Method
These quick spooky black cat sugar cookies come together fast. Follow these steps, and you will have a batch of adorable (and slightly creepy) cats in no time.
- Preheat your oven to 375°F (190°C). Line two baking sheets with parchment paper. This is important—the cookies will stick without it.
- Cream the butter and sugar. In your large mixing bowl, beat the softened butter and granulated sugar together until light and fluffy. This takes about 2-3 minutes with a hand mixer. You want it to look pale and creamy. Scrape down the sides of the bowl once during mixing.
- Add the egg and vanilla. Beat in the egg and vanilla extract until everything is well combined. The mixture might look a little curdled at this point—that is totally normal. Don’t panic.
- Add the food coloring. Squeeze in about 1 teaspoon of black gel food coloring and mix until the dough is an even grayish color. It will look lighter than you want right now. Don’t worry—it darkens as you add the flour and during baking. If you want a deeper black, add another ½ teaspoon. I usually end up using about 2 teaspoons total.
- Mix the dry ingredients. In a separate bowl, whisk together the flour, baking powder, and salt. This just ensures everything is evenly distributed.
- Combine wet and dry. Gradually add the flour mixture to the butter mixture, mixing on low speed. Stop when the dough just comes together. It should be soft but not sticky. If it feels too sticky, add a tablespoon more flour. If it is too dry, add a teaspoon of milk.
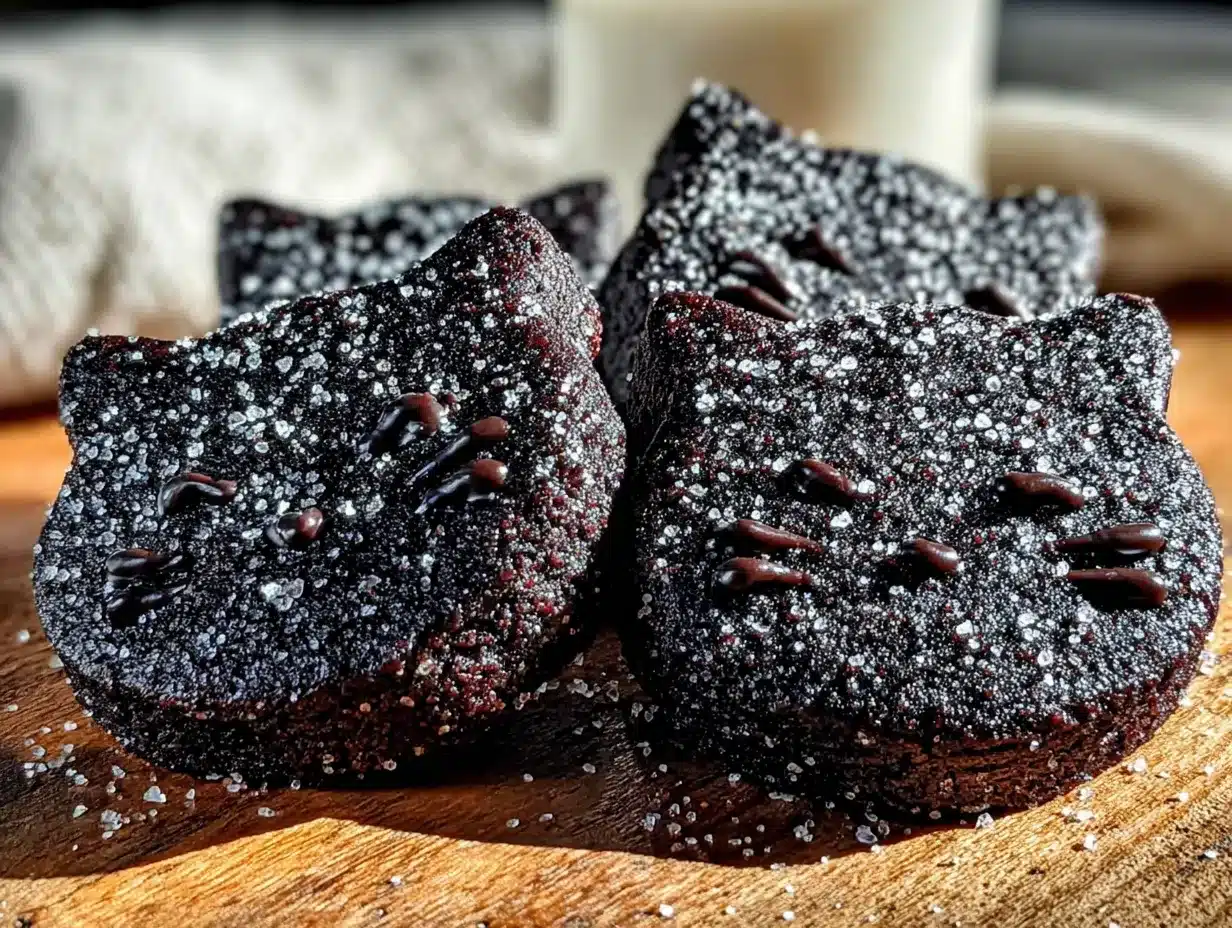
- Shape the cookies. This is the fun part. Scoop out about 2 tablespoons of dough and roll it into a ball. Place it on the prepared baking sheet. Gently flatten it into a slightly oval shape—this will be the cat’s body. Then, pinch two small triangles on top for ears. Don’t worry about making them perfect. Remember what the craft fair lady said—crooked is spooky. Leave about 2 inches between each cookie because they will spread a little.
- Bake for 8-10 minutes. You want the edges to be just barely golden. The centers will look soft and slightly underdone—that’s perfect. They will continue to set as they cool. Overbaking makes them hard.
- Cool completely. Let the cookies sit on the baking sheet for 5 minutes, then transfer them to a wire rack. Do not try to decorate them while they are warm, or the icing will melt into a puddle. I learned that the hard way.
- Make the royal icing. While the cookies cool, whisk together the powdered sugar and meringue powder in a small bowl. Add the water one tablespoon at a time, stirring until the icing is smooth and thick. It should flow like honey—thick enough to hold its shape but thin enough to spread when you pipe it. If it is too thick, add a few drops of water. Too thin, add a little more powdered sugar.
- Pipe the faces. Spoon the icing into a piping bag or a zip-top bag with a tiny corner snipped off. Pipe two small triangles for eyes and a little upside-down triangle for the nose. Then pipe three whiskers on each side. If you are using candy eyes, press them into the wet icing right away.
- Add sparkle (optional). Sprinkle black sparkle sugar over the wet icing for a little extra Halloween flair.
- Let the icing set. Let the cookies sit for about 30 minutes so the icing can harden. Then they are ready to serve.
Cooking Tips & Techniques
I have made these quick spooky black cat sugar cookies about a dozen times, and I have definitely learned a few things along the way. Here are my best tips to make sure yours turn out perfect:
Don’t overmix the dough. Once you add the flour, mix just until it comes together. Overmixing develops the gluten and makes the cookies tough. You want them soft and tender.
Use gel food coloring, not liquid. Liquid coloring will throw off the liquid balance in the dough and make it too sticky. Gel coloring is concentrated, so you need less of it, and it won’t affect the texture. I keep a bottle of Americolor Super Black in my pantry year-round just for these cookies.
Shape the cookies consistently. Try to make all the cookies about the same size so they bake evenly. I use a cookie scoop to portion the dough, then shape them by hand. It takes a little practice, but you will get the hang of it after the first few.
Watch the baking time. Every oven runs a little differently. Start checking at 8 minutes. The cookies are done when the edges are set and the centers look slightly puffy and soft. They will look underdone, but trust the process. If you wait until they look fully baked, they will be overdone and crunchy.
Let them cool completely. I know it is tempting to start decorating right away, but warm cookies will turn your icing into a mess. Be patient. Use that time to make the icing and clean up your workspace.
Practice your piping on a plate. If you are nervous about piping the faces, practice a few on a plate first. It helps you get a feel for the pressure and flow. And remember—these are spooky cats. They are supposed to look a little wonky.
Variations & Adaptations
One of the best things about these quick spooky black cat sugar cookies is how easy they are to customize. Here are some variations I have tried over the years:
Gluten-Free Version: Swap the all-purpose flour for a 1-to-1 gluten-free baking flour. I like Bob’s Red Mill brand. The texture will be slightly more crumbly, but they still taste great. Add an extra tablespoon of butter to help with moisture.
Vegan Option: Use vegan butter sticks (not the spreadable kind) and a flax egg (1 tablespoon ground flaxseed mixed with 3 tablespoons water, let sit for 5 minutes). The cookies will be a little less tender, but still delicious. Use vegan powdered sugar for the icing.
Different Shapes: If you don’t want cats, you can shape the dough into pumpkins, ghosts, or even bats. For pumpkins, roll the dough into balls and flatten slightly, then use a toothpick to score lines. For ghosts, shape them into teardrops. The possibilities are endless.
Chocolate Version: Add ¼ cup of unsweetened cocoa powder to the flour mixture for a chocolate black cat cookie. Reduce the flour by ¼ cup to keep the texture right. The chocolate flavor pairs beautifully with the vanilla icing.
Spiced Version: Add 1 teaspoon of pumpkin pie spice or cinnamon to the flour mixture. It gives the cookies a warm, fall flavor that is perfect for Halloween parties. I tried this last year and it was a huge hit.
Serving & Storage Suggestions
These cookies are best served at room temperature. The icing should be fully set and hard to the touch. Arrange them on a platter with some orange and purple napkins for a festive look. They look amazing next to a bowl of candy corn or caramel apples.
For a Halloween party, I like to set up a small decorating station with extra icing and candy eyes so guests can customize their own cats. It is a great activity for kids and adults alike.
Storage: Store the cookies in an airtight container at room temperature. They will stay fresh for up to 5 days. Layer them between sheets of parchment paper to prevent the icing from sticking. Do not refrigerate them—the fridge will make the cookies dry and the icing can get sticky from the humidity.
Freezer Instructions: You can freeze the undecorated cookies for up to 3 months. Place them in a single layer in a freezer-safe container with parchment between layers. Thaw at room temperature, then decorate. The flavor actually gets better after freezing—the vanilla becomes more pronounced.
Make-Ahead Tip: The dough can be made up to 2 days in advance and kept in the fridge. Let it sit at room temperature for 10 minutes before shaping, as cold dough is harder to work with. You can also freeze the dough balls for up to 3 months. Just shape them, freeze them on a baking sheet, then transfer to a freezer bag. Bake from frozen, adding 2-3 minutes to the baking time.
Nutritional Information & Benefits
These quick spooky black cat sugar cookies are a treat, so they are not exactly health food. But here is the estimated nutritional breakdown for one cookie (based on 24 cookies):
| Nutrient | Amount per Cookie |
|---|---|
| Calories | 145 |
| Total Fat | 7g |
| Saturated Fat | 4g |
| Cholesterol | 25mg |
| Sodium | 55mg |
| Total Carbohydrates | 19g |
| Sugars | 10g |
| Protein | 2g |
These cookies contain dairy (butter) and gluten (flour). For allergen-friendly options, see the variations section above. While they are not a health food, they are made with simple, recognizable ingredients—no preservatives or artificial flavors. I like to think of them as a special occasion treat that is worth the indulgence. And honestly, a little sugar and butter on Halloween is practically a tradition. Balance is everything.
The butter provides a small amount of vitamin A, and the eggs offer some protein. But let’s be real—you are making these for the joy, not the nutrition. And that is perfectly okay.
Conclusion
These quick spooky black cat sugar cookies have become a Halloween staple in my house for one simple reason: they actually work. No fuss, no stress, no 3-hour project that leaves you covered in flour and regretting your life choices. They are fun to make, adorable to look at, and delicious to eat. That is a winning combination in my book.
I love that every batch turns out a little different. Some cats look surprised, some look grumpy, and some look like they are plotting something. That is the beauty of hand-shaped cookies—they have personality. And honestly, isn’t that what Halloween is all about? A little bit spooky, a little bit silly, and a whole lot of fun.
I hope you give these a try. Customize them however you like—add more sparkle, make them gluten-free, or turn them into ghosts. The recipe is just a starting point. I would love to hear how yours turn out. Drop a comment below and tell me what shapes you made, or share a photo of your spooky cat cookies. And if you have a favorite Halloween baking tip, I am all ears. Happy Halloween, and happy baking!
Frequently Asked Questions
Can I use a cookie cutter instead of shaping the dough by hand?
You can, but it changes the process a bit. If you want to use a cat-shaped cookie cutter, you will need to roll out the dough and chill it for at least 30 minutes so it holds its shape. The hand-shaping method is faster and avoids the hassle of re-rolling scraps.
Why did my cookies turn out gray instead of black?
This usually happens when you don’t use enough food coloring, or you used liquid coloring instead of gel. Gel coloring is much more concentrated. Start with 1 teaspoon and add more until the dough looks very dark gray. It will darken slightly as it bakes.
Can I make the icing ahead of time?
Yes, but you need to store it properly. Place the icing in an airtight container with a piece of plastic wrap pressed directly onto the surface. This prevents a skin from forming. It will keep at room temperature for up to 3 days. Stir it well before using, and add a few drops of water if it has thickened.
How do I get the whiskers straight?
Practice makes perfect, but here is a trick: use a toothpick to gently guide the icing into straight lines after you pipe it. Or, just embrace the wonky look. Crooked whiskers make the cats look more mischievous and spooky.
Can I double this recipe?
Absolutely. This recipe doubles beautifully. Just make sure your mixing bowl is big enough, and bake in batches. The dough can sit at room temperature for about an hour while you bake the first batch. If it gets too soft, pop it in the fridge for 10 minutes.
Pin This Recipe!
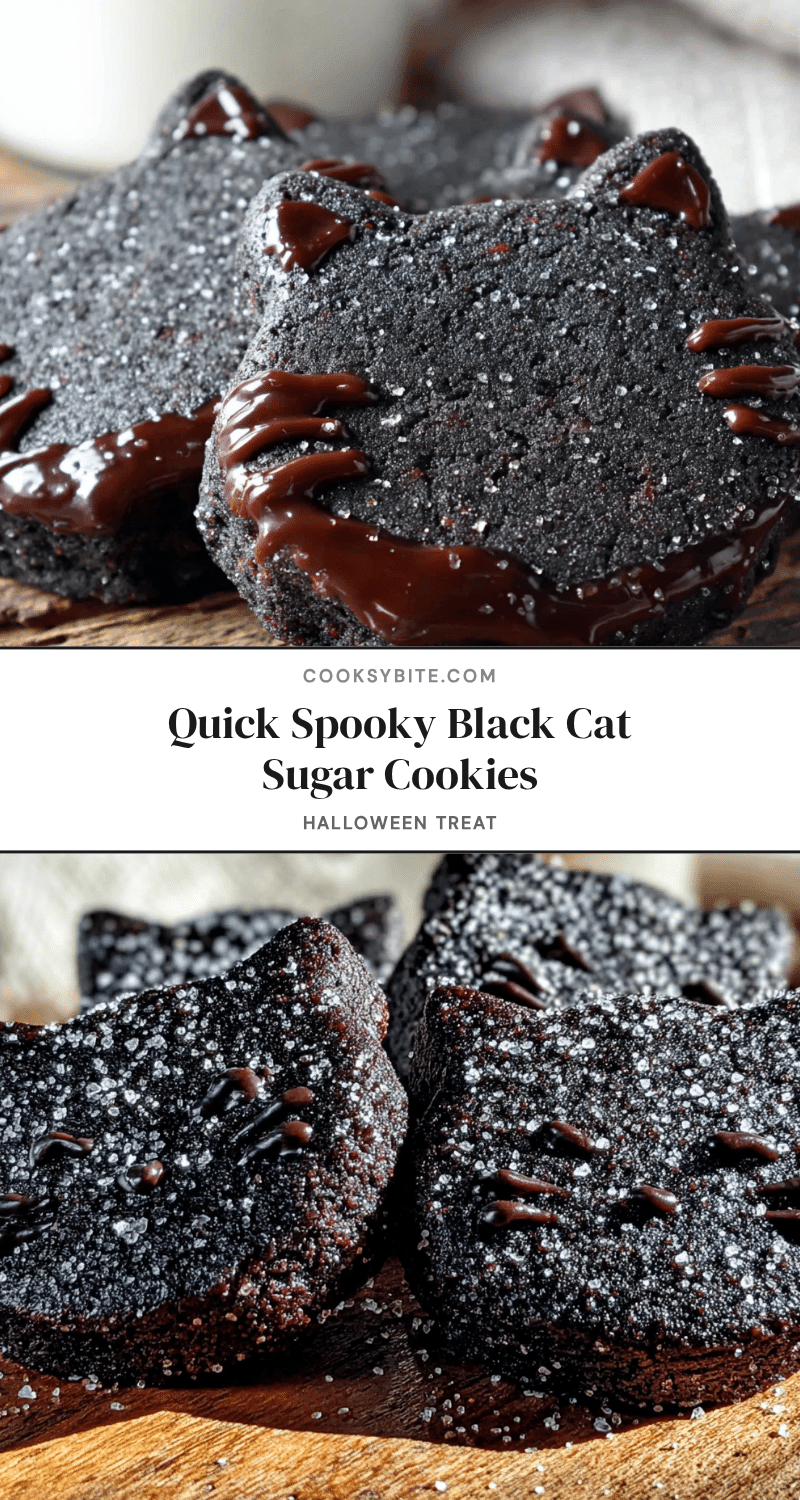
Quick Spooky Black Cat Sugar Cookies: Easy Halloween Treat
These quick spooky black cat sugar cookies are a lifesaver for busy weeknights. No chilling, no rolling, no stress—you can have a batch cooling in under 30 minutes, and they look like you spent hours on them.
- Prep Time: 15 minutes
- Cook Time: 10 minutes
- Total Time: 25 minutes
- Yield: 24 servings 1x
- Category: Dessert
- Cuisine: American
Ingredients
- 1 cup (2 sticks) unsalted butter, softened
- 1 cup granulated sugar
- 1 large egg, room temperature
- 2 teaspoons vanilla extract
- 2 ½ cups all-purpose flour
- ½ teaspoon baking powder
- ¼ teaspoon salt
- Black gel food coloring (about 1-2 teaspoons)
- 1 cup powdered sugar
- 2 tablespoons meringue powder
- 3–4 tablespoons water
- Yellow or green candy eyes (optional)
- Black sparkle sugar (optional)
Instructions
- Preheat your oven to 375°F (190°C). Line two baking sheets with parchment paper.
- In a large mixing bowl, beat the softened butter and granulated sugar together until light and fluffy, about 2-3 minutes. Scrape down the sides once.
- Beat in the egg and vanilla extract until well combined. The mixture may look slightly curdled.
- Add about 1 teaspoon of black gel food coloring and mix until the dough is an even grayish color. Add more if desired (up to 2 teaspoons total).
- In a separate bowl, whisk together the flour, baking powder, and salt.
- Gradually add the flour mixture to the butter mixture, mixing on low speed until the dough just comes together. It should be soft but not sticky.
- Scoop about 2 tablespoons of dough and roll into a ball. Place on the prepared baking sheet. Gently flatten into a slightly oval shape, then pinch two small triangles on top for ears. Leave about 2 inches between cookies.
- Bake for 8-10 minutes, until the edges are just barely golden. The centers will look soft. Let cool on the baking sheet for 5 minutes, then transfer to a wire rack to cool completely.
- While cookies cool, make the royal icing: whisk together powdered sugar and meringue powder in a small bowl. Add water one tablespoon at a time, stirring until smooth and thick (like honey).
- Spoon icing into a piping bag or zip-top bag with a tiny corner snipped off. Pipe two small triangles for eyes and an upside-down triangle for the nose. Pipe three whiskers on each side. If using candy eyes, press them into the wet icing.
- Optional: Sprinkle black sparkle sugar over the wet icing.
- Let the icing set for about 30 minutes before serving.
Notes
Use gel food coloring for best results; liquid coloring will affect texture. Don’t overmix the dough. Cookies are done when edges are set and centers look slightly underdone. Let cool completely before decorating. Store in an airtight container at room temperature for up to 5 days. Freeze undecorated cookies for up to 3 months.
Nutrition
- Serving Size: 1 cookie
- Calories: 145
- Sugar: 10
- Sodium: 55
- Fat: 7
- Saturated Fat: 4
- Carbohydrates: 19
- Protein: 2
Keywords: Halloween cookies, black cat cookies, sugar cookies, easy Halloween treats, spooky cookies, quick cookies, no-chill cookies


