It was just after midnight when the craving hit—unexpected and oddly specific. I’d been rifling through my pantry, half-asleep, when a bag of mochiko flour caught my eye. Honestly, I wasn’t sure if I could pull off making mochi at home without it turning into a sticky mess. But something about the thought of soft, chewy Japanese mochi, those little pillows of chewy delight, felt like the perfect late-night reset. I remember mumbling to myself, “Let’s see if I can make these tender mochi treats without fuss.”
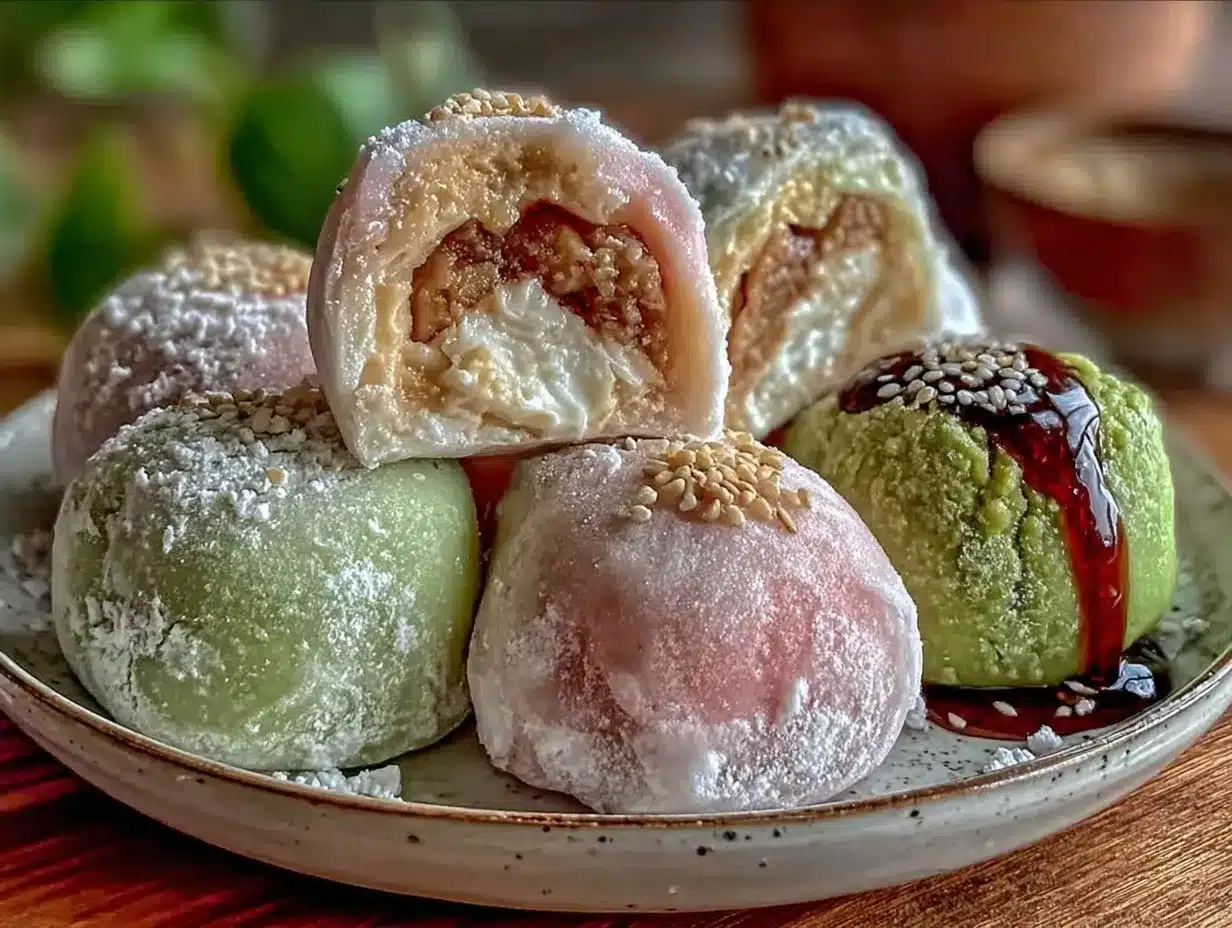
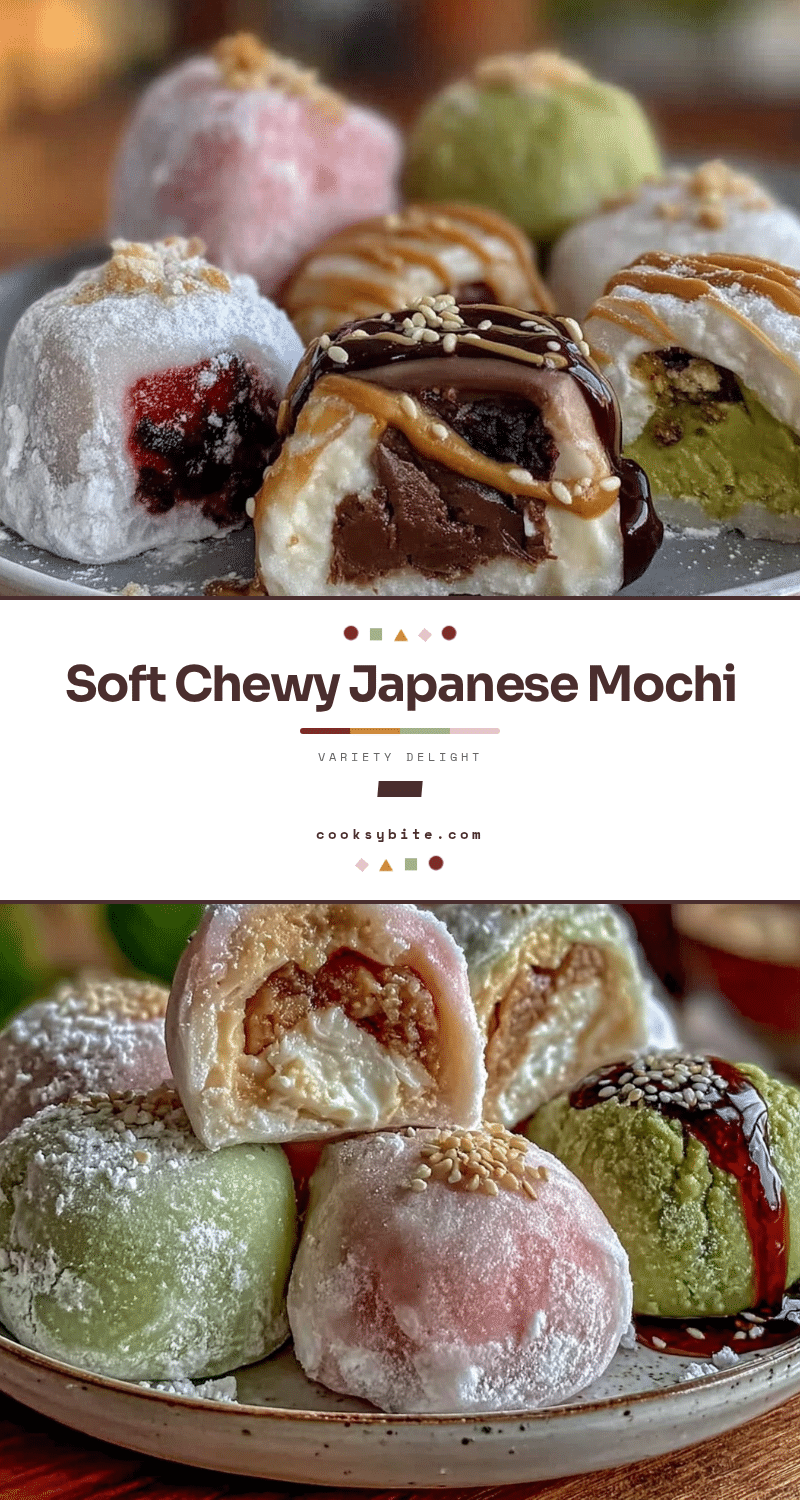
The kitchen was quiet except for the faint hum of the microwave, which I used to steam the dough. The texture was a revelation—soft yet springy, with that classic chewiness that you don’t get from just any rice cake. I started experimenting with different fillings and coatings, and before I knew it, I’d whipped up a whole variety platter of mochi, each piece uniquely tender and wonderfully chewy.
What stuck with me was how this simple recipe felt accessible and forgiving. No fancy equipment, no complicated steps, just a few ingredients and a little patience. The mochi became my go-to when I needed a sweet, soothing bite that felt like a small celebration. It’s a recipe that’s as comforting as it is satisfying, and it quietly earned a spot in my regular kitchen rotation.
Making this mochi variety felt like a small triumph—a reminder of how sometimes, the simplest recipes bring the most unexpected joy.
Why You’ll Love This Tender Japanese Mochi Variety Recipe
Making mochi at home might sound intimidating, but this recipe breaks it down into something genuinely doable, even on a busy weeknight. Over multiple attempts, I found this recipe consistently delivers tender Japanese mochi with that perfect soft, chewy texture everyone craves.
- Quick & Easy: Ready in about 30 minutes from start to finish — no long soaking or fermenting required.
- Simple Ingredients: Mostly pantry staples like mochiko (sweet rice flour), sugar, and water. You probably already have everything on hand.
- Perfect for Sharing: Great for small gatherings, afternoon snacks, or a sweet finish to dinner.
- Crowd-Pleaser: Kids and adults alike adore the chewy texture and variety of flavors you can create.
- Unbelievably Delicious: The subtle sweetness and melt-in-your-mouth softness make it feel both indulgent and light.
This isn’t your typical store-bought mochi. The magic lies in gently steaming the dough and folding in just the right amount of moisture, which creates that tender chewiness without being sticky or tough. Plus, I’ve added a few filling and coating ideas that bring extra layers of flavor and texture to the table.
Honestly, it’s the kind of treat that makes you pause, savor, and maybe even close your eyes after the first bite — a quiet little moment of pure comfort.
What Ingredients You Will Need
This tender Japanese mochi recipe uses simple, wholesome ingredients to create a soft, chewy texture that’s both satisfying and approachable. Most are pantry staples, and where possible, I’ll offer easy substitutions to suit your kitchen or dietary needs.
- Mochiko (Sweet Rice Flour): The star of the show—look for brands like Shirakiku for a fine, consistent texture.
- Granulated Sugar: Adds just the right hint of sweetness; you can adjust to taste.
- Water: Lukewarm, to help the flour and sugar blend smoothly.
- Cornstarch or Potato Starch: For dusting and preventing stickiness during shaping.
- Fillings (optional):
- Sweetened red bean paste (anko) – classic and rich
- Fresh fruit like strawberries or mango chunks – for a juicy surprise
- Matcha powder mixed with sugar – adds a subtle earthy twist
- Coatings (optional):
- Kinako (roasted soybean flour) – nutty and fragrant
- Desiccated coconut – for a tropical touch
- Ground toasted sesame seeds – adds crunch and flavor
If you want to keep it vegan and gluten-free, this recipe fits perfectly as-is. For a low-sugar option, try swapping regular sugar with coconut sugar or erythritol, though it may slightly alter the sweetness balance.
Equipment Needed
- Microwave-safe bowl with lid or plastic wrap: For steaming the mochi dough – if you don’t have a microwave steamer, this works just fine.
- Mixing bowl: To combine your ingredients smoothly.
- Rubber spatula: Essential for scraping sticky dough without losing any goodness.
- Measuring cups and spoons: For precise ingredient amounts—accuracy makes a difference in texture.
- Rolling pin (optional): Helpful if you want to flatten the dough before shaping, but your hands work perfectly too.
- Kitchen scale (optional): Great for consistent portioning, especially if you want uniform mochi sizes.
If you’re on a budget, most of these tools are common kitchen basics. I’ve found that a silicone spatula lasts longer and handles sticky dough better than wooden spoons or metal spatulas. Also, keeping your work surface and hands lightly dusted with starch helps avoid frustration when shaping.
Preparation Method
- Mix dry ingredients: In a microwave-safe bowl, combine 1 cup (120g) mochiko and 1/4 cup (50g) granulated sugar. Stir well to evenly distribute the sugar. This step ensures sweetness is consistent throughout the dough. (Approx. 2 minutes)
- Add water: Gradually pour in 3/4 cup (180ml) lukewarm water, stirring constantly with a rubber spatula until the mixture is smooth and lump-free. The batter should have a thick, slightly runny consistency. (Approx. 3 minutes)
- Steam the mochi dough: Cover the bowl loosely with microwave-safe plastic wrap or a lid. Microwave on high for 2 minutes. Remove carefully (steam will be hot!), stir the dough to redistribute heat, then microwave for another 1-2 minutes until the dough turns translucent and slightly sticky. (Total steaming time: 3-4 minutes)
- Dust your work surface: Generously sprinkle cornstarch or potato starch to keep the mochi from sticking during shaping. Transfer the hot dough carefully onto the dusted surface. Use a spatula dusted with starch or wet your hands lightly to handle the dough. (Approx. 2 minutes)
- Shape the mochi: Flatten the dough gently using your hands or a rolling pin dusted with starch to about 1/4 inch (0.6cm) thickness. Cut into 2-inch (5cm) squares or circles. For filled mochi, place about 1 teaspoon of filling in the center, then pinch the edges to seal tightly. (Approx. 10 minutes)
- Coat and serve: Roll each mochi piece in your choice of coating—kinako, coconut, or sesame seeds—to prevent sticking and add flavor. Let cool slightly before serving, as mochi is best enjoyed tender and warm or at room temperature. (Approx. 5 minutes)
Tip: If the dough feels too sticky during shaping, sprinkle a bit more starch on your hands and surface. If it’s too dry or cracks, add a teaspoon of water and knead gently before shaping.
Once you get the hang of the steaming and handling, this tender Japanese mochi recipe flows pretty smoothly, even if you’re new to mochi-making.
Cooking Tips & Techniques
Making mochi can feel like a dance between too sticky and too dry. I’ve learned a few tricks that really help hit that tender, chewy balance every time.
- Don’t rush the steaming: The dough needs to fully gelatinize to reach that unique chewiness. Stirring halfway through microwaving redistributes heat and prevents uneven cooking.
- Moisture control is key: The water-to-flour ratio affects texture dramatically. Too much water makes it sticky and hard to handle; too little makes your mochi tough. Start with the recommended amounts and adjust slightly if needed.
- Use starch generously: Dust hands and surfaces well. It feels odd at first but trust me—it’s the easiest way to keep the dough from sticking like glue.
- Work fast but gently: Mochi cools and firms quickly, so shaping while warm prevents cracking. But be gentle to avoid tearing the dough.
- Experiment with fillings and coatings separately: Some fillings add moisture, so adjust the dough thickness accordingly. For coatings, toast kinako or sesame seeds lightly to boost flavor.
- Practice makes perfect: My first batch was a sticky disaster, but after a couple tries, I found a rhythm and it got easier. Don’t be afraid to tweak as you go.
Honestly, the process is surprisingly forgiving. Once you get comfortable with texture and timing, you’ll find the results consistently tender and delightfully chewy.
Variations & Adaptations
This tender Japanese mochi recipe is a fantastic blank canvas for tasty twists and customizations. Here are a few of my favorites:
- Fruit-filled mochi: Swap traditional red bean paste with small chunks of juicy fruit like strawberries, mango, or blueberries for a fresh burst with every bite.
- Matcha mochi: Add 1-2 teaspoons of matcha powder to the dry ingredients for a beautiful green hue and a subtle earthy flavor.
- Chocolate mochi: Stir in cocoa powder or add a small piece of chocolate in the center before sealing for a rich surprise.
- Gluten-free and vegan: This recipe is naturally gluten-free and vegan, but you can swap sugar for coconut sugar or maple syrup to adjust sweetness and flavor profile.
- Alternative cooking methods: If you don’t have a microwave, you can steam the dough in a heatproof bowl over a pot of boiling water for about 15 minutes, stirring halfway.
Personally, I love the matcha version dusted with kinako—there’s something about that combo that feels both traditional and refreshingly new. Feel free to get creative and find your own perfect mochi style!
Serving & Storage Suggestions
Tender Japanese mochi tastes best when served fresh, at room temperature or slightly warm. The chewy, soft texture is most enjoyable within a few hours of making.
- Serving ideas: Arrange mochi on a pretty plate dusted with extra kinako or toasted sesame seeds. Pair with green tea or a light jasmine tea to balance the sweetness.
- Storage: Store mochi in an airtight container at room temperature for up to 1 day. For longer storage, refrigerate for up to 2 days, but be aware the texture firms up and becomes less tender.
- Freezing: Mochi freezes well—wrap each piece individually in plastic wrap, then place in a freezer bag. Thaw at room temperature before eating, then gently warm in the microwave for a few seconds to regain softness.
- Reheating tips: To soften refrigerated or frozen mochi, microwave covered with a damp paper towel for 10-15 seconds. Avoid overheating, which can make it tough.
Flavors tend to mellow and deepen over time, especially if filled with fruit or sweet bean paste, so enjoy experimenting with timing to find your favorite texture and flavor.
Nutritional Information & Benefits
This tender Japanese mochi variety is a light, satisfying treat that’s low in fat and naturally gluten-free. Here’s a rough estimate per serving (1 piece, about 30g):
- Calories: 80-100 kcal
- Carbohydrates: 18-22g
- Protein: 1-2g
- Fat: 0-1g (depending on fillings)
- Fiber: 0-1g
Key ingredients like mochiko provide a source of complex carbohydrates, offering gentle energy release without spikes. Using natural fillings like red bean paste adds protein and fiber, while coatings like kinako contribute beneficial plant compounds.
As a mostly plant-based snack, mochi fits well into many dietary lifestyles, including vegan and gluten-free. Just watch for added sugars if you’re mindful of intake.
From a personal wellness perspective, I appreciate mochi as a mindful treat—small portions, balanced sweetness, and that satisfying chew that makes it feel indulgent without heaviness.
Conclusion
This tender Japanese mochi variety recipe has become one of those little kitchen wins I come back to when I want a sweet, soft, and chewy treat without fuss. It’s approachable enough for beginners but flexible enough to play with flavors and fillings.
Whether you’re craving something nostalgic, looking to impress guests with a delicate homemade dessert, or just want a comforting bite after a hectic day, this mochi recipe delivers quietly but memorably.
I hope you enjoy making and sharing it as much as I do. Don’t hesitate to tweak the fillings and coatings to reflect your taste—mochi is meant to be playful and personal.
When you try it, I’d love to hear how your mochi turns out or what unique variations you create. Cooking is always better when shared, even through stories and recipes.
Here’s to tender, soft, chewy bites of happiness—made right at home.
FAQs About Tender Japanese Mochi Variety
What makes mochi soft and chewy?
The texture comes from the sweet rice flour (mochiko) being steamed until gelatinized, creating a tender, stretchy dough. Proper moisture balance and steaming time are crucial.
Can I make mochi without a microwave?
Yes! You can steam the dough over boiling water using a heatproof bowl and a steamer basket for about 15 minutes, stirring halfway to ensure even cooking.
How long does homemade mochi stay fresh?
Fresh mochi is best eaten within a day. Store at room temperature in an airtight container. Refrigeration can toughen the texture, but freezing is a good option for longer storage.
What are some common fillings for mochi?
Traditional fillings include sweetened red bean paste (anko), but you can also use fresh fruit, chocolate, matcha-flavored creams, or even nut butters for creative twists.
Is this recipe gluten-free and vegan?
Yes, this tender Japanese mochi recipe is naturally gluten-free and vegan, made with mochiko, sugar, and water. Just check your fillings and coatings to keep it consistent.
Pin This Recipe!
Tender Japanese Mochi Variety Recipe Easy Soft Chewy Mochi at Home

This recipe delivers tender Japanese mochi with a perfect soft, chewy texture using simple ingredients and a quick steaming method. It’s easy, forgiving, and perfect for sharing with a variety of fillings and coatings.
- Prep Time: 10 minutes
- Cook Time: 5 minutes
- Total Time: 30 minutes
- Yield: 12 servings 1x
- Category: Dessert
- Cuisine: Japanese
Ingredients
- 1 cup (120g) mochiko (sweet rice flour)
- 1/4 cup (50g) granulated sugar
- 3/4 cup (180ml) lukewarm water
- Cornstarch or potato starch for dusting
- Optional fillings: sweetened red bean paste (anko), fresh fruit (strawberries, mango chunks), matcha powder mixed with sugar
- Optional coatings: kinako (roasted soybean flour), desiccated coconut, ground toasted sesame seeds
Instructions
- In a microwave-safe bowl, combine 1 cup (120g) mochiko and 1/4 cup (50g) granulated sugar. Stir well to evenly distribute the sugar.
- Gradually pour in 3/4 cup (180ml) lukewarm water, stirring constantly with a rubber spatula until the mixture is smooth and lump-free.
- Cover the bowl loosely with microwave-safe plastic wrap or a lid. Microwave on high for 2 minutes. Remove carefully, stir the dough to redistribute heat, then microwave for another 1-2 minutes until the dough turns translucent and slightly sticky.
- Generously sprinkle cornstarch or potato starch on your work surface. Transfer the hot dough carefully onto the dusted surface. Use a spatula dusted with starch or wet your hands lightly to handle the dough.
- Flatten the dough gently using your hands or a rolling pin dusted with starch to about 1/4 inch (0.6cm) thickness. Cut into 2-inch (5cm) squares or circles. For filled mochi, place about 1 teaspoon of filling in the center, then pinch the edges to seal tightly.
- Roll each mochi piece in your choice of coating—kinako, coconut, or sesame seeds—to prevent sticking and add flavor. Let cool slightly before serving.
Notes
If the dough feels too sticky during shaping, sprinkle more starch on your hands and surface. If too dry or cracking, add a teaspoon of water and knead gently. For non-microwave cooking, steam dough over boiling water for about 15 minutes, stirring halfway. Mochi is best enjoyed fresh or slightly warm. Store in airtight container at room temperature up to 1 day or refrigerate up to 2 days (texture firms). Freeze wrapped individually for longer storage.
Nutrition
- Serving Size: 1 piece (about 30g)
- Calories: 80100
- Fat: 1
- Carbohydrates: 1822
- Fiber: 1
- Protein: 12
Keywords: mochi, Japanese mochi, soft mochi, chewy mochi, mochiko, sweet rice flour, homemade mochi, gluten-free dessert, vegan dessert