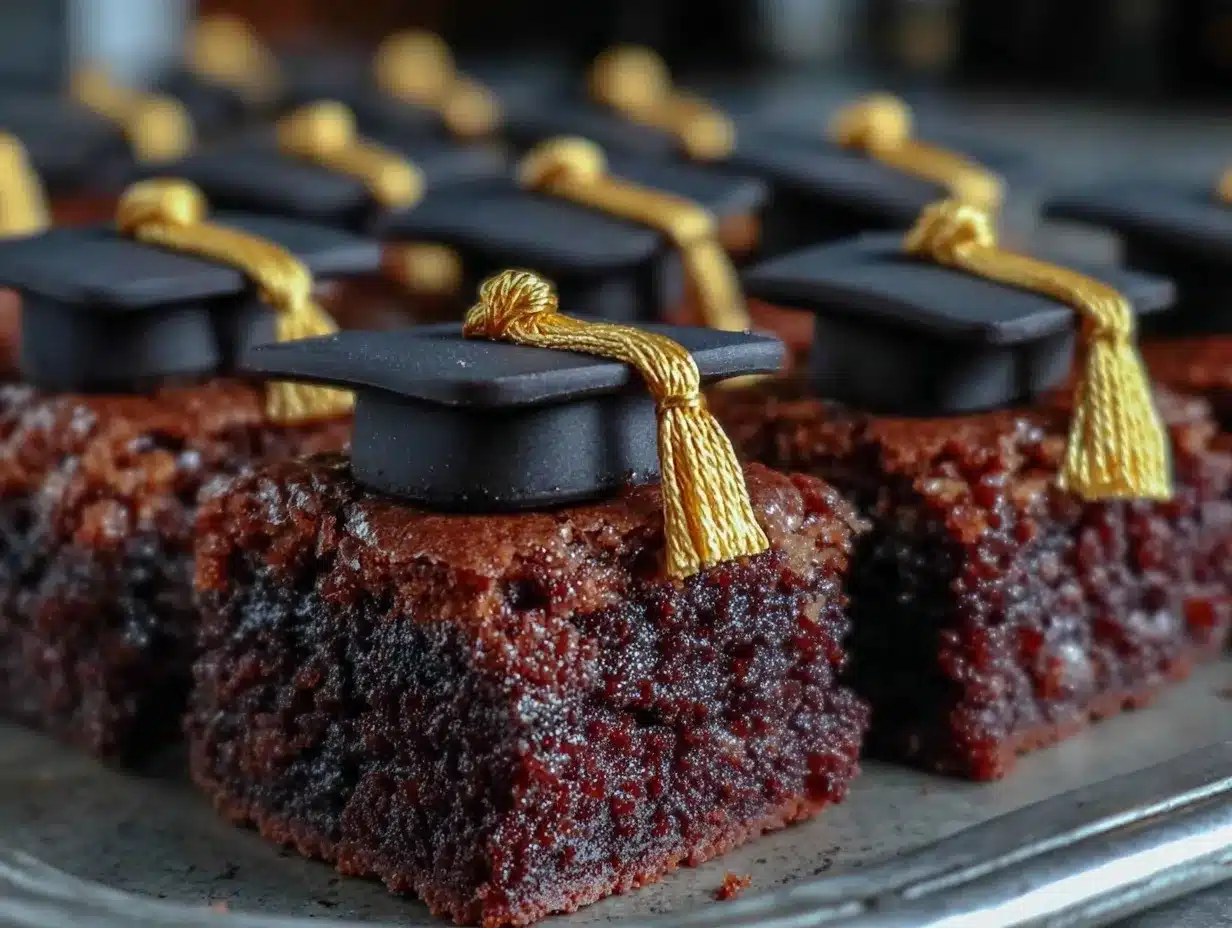
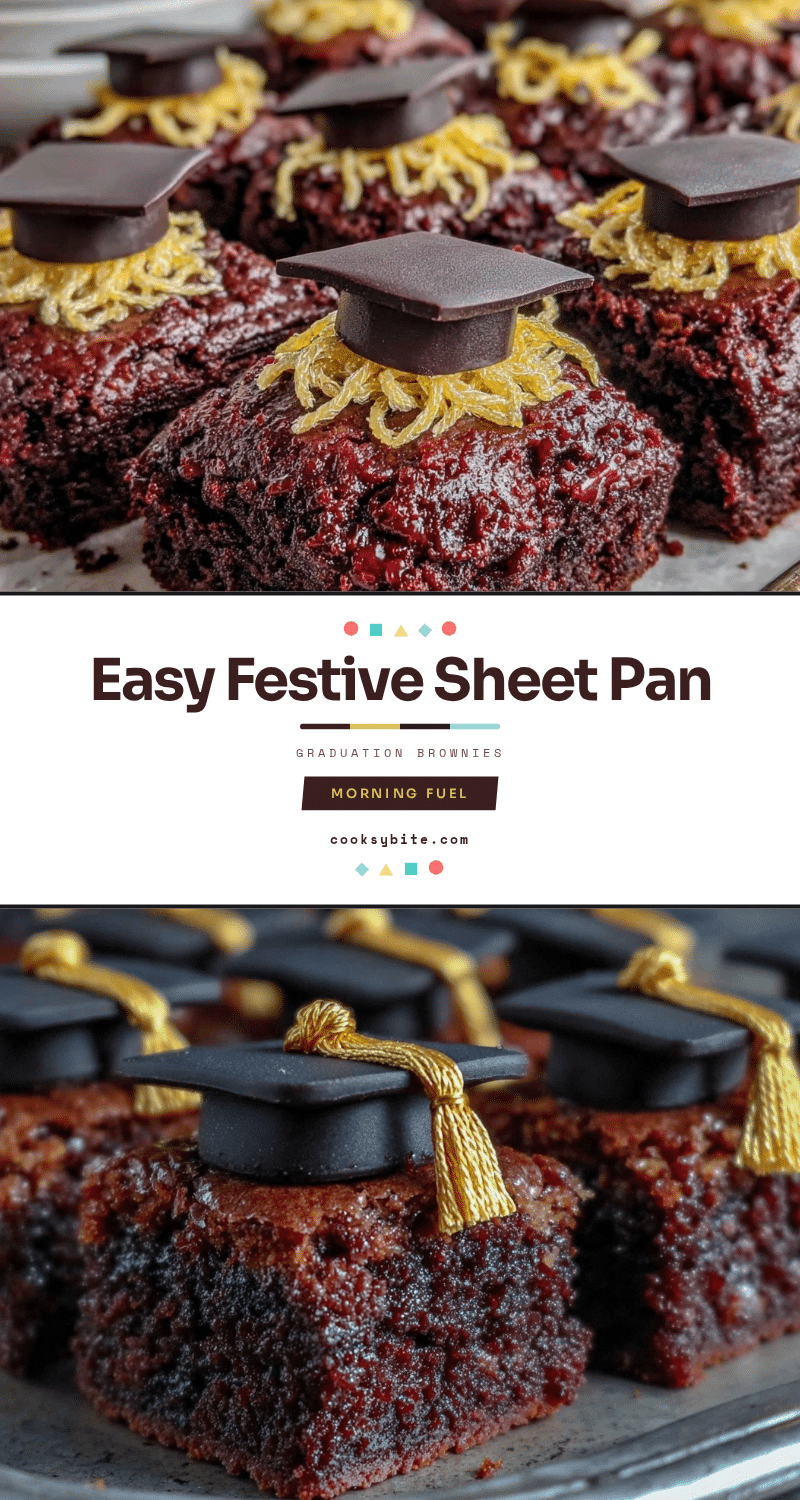
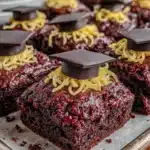
“You’re seriously making brownies shaped like graduation caps?” my sister asked, half amused, half skeptical, as I pulled out my trusty sheet pan and a tub of fondant from the pantry. Honestly, I wasn’t planning to make an elaborate dessert that day. It started as a last-minute idea—my niece’s graduation party was just hours away, and the usual cupcakes felt a bit too predictable. I wanted something festive but simple; something that would catch the eye and make everyone smile without turning me into a stressed mess.
It wasn’t until I spread the rich, fudgy brownie batter evenly across the pan and started shaping the fondant tassels that the magic clicked. The kitchen smelled like cocoa heaven, the fondant tassels added that perfect pop of whimsy, and suddenly, these easy festive sheet pan graduation cap brownies felt like the star of the show. What began as a quick snack idea soon became my go-to recipe for graduation parties, impressing both the kids and the adults with its simple charm and fun presentation.
There’s something quietly satisfying about serving a dessert that looks festive but didn’t eat up the whole day to prepare. Plus, the bonus was all the compliments and requests for the recipe, which I’m sharing here because, honestly, this is one celebration treat that deserves a spot at your next party table.
Why You’ll Love This Recipe
After making these brownies several times over graduation seasons, I can say with confidence that this recipe ticks all the boxes for a fuss-free party dessert:
- Quick & Easy: Ready in about an hour from start to finish, including baking and decorating. Perfect when you’re juggling last-minute party prep.
- Simple Ingredients: You probably already have everything in your pantry—no need for obscure baking supplies or expensive fondant brands (though I like Wilton’s fondant for smooth, easy shaping).
- Perfect for Graduation Celebrations: The design is festive without being over the top, making it ideal for school events, family gatherings, or even a casual get-together honoring your graduate.
- Crowd-Pleaser: The fudgy brownie base appeals to all ages, and the fondant tassels add a playful touch that kids especially love.
- Unbelievably Delicious: The texture is moist and rich, with a slightly crackly top that contrasts beautifully with the smooth fondant decoration.
This isn’t just any brownie recipe—it’s the kind where the brownie batter is spread evenly on a sheet pan for perfect thickness every time, and the fondant tassels are shaped by hand for that charming homemade feel. Plus, the design is customizable; you can change tassel colors or add a little shimmer to match your school colors. Honestly, it’s a recipe I keep coming back to because it makes me feel like I’m celebrating in style without the stress.
What Ingredients You Will Need
This recipe uses straightforward, pantry-friendly ingredients to create that rich, fudgy brownie base and the festive fondant accents. You won’t need to hunt down anything fancy, which is a relief when time is tight.
- For the Brownies:
- 1 cup (226g) unsalted butter, melted (adds richness and fudginess)
- 2 cups (400g) granulated sugar
- 4 large eggs, room temperature
- 1 teaspoon pure vanilla extract
- 1 cup (85g) unsweetened cocoa powder (I prefer Dutch-processed for a deeper chocolate flavor)
- 1 cup (125g) all-purpose flour
- ½ teaspoon salt
- ½ teaspoon baking powder
- For the Fondant Tassels:
- 1 package (16 oz / 450g) ready-to-roll fondant (Wilton brand works well for smooth texture)
- Food coloring gel in your choice of tassel colors (optional)
- Powdered sugar or cornstarch for dusting
If you want to swap things up, almond flour can replace all-purpose flour for a gluten-free version, but the texture will be a bit different—more crumbly, less chewy. For dairy-free brownies, substitute the butter with coconut oil or a vegan butter alternative. And if fondant isn’t your thing, you can try piping buttercream tassels instead, though it requires more skill and time.
Equipment Needed
- 9×13-inch (23×33 cm) rimmed sheet pan – this size is perfect for evenly spreading the brownie batter.
- Mixing bowls – at least two, one for wet ingredients and one for dry.
- Whisk and rubber spatula – for smooth mixing and scraping down the sides.
- Electric mixer (optional) – speeds up the creaming and mixing process but whisking by hand also works fine.
- Rolling pin – essential for flattening the fondant tassels evenly.
- Sharp knife or fondant cutter – for cutting tassel strips and shapes precisely.
- Small brush – handy for dusting powdered sugar or applying a little water to stick fondant pieces together.
I’ve used a silicone baking mat for the fondant work—makes it less sticky and easier to clean up. If you don’t have a rolling pin, a clean wine bottle can work in a pinch. And honestly, you don’t need expensive fondant tools; a butter knife and steady hands do just fine.
Preparation Method
- Preheat your oven to 350°F (175°C). Line your 9×13 inch sheet pan with parchment paper, leaving some overhang on the sides for easy removal later. This helps the brownies come out in one piece.
- Prepare the brownie batter: In a large bowl, whisk together the melted butter and granulated sugar until smooth and glossy. Beat in the eggs one at a time, followed by the vanilla extract.
- In a separate bowl, sift together the cocoa powder, flour, salt, and baking powder. Gradually fold the dry ingredients into the wet mixture using a spatula, stirring gently to combine without overmixing. The batter should be thick and glossy.
- Pour the batter into the prepared sheet pan. Use an offset spatula or the back of a spoon to spread it evenly to the edges, aiming for consistent thickness for even baking. Tap the pan gently on the counter to release any air bubbles.
- Bake for 25-30 minutes. Start checking at 25 minutes by inserting a toothpick into the center; it should come out with moist crumbs but not wet batter. The top will have a slightly crackly finish.
- Remove brownies from the oven and let cool completely in the pan. This step is crucial because fondant won’t stick or hold shape well on warm brownies.
- While brownies cool, prepare the fondant tassels: Knead the fondant until soft and pliable, dusting your work surface with powdered sugar or cornstarch to prevent sticking.
- Roll out the fondant to about 1/8 inch (3mm) thick. Cut squares approximately 2.5 inches (6.3 cm) wide to match the size of individual brownie caps. Then, cut thin strips for the tassels—about 1/8 inch (3mm) wide and 3 inches (7.5 cm) long.
- Assemble tassels: Gather the strips at one end, twist gently, and secure with a tiny bit of water using a brush to hold the shape. Place the tassels on top of each brownie square, gently pressing to adhere.
- Cut the brownies into squares matching the fondant caps. Use a sharp knife and wipe it clean between cuts for neat edges.
If you want a pop of color, tint the fondant with gel food coloring before rolling it out. I once made navy blue tassels with gold glitter dust for a friend’s graduation party, and they stole the show. Just remember—fondant can dry out quickly, so keep it wrapped in plastic wrap until ready to use.
Cooking Tips & Techniques
Getting these brownies just right is easier than it looks, but a few tricks help make them foolproof.
- Don’t overbake. The brownies should be fudgy and moist, not cakey. It’s tempting to leave them in longer, but that ruins the texture. Start checking at 25 minutes.
- Even thickness matters. When spreading batter in the sheet pan, smooth it out carefully so every brownie bakes evenly. Uneven thickness can mean some squares are dry while others are gooey.
- Fondant handling: Knead the fondant well to avoid cracks, and dust your workspace to prevent sticking. If you find fondant too sticky, a little cornstarch helps without drying it out.
- Work quickly with fondant. It hardens as it dries, so cut all your tassels at once and assemble swiftly.
- Use a serrated knife for cutting brownies. It’ll give you cleaner edges without squishing the delicate fondant caps.
Once, I accidentally left the brownies in the oven for 35 minutes—ugh, dry and crumbly. After that, I always set a timer and rely on the toothpick test. Also, if you want to multitask, prepare the fondant tassels while the brownies bake, so assembly is quick once they cool.
Variations & Adaptations
These brownies are a blank canvas for creativity, so feel free to make them your own.
- Flavor Twist: Add a teaspoon of espresso powder to the brownie batter to intensify the chocolate flavor. Alternatively, swirl in some peanut butter or caramel before baking for a decadent surprise.
- Seasonal Colors: Change the fondant tassel colors to match your school or party theme—reds and golds for fall graduations, pastels for spring, or even metallic silver for a chic look.
- Dietary Adaptations: Use gluten-free flour blends to make the brownies safe for gluten-sensitive guests. Swap regular fondant for a vegan version if needed, or try decorating with dairy-free buttercream tassels if fondant feels too sweet.
- Mini Version: Bake the brownies in a half-sheet pan or muffin tin for bite-sized treats that are perfect finger foods at large parties.
I once made a batch with cherry chocolate brownies as the base, swapping in dark red fondant tassels for a friend’s celebration. The combination of tart cherry and bittersweet chocolate with the festive tassels was a hit and added a unique twist to the classic look.
Serving & Storage Suggestions
These brownies are best served at room temperature so the fudgy texture shines through and the fondant tassels stay soft and chewy. Arrange them on a festive platter or tiered dessert stand for a party-ready presentation.
Pair with cold milk, coffee, or even a sparkling non-alcoholic punch for a full celebration vibe. They also go well alongside other treats like pink champagne jello shots or a creamy dessert like strawberry mousse cups for a dessert table that covers all the bases.
Store leftover brownies in an airtight container at room temperature for up to 3 days. If your party runs long, refrigeration extends freshness to about a week, but the fondant may harden slightly—just let them sit out for 15 minutes before serving to soften.
You can freeze brownies without fondant for up to 3 months, but it’s best to add the tassels fresh after thawing for the best texture and appearance.
Nutritional Information & Benefits
Each serving (about 2×2-inch square) provides approximately:
| Calories | Fat | Carbohydrates | Protein | Sugar |
|---|---|---|---|---|
| 220 | 12g | 28g | 3g | 20g |
While these brownies are an indulgence, they contain real butter and eggs, delivering protein and fats that satisfy hunger. Cocoa powder is rich in antioxidants, which is a nice bonus in any chocolate treat.
They’re gluten-friendly if you swap to almond flour, and you can easily make them dairy-free with substitutions—making them accessible for a wider range of dietary needs. Of course, the fondant contains sugar and should be enjoyed in moderation, but it’s a small decorative touch that adds fun without overpowering the dessert.
Conclusion
These easy festive sheet pan graduation cap brownies with fondant tassels have become a staple in my celebration arsenal. They strike the perfect balance of fuss-free prep and festive flair—a combo that’s hard to beat when you want to impress without stress. You can tweak the colors, flavors, and sizes to fit your party vibe, making them uniquely yours.
I love that they bring a smile and a little playful spirit to graduation day—a sweet reminder of achievement wrapped in chocolatey goodness. If you’re looking for a crowd-pleaser that’s both charming and delicious, this recipe is worth a try.
Feel free to share your variations and stories—I’m always curious how others put their spin on these festive brownies. Wishing you smooth celebrations and plenty of sweet moments ahead!
FAQs
- Can I make these brownies ahead of time? Yes! You can bake the brownies a day or two before and prepare the fondant tassels separately. Assemble just before serving for best freshness.
- What if I don’t have fondant? You can decorate with piped buttercream tassels or even edible paper decorations, though fondant gives the cleanest look.
- How do I store leftover brownies with fondant? Store them in an airtight container at room temperature for up to 3 days. Avoid refrigeration if possible to keep fondant soft.
- Can I use boxed brownie mix? You can, but homemade brownies give better control over texture and flavor. If using a mix, choose one that yields fudgy brownies.
- How do I prevent the fondant from sticking? Dust your work surface and rolling pin lightly with powdered sugar or cornstarch to keep fondant from sticking while rolling and cutting.
Pin This Recipe!
Easy Festive Graduation Cap Brownies Recipe with Fondant Tassels for Graduation Parties
These easy festive sheet pan brownies shaped like graduation caps with fondant tassels are perfect for graduation parties. They are quick to make, fudgy, and visually charming, ideal for last-minute celebrations.
- Prep Time: 15 minutes
- Cook Time: 25-30 minutes
- Total Time: 40-45 minutes
- Yield: 24 servings 1x
- Category: Dessert
- Cuisine: American
Ingredients
- 1 cup (226g) unsalted butter, melted
- 2 cups (400g) granulated sugar
- 4 large eggs, room temperature
- 1 teaspoon pure vanilla extract
- 1 cup (85g) unsweetened cocoa powder (preferably Dutch-processed)
- 1 cup (125g) all-purpose flour
- ½ teaspoon salt
- ½ teaspoon baking powder
- 1 package (16 oz / 450g) ready-to-roll fondant (Wilton brand recommended)
- Food coloring gel (optional)
- Powdered sugar or cornstarch for dusting
Instructions
- Preheat your oven to 350°F (175°C). Line a 9×13 inch sheet pan with parchment paper, leaving some overhang for easy removal.
- In a large bowl, whisk together the melted butter and granulated sugar until smooth and glossy. Beat in the eggs one at a time, then add vanilla extract.
- In a separate bowl, sift together cocoa powder, flour, salt, and baking powder. Gradually fold the dry ingredients into the wet mixture using a spatula, stirring gently to combine without overmixing.
- Pour the batter into the prepared sheet pan and spread evenly to the edges. Tap the pan gently on the counter to release air bubbles.
- Bake for 25-30 minutes, checking at 25 minutes with a toothpick; it should come out with moist crumbs but not wet batter.
- Remove brownies from oven and let cool completely in the pan.
- While brownies cool, knead the fondant until soft and pliable, dusting your work surface with powdered sugar or cornstarch to prevent sticking.
- Roll out the fondant to about 1/8 inch (3mm) thick. Cut squares approximately 2.5 inches (6.3 cm) wide to match brownie size, then cut thin strips about 1/8 inch (3mm) wide and 3 inches (7.5 cm) long for tassels.
- Assemble tassels by gathering strips at one end, twisting gently, and securing with a tiny bit of water using a brush. Place tassels on top of each brownie square, pressing gently to adhere.
- Cut brownies into squares matching the fondant caps using a sharp or serrated knife, wiping clean between cuts for neat edges.
Notes
Do not overbake to keep brownies fudgy. Even thickness when spreading batter ensures even baking. Knead fondant well and dust work surface to prevent sticking. Work quickly with fondant as it hardens when drying. Use a serrated knife for cleaner brownie cuts. Fondant can dry out quickly; keep wrapped until use. For gluten-free, substitute almond flour; for dairy-free, use coconut oil or vegan butter. Fondant can be replaced with buttercream tassels if preferred.
Nutrition
- Serving Size: 1 brownie square (ab
- Calories: 220
- Sugar: 20
- Fat: 12
- Carbohydrates: 28
- Protein: 3
Keywords: brownies, graduation party, fondant tassels, festive dessert, sheet pan brownies, fudgy brownies, easy brownies, party dessert