My niece Clara asked why I couldn’t just shape the pretzel dough into fingers instead of knots. I started to explain why that wouldn’t work — then stopped. Honestly, I had no good reason. I’d been making soft pretzels for years, following the same twisting method my grandmother taught me. But Clara, who was maybe eight at the time, just saw a pile of dough and thought, “That looks like a hand.” Kids have a way of cutting through all the overthinking we adults do, you know?
So I let her shape one. It looked ridiculous at first — way too thick, with uneven knuckles and a thumb that was practically a separate bread roll. But when it came out of the baking soda bath and into the oven, something clicked. The salt crystallized on the surface, the baking soda gave it that signature dark brown crust, and suddenly it looked less like a failed bread experiment and more like something you’d see in a witch’s kitchen. I pulled the tray out and just stared at it for a second. I mean, it actually worked.
That was a Tuesday night in mid-October, and my kitchen was a disaster. Flour on the counters, salt scattered everywhere, and a very proud eight-year-old covered in dough. I remember thinking, “This is either going to be a hilarious failure or the thing I bring to every Halloween party from now on.” Spoiler: it’s the second one. These witch finger pretzel bites have become my signature Halloween party snack, and I keep making them because they’re genuinely fun — not just cute, but actually delicious. Maybe you’ve been there, staring at a recipe thinking there’s only one right way to do it, until someone asks a simple question that changes everything.
Why You’ll Love This Recipe
Let me tell you why these witch finger pretzel bites have earned a permanent spot in my Halloween rotation. I’ve tested this recipe at least a dozen times across different ovens, different flours, and different levels of kitchen chaos. Here’s what I’ve learned:
- Quick & Easy: From start to finish, these come together in about 45 minutes. Most of that time is inactive rising, so you’re not stuck at the stove while your guests arrive.
- Simple Ingredients: You probably have everything in your pantry right now. Flour, yeast, salt, baking soda, butter — that’s it. No weird specialty items that you’ll use once and forget about.
- Perfect for Halloween Parties: These are the snack that makes people stop and take pictures before they eat. They’re creepy enough to fit the theme but approachable enough that everyone grabs one.
- Crowd-Pleaser: I’ve brought these to potlucks, office parties, and family gatherings. Kids love the gross-out factor, and adults appreciate that they’re actually good pretzels underneath the spooky look.
- Unbelievably Delicious: The texture is that perfect soft pretzel chew — golden brown on the outside, pillowy on the inside. The salt crystals against the buttery finish? Chef’s kiss.
What makes these different from every other Halloween snack out there is the technique. Instead of using pre-made dough or crescent rolls (which taste fine but lack that authentic pretzel bite), we’re making real soft pretzel dough from scratch. The baking soda bath is non-negotiable — it’s what gives pretzels that distinct flavor and dark crust. And the shaping method? That came straight from an eight-year-old’s imagination, and honestly, it works better than anything I could have planned.
This recipe isn’t just good — it’s the kind that makes you close your eyes after the first bite. It’s comfort food with a spooky twist, perfect for impressing your Halloween guests without spending all day in the kitchen. Plus, watching people’s faces when they realize they’re eating a “witch finger” is pure entertainment.
What Ingredients You Will Need
This recipe uses simple, pantry-friendly ingredients to create something that looks complicated but isn’t. Most of these are staples you probably already have, which makes these witch finger pretzel bites perfect for last-minute Halloween planning.
For the Dough
- 1 ½ cups warm water (110°F to 115°F — warm but not hot, like bathwater)
- 1 packet active dry yeast (about 2 ¼ teaspoons — I prefer Red Star or Fleischmann’s for consistent results)
- 1 tablespoon brown sugar (adds richness and helps the yeast activate; you can use white sugar in a pinch)
- 3 ½ cups all-purpose flour (plus more for dusting — King Arthur Flour gives the best texture, but any brand works)
- 1 teaspoon salt (fine sea salt or table salt — don’t use coarse salt here as it won’t distribute evenly)
- 2 tablespoons unsalted butter (melted and slightly cooled — adds tenderness to the dough)
For the Baking Soda Bath
- ½ cup baking soda (this is what gives pretzels their signature dark crust and flavor; don’t skip this)
- 6 cups water (for boiling)
For the Topping
- 1 large egg (beaten with 1 tablespoon water for egg wash — gives that glossy, golden finish)
- Coarse sea salt or pretzel salt (I use Morton’s coarse kosher salt; regular table salt is too fine and will dissolve)
- 1 tablespoon melted butter (for brushing after baking — optional but highly recommended)
For the Witch Finger Effect
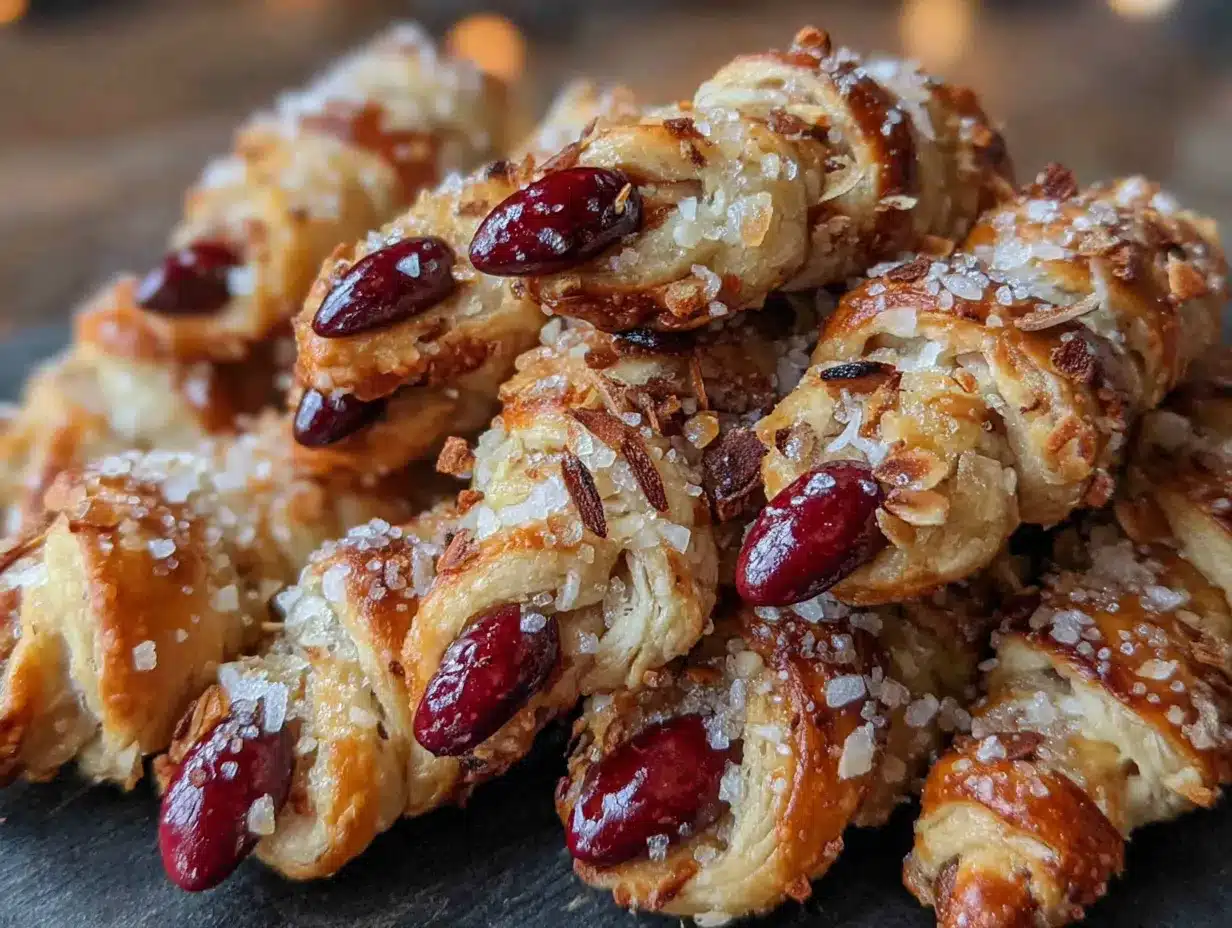
- Sliced almonds (one per pretzel bite — these become the “fingernails”; look for whole sliced almonds, not slivered)
- Optional: red food coloring or paprika (to tint the “nail bed” for extra creepiness — totally optional but fun)
One thing I learned the hard way — make sure your yeast is fresh. I once used a packet that had been sitting in my pantry for over a year, and the dough barely rose. If you’re unsure, proof the yeast first: mix it with the warm water and brown sugar, wait 5-10 minutes, and look for foam. If nothing happens, your yeast is dead and you need a new packet.
For the sliced almonds, I recommend buying them already sliced rather than trying to slice whole almonds yourself. The pre-sliced ones are more uniform and look more like actual fingernails. Plus, it saves you about fifteen minutes of frustration.
Equipment Needed
You don’t need anything fancy for these witch finger pretzel bites, which is part of why I love this recipe. Here’s what you’ll need:
- Large mixing bowl (glass or stainless steel works best — avoid plastic as it can retain odors)
- Wooden spoon or dough hook attachment (for mixing; a stand mixer makes this easier but hand mixing works fine)
- Measuring cups and spoons (accurate measurements matter in baking)
- Kitchen thermometer (not strictly necessary but helpful for getting the water temperature right — I killed my yeast twice before buying one)
- Large pot (for the baking soda bath — at least 4-quart capacity)
- Slotted spoon or spider strainer (for removing pretzels from the boiling water)
- Baking sheet (lined with parchment paper or a silicone baking mat — parchment is easier for cleanup)
- Pastry brush (for egg wash and butter; a silicone brush is easier to clean than natural bristles)
- Sharp knife or bench scraper (for dividing the dough)
If you don’t have a kitchen thermometer, just test the water on your wrist — it should feel warm but not hot, like comfortable bath water. Too hot and you’ll kill the yeast; too cold and it won’t activate. I’ve made the mistake of using water straight from the tap on “hot” and ended up with flat, dense pretzels. Learn from my failures!
Preparation Method
Let me walk you through this step by step. These witch finger pretzel bites look complicated, but I promise they’re not. Take your time with the shaping — that’s where the magic happens.
Step 1: Activate the Yeast
In your large mixing bowl, combine the warm water (110°F to 115°F), brown sugar, and active dry yeast. Give it a gentle stir and let it sit for 5 to 10 minutes. You’re looking for a foamy layer on top — that means your yeast is alive and happy. If nothing happens after 10 minutes, start over with fresh yeast. Trust me on this one — I’ve tried to push through with dead yeast, and the result is dense, sad pretzels that nobody wants to eat.
Step 2: Make the Dough
Add the melted butter, salt, and 2 cups of flour to the yeast mixture. Stir until combined, then gradually add the remaining 1 ½ cups of flour, ½ cup at a time. The dough should come together into a shaggy ball that pulls away from the sides of the bowl. If it’s too sticky, add flour one tablespoon at a time. If it’s too dry, add water one tablespoon at a time. Turn the dough out onto a lightly floured surface and knead for 5 to 7 minutes — you want it smooth and elastic, like a soft earlobe. (Weird comparison, I know, but that’s exactly the texture you’re going for.)
Step 3: First Rise
Place the dough in a lightly greased bowl (I use the same bowl, just wiped clean with a bit of oil). Cover with a clean kitchen towel or plastic wrap and let it rise in a warm spot for 30 to 45 minutes, until doubled in size. I usually put mine in the microwave — not turned on, obviously — because it’s draft-free and stays warm. While you wait, get your baking soda bath ready and preheat your oven to 425°F.
Step 4: Shape the Witch Fingers
Punch down the risen dough and turn it out onto a lightly floured surface. Divide it into 12 to 16 equal pieces, depending on how big you want your witch finger pretzel bites. Roll each piece into a rope about 4 to 5 inches long. Here’s the fun part: shape each rope into a finger. Make one end slightly thicker (the “palm” end) and taper the other end to a point (the “fingertip”). Use a sharp knife to score 2 to 3 shallow lines across the middle for knuckles. Don’t cut too deep — you just want the impression. Press a sliced almond into the tapered end for the fingernail. If you want extra creepiness, dab a tiny bit of red food coloring or paprika under the almond before pressing it in. Clara insisted on this detail, and honestly, it makes the effect so much better.
Step 5: The Baking Soda Bath
Bring 6 cups of water to a boil in your large pot. Carefully add the ½ cup of baking soda — it will fizz up, so add it slowly. Drop 2 to 3 shaped pretzels into the boiling water at a time. Let them boil for 20 to 30 seconds on each side. Use your slotted spoon to flip them gently. The longer they boil, the darker and chewier the crust will be. I usually go for 25 seconds per side for that perfect balance. Remove with the slotted spoon and place on your parchment-lined baking sheet, spacing them about 2 inches apart.
Step 6: Egg Wash and Bake
Brush each pretzel bite with the egg wash (beaten egg mixed with water). Sprinkle generously with coarse salt. Bake at 425°F for 12 to 15 minutes, until deep golden brown. The smell in your kitchen right now is absolutely incredible — buttery, salty, and slightly toasty. Let them cool on the baking sheet for 5 minutes, then brush with melted butter for that extra shine and flavor.
Cooking Tips & Techniques
After making these witch finger pretzel bites more times than I care to count, I’ve collected some hard-won wisdom. Let me share what I’ve learned so you don’t make the same mistakes I did.
Don’t skip the baking soda bath. I know it seems like an extra step, but this is what separates soft pretzels from regular bread. The alkaline bath is what gives pretzels that dark, shiny crust and distinctive flavor. Without it, you’re just making weirdly shaped dinner rolls. I tried skipping it once when I was in a hurry, and the result was pale, bland, and honestly embarrassing for a party snack.
Keep the dough covered while shaping. Pretzel dough dries out fast. While you’re shaping one batch, keep the remaining dough under a damp towel or plastic wrap. Dry dough cracks when you try to shape it, and cracked “fingers” look more like broken twigs than witch fingers. Not the vibe we’re going for.
Watch your boiling time. I’ve found that 20 to 25 seconds per side is the sweet spot. Too short and the crust doesn’t develop properly; too long and the pretzels get a weird, almost metallic taste from the baking soda. Set a timer if you need to — I’ve definitely gotten distracted and left a batch in too long.
Space them out on the baking sheet. These puff up during baking, so give them room to breathe. I usually fit 6 to 8 per standard baking sheet. Crowding them leads to pale spots where they touch, and you lose that beautiful even browning.
Make extra for the freezer. These freeze beautifully. I always double the batch and freeze half before the baking soda bath. Just shape them, freeze on a baking sheet until solid, then transfer to a freezer bag. When you’re ready, drop them straight from frozen into the boiling water and add a few extra seconds to the boil time. Fresh witch finger pretzel bites whenever you want them!
Variations & Adaptations
One of the best things about this recipe is how flexible it is. Here are some variations I’ve tried and loved:
Gluten-Free Version: Substitute the all-purpose flour with a 1:1 gluten-free baking flour blend (I like Bob’s Red Mill). The dough will be slightly stickier, so add an extra tablespoon or two of flour as needed. The texture won’t be quite as chewy, but they’re still delicious and creepy. My gluten-sensitive friends devour these every Halloween.
Spicy Witch Fingers: Add 1 teaspoon of cayenne pepper and ½ teaspoon of garlic powder to the flour mixture. The heat builds slowly and pairs surprisingly well with the salt. I made these for a Halloween party with a “spicy challenge” theme, and they were gone in twenty minutes.
Everything Bagel Version: After brushing with egg wash, sprinkle with everything bagel seasoning instead of just salt. The sesame seeds, poppy seeds, garlic, and onion flakes add incredible flavor and texture. This is honestly my favorite variation — it’s so good that I make these year-round, not just for Halloween.
Sweet Cinnamon Sugar Fingers: Skip the salt and brush with melted butter immediately after baking, then roll in a mixture of cinnamon and sugar. These are less “witch finger” and more “monster treat,” but kids absolutely love them. I usually make a batch of both salty and sweet so everyone’s happy.
Cheese-Stuffed Fingers: Before shaping, press a small cube of cheddar or mozzarella into the center of each dough piece. Make sure the cheese is completely sealed inside, or it will leak out during boiling. The melted cheese center is a fun surprise — just warn people to let them cool slightly before biting in, because that cheese gets hot.
Serving & Storage Suggestions
These witch finger pretzel bites are best served warm, right after baking. The contrast between the crisp exterior and soft interior is at its peak within the first hour. For a Halloween party, I recommend timing the final bake so they come out about 15 minutes before guests arrive. The smell alone will draw everyone to the kitchen.
For presentation, arrange them on a platter in a way that suggests a hand — fan out the “fingers” slightly, with the almond nails pointing outward. I like to serve them with a small bowl of spicy mustard or cheese dip in the center. The mustard adds a tangy contrast to the salty pretzel, and the orange color fits the Halloween theme perfectly. A side of warm queso or beer cheese also works beautifully.
If you have leftovers (unlikely, but possible), store them in an airtight container at room temperature for up to 2 days. They’ll lose some of that fresh-baked crispness, but they’re still tasty. To reheat, pop them in a 350°F oven for 5 minutes — the microwave will make them rubbery. You can also reheat them in an air fryer at 350°F for 3 minutes, which actually brings back some of the original texture.
These freeze exceptionally well. After baking and cooling completely, place them in a single layer on a baking sheet and freeze until solid, then transfer to a freezer bag. They’ll keep for up to 3 months. Reheat directly from frozen in a 350°F oven for 8 to 10 minutes. I always keep a stash in my freezer for unexpected guests or last-minute Halloween cravings.
Nutritional Information & Benefits
While these witch finger pretzel bites are definitely a treat, they’re not as indulgent as you might think. Here’s the estimated nutrition per serving (based on 16 pretzel bites):
| Nutrient | Amount per serving (1 pretzel bite) |
|---|---|
| Calories | ~120 |
| Total Fat | 3g |
| Saturated Fat | 1.5g |
| Carbohydrates | 20g |
| Protein | 3g |
| Sodium | 450mg |
| Fiber | 1g |
| Sugar | 1g |
The main source of fat is the butter, which you can reduce by using a light brushing instead of a generous one. The protein comes from the flour and egg wash, and the fiber is from the whole wheat if you choose to substitute half the flour with whole wheat pastry flour (which I sometimes do for a heartier texture).
These pretzels are nut-free (besides the almond garnish, which can be omitted) and can easily be made dairy-free by using vegan butter. The yeast provides B vitamins, and the flour contains iron and folate. Are they health food? No. But as a Halloween party snack, they’re far better than anything from a bag or box.
Conclusion
If you’re hosting a Halloween party this year, these witch finger pretzel bites need to be on your table. They’re the perfect combination of creepy and delicious — the kind of snack that gets people talking, taking pictures, and coming back for seconds. And honestly, they’re just fun to make. There’s something deeply satisfying about shaping dough into fingers and watching your guests’ reactions when they realize what they’re eating.
I keep making this recipe because it reminds me that sometimes the best ideas come from unexpected places. Clara didn’t know anything about pretzel-making traditions or proper technique — she just saw dough and imagined something fun. That’s the spirit I try to bring to every Halloween gathering now. Don’t be afraid to experiment, to let your kids (or your inner child) take the lead, and to serve something that makes people smile before they even take a bite.
I’d love to hear how yours turn out! Drop a comment below and let me know if you tried any variations, if your guests were appropriately creeped out, or if you have your own twist on these witch finger pretzel bites. Share this recipe with your Halloween-loving friends, and don’t forget to pin it for later. Happy haunting — and happy snacking!
Frequently Asked Questions
Can I make these witch finger pretzel bites ahead of time?
Absolutely! You can prepare them up to the baking soda bath stage, then refrigerate on the baking sheet for up to 24 hours. When you’re ready, just proceed with the boiling and baking steps. You can also freeze them after baking for up to 3 months.
Why did my pretzels turn out pale?
This usually means the baking soda bath wasn’t long enough, or your baking soda is old. Make sure you’re boiling each pretzel for at least 20 seconds per side. Also check that your baking soda isn’t expired — it loses potency over time and won’t create the same alkaline reaction.
Can I use whole wheat flour instead of all-purpose?
You can substitute up to half the all-purpose flour with whole wheat flour without significantly changing the texture. Using 100% whole wheat will result in denser, less chewy pretzels. I’d recommend starting with a 50/50 blend and seeing how you like it.
How do I get the almond “fingernails” to stay on?
Press the almond firmly into the dough before the baking soda bath. The boiling and baking process will help it adhere. If some fall off during boiling, just press them back on after the bath but before the egg wash. A tiny dab of egg wash under the almond acts like glue.
Can I make these without yeast?
You can use a no-yeast pretzel recipe, but the texture will be more like a dense breadstick than a soft pretzel. If you’re in a rush, look for a baking powder-based soft pretzel recipe and shape the dough the same way. The witch finger effect works with any pretzel dough.
Pin This Recipe!

Witch Finger Pretzel Bites: The Best Easy Halloween Party Snack
These creepy yet delicious witch finger pretzel bites are made from scratch with a soft, chewy texture and a spooky shape that’s perfect for Halloween parties. Quick to prepare and sure to be a crowd-pleaser, they’re a fun twist on classic soft pretzels.
- Prep Time: 15 minutes
- Cook Time: 15 minutes
- Total Time: 45 minutes
- Yield: 16 servings 1x
- Category: Appetizer
- Cuisine: American
Ingredients
- 1 ½ cups warm water (110°F to 115°F)
- 1 packet active dry yeast (about 2 ¼ teaspoons)
- 1 tablespoon brown sugar
- 3 ½ cups all-purpose flour (plus more for dusting)
- 1 teaspoon fine sea salt or table salt
- 2 tablespoons unsalted butter (melted and slightly cooled)
- ½ cup baking soda
- 6 cups water (for boiling)
- 1 large egg (beaten with 1 tablespoon water for egg wash)
- Coarse sea salt or pretzel salt (for topping)
- 1 tablespoon melted butter (for brushing after baking, optional)
- Sliced almonds (one per pretzel bite)
- Optional: red food coloring or paprika (for tinting the ‘nail bed’)
Instructions
- In a large mixing bowl, combine warm water (110°F to 115°F), brown sugar, and active dry yeast. Stir gently and let sit for 5 to 10 minutes until foamy.
- Add melted butter, salt, and 2 cups of flour to the yeast mixture. Stir until combined, then gradually add the remaining 1 ½ cups of flour, ½ cup at a time, until a shaggy dough forms.
- Turn dough onto a lightly floured surface and knead for 5 to 7 minutes until smooth and elastic.
- Place dough in a lightly greased bowl, cover with a towel or plastic wrap, and let rise in a warm spot for 30 to 45 minutes until doubled in size.
- Punch down the dough and divide into 12 to 16 equal pieces. Roll each piece into a 4- to 5-inch rope, shaping one end thicker (palm) and tapering the other (fingertip). Score 2 to 3 shallow lines for knuckles and press a sliced almond into the tapered end for the fingernail. Optionally, dab red food coloring or paprika under the almond.
- Bring 6 cups of water to a boil in a large pot. Carefully add ½ cup baking soda (it will fizz). Boil 2 to 3 shaped pretzels at a time for 20 to 30 seconds per side. Remove with a slotted spoon and place on a parchment-lined baking sheet, spacing 2 inches apart.
- Brush each pretzel bite with egg wash and sprinkle generously with coarse salt. Bake at 425°F for 12 to 15 minutes until deep golden brown.
- Let cool on the baking sheet for 5 minutes, then brush with melted butter for extra shine and flavor.
Notes
Don’t skip the baking soda bath—it gives pretzels their signature dark crust and flavor. Keep dough covered while shaping to prevent drying. For best results, boil each pretzel for 20 to 25 seconds per side. These freeze well; freeze before the baking soda bath or after baking.
Nutrition
- Serving Size: 1 pretzel bite
- Calories: 120
- Sugar: 1
- Sodium: 450
- Fat: 3
- Saturated Fat: 1.5
- Carbohydrates: 20
- Fiber: 1
- Protein: 3
Keywords: Halloween, pretzel bites, witch fingers, party snack, soft pretzels, spooky snack


